Giriş
Replacing a broken display assembly gives you a new LCD, front glass, display enclosure, iSight camera, and new AirPort antennas.
Neye ihtiyacın var
-
-
Remove the following ten screws securing the lower case to the upper case:
-
Three 13.5 mm (14.1 mm) Phillips screws.
-
Seven 3 mm Phillips screws.
-
-
-
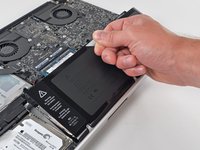
Remove the two 7.4 mm Tri-point screws securing the battery to the upper case.
-
Note: For certain repairs (e.g. hard drive), removing the battery is not necessary but it prevents any accidental shorting of electronics on the motherboard. If you do not remove the battery, please be careful as parts of the motherboard might be electrified.
-
-
-
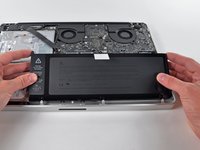
Tilt the battery away from the logic board enough to access the battery cable connector.
-
Pull the battery cable connector away from its socket on the logic board and remove the battery from the upper case.
-
Charge it to 100%, and then keep charging it for at least 2 more hours. Next, unplug and use it normally to drain the battery. When you see the low battery warning, save your work, and keep your laptop on until it goes to sleep due to low battery. Wait at least 5 hours, then charge your laptop uninterrupted to 100%.
-
If you notice any unusual behavior or problems after installing your new battery, you may need to reset your MacBook's SMC.
-
-
-
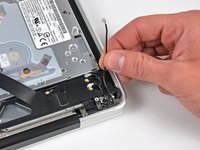
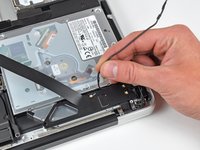
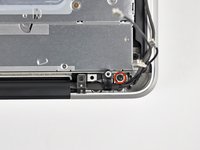
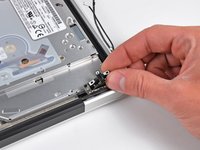
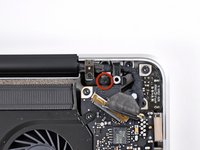
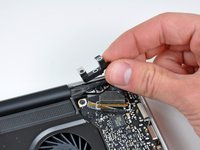
Use the flat end of a spudger to carefully pry the AirPort/Bluetooth ribbon cable up off its socket on the logic board.
-
-
-
-
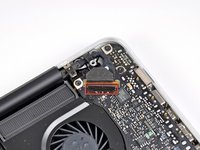
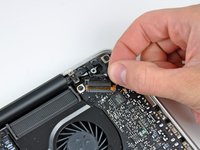
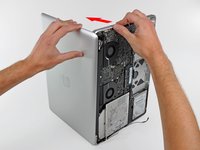
Grab the upper case with your right hand and rotate it slightly toward the top of the display so the upper display bracket clears the edge of the upper case.
-
Rotate the display slightly away from the upper case.
-
Lift the display up and away from the upper case, minding any brackets or cables that may get caught.
-


To reassemble your device, follow these instructions in reverse order.
To reassemble your device, follow these instructions in reverse order.
İptal et: Bu kılavuzu tamamlamadım.
41 farklı kişi bu kılavuzu tamamladı.

10Kılavuz Yorumları
I am trying to put the display back together but I realised that the new display from ifix it has 3 cables to conect when only two spaces are available please advice ?
Are you talking about the antenna wires? The longest two go in the same track.
The video cable in my MacBook Pro is a bit frayed. This was caused by the hinges being loose or missing screws. I replaced/tightened all the screws, but because of the fraying, the video signal is degraded. It flickers, sometimes loses some colors, or loses half its pixels.
It's finicky. If I put the bottom chassis on an close up the MacBook Pro, the video cable gets pinched enough to ensure the video degradation. However if I keep the bottom off, and keep the video cable positioned just so, not so crowded, then the video signal is fine. However the machine is not much of a laptop if you have to use it with the bottom off, without moving it.
I can get a spare video cable from a junker, but I don't have the heat lamp and suction cups, and anyway am not sure I want to attempt to dissamble the display assembly. Are there any things I can do to improve the functioning of the video cable in place, without replacing it?
I did try wrapping the frayed cable in Sugru. It did not resolve the issue.
I have the exact same question: I would like to reuse the mid-2009 display on a 2010 mac book pro … I see the connections are slightly different: I don’t think the mid 2009 display has a dedicated wire for the camera (which I don’t necessary need at the end …) but I don’t know if the mid-2009 display is compatible with the 2010 motherboard ?