Ana içeriğe geç
Makita XPH01 Outer Casing Replacement

Makita XPH01 Outer Casing Replacement

Eric Herwatt

Eric Herwatt ve 3 diğer katkıda bulunanlar

En son November 30, 2016 tarihinde güncellendi

5 - 7 dakika
Kolay
Salt Önkoşul
Bu kılavuz yalnızca diğer kılavuzlar için bir ön koşul olarak kullanılmak üzere tasarlanmıştır. Tek başına eksiktir.

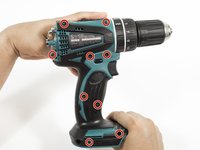
The outer casing of the drill needs to be taken out in order to replace the other parts of the drill. There are a total of nine 18 mm screws that needs to be taken out of the outer casing. This guide serves as a prerequisite guide for the other replacement guides.

Neye ihtiyacın var

iFixit bu bağlantılar üzerinden satın aldığınızda komisyon kazanır.
  1. Makita XPH01 Outer Casing Replacement, Battery: adım 1, 1 resimden 1.
    • Hold the drill upright.

    • Place your finger on the white battery-release button.

  2. Makita XPH01 Outer Casing Replacement: adım 2, 1 resimden 1.
    • Press and hold the white release button located on the front of the battery.

  3. Makita XPH01 Outer Casing Replacement: adım 3, 1 resimden 1.
    • Slide the battery forward while pressing down on the white battery-release button.

  4. Makita XPH01 Outer Casing Replacement, Outer Casing: adım 4, 2 resimden 1. Makita XPH01 Outer Casing Replacement, Outer Casing: adım 4, 2 resimden 2.
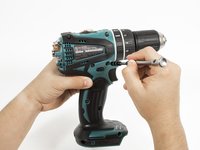
    • Hold the drill upright with the back panel facing you.

    • Unscrew the two 18 mm screws from the back panel using a Phillips PH2 screwdriver.

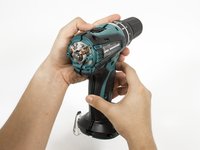
  5. Makita XPH01 Outer Casing Replacement: adım 5, 1 resimden 1.
    • Apply slight pressure to the sides of the backplate and pull away from the drill.

  6. Makita XPH01 Outer Casing Replacement: adım 6, 2 resimden 1. Makita XPH01 Outer Casing Replacement: adım 6, 2 resimden 2.
    • Unscrew the nine 18 mm screws from the outer casing using a Phillips PH2 screwdriver.

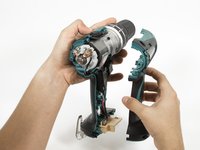
  7. Makita XPH01 Outer Casing Replacement: adım 7, 2 resimden 1. Makita XPH01 Outer Casing Replacement: adım 7, 2 resimden 2.
    • Apply slight pressure to the sides of the outer casing and pull away from the drill.

Sonuç

To reassemble your device, follow these instructions in reverse order.

Eric Herwatt

Üyelik tarihi: 10/05/16

1.020 İtibar

7 adet Kılavuz yazıldı

Ekip

Cal Poly, Team 15-4, Livingston Fall 2016 Cal Poly, Team 15-4, Livingston Fall 2016 üyesi

CPSU-LIVINGSTON-F16S15G4

4 Üyeler

7 adet Kılavuz yazıldı

0 Yorum

Yorum Ekle

İstatistikleri Görüntüle:

Son 24 Saat: 0

Son 7 gün: 1

Son 30 gün: 1

Her zaman: 48