
Melitta Caffeo Solo grindstones replacement
Giriş
1. adıma gitNeye ihtiyacın var
Parçalar
Aletler


Daha fazlasını göster…
-
-
Remove the water tank and drainage tray.
-
Remove the side cover and remove the brewing unit.
-
Remove all coffee beans.
-
-
-
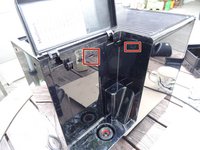
Press carefully into the slits on the sides using a minus screwdriver or a flat metal spatula, to release the clasps on the upper surface. These may be well tight and you have to use some force.
-
You should have created a separation between the upper surface and side panels. Now lever the upper covering away using a plastic tool. This may be quite stuck and you may apply some force.
-
-
-
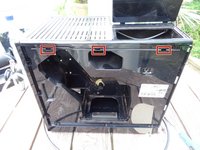
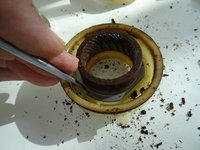
The grinder is situated on the top right rearside of the device. The adjuster and the outer ring can just be taken off, but this is only necessary if the grinder has to be completely replaced. Be careful and do not use excessive force.
-
The following pictures show a grinder of a Jura and there are slight differences. But since the grinder is the same, the repair is basically the same.
-
-
-
Now the grinder is free. Again take a picture, then pull out the axis of the adjuster with moderate force.
-
Depending on the model you will find a silicon sealing on top of the grinder ring, remove it.
-
Watch the fabrication signs , here green. This alignment must be restored later. Now turn the great black gear about 90 degrees counterclockwise. The grinder ring is free and can be lifted off.
-
-
-
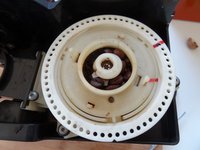
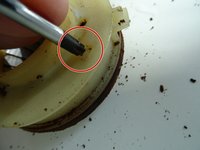
The grinding cone is fastened with a long Torx T20 screw. The screw head is often covered with remnants of coffee beans. Expose the head and turn the screw out counterclockwise.
-
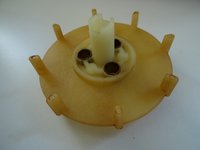
Now the bean feeder (the small white snail) can be removed. The grinder cone and drive can now also be lifted up carefully.
-
-
-
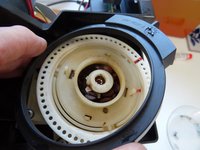
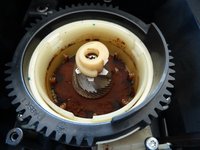
The grinder is usually filled with old, sticky coffee grounds. Clean everything carefully for an excellent coffee aroma.
-
Gently lift the felt ring around the drive shaft with a needle, then wipe it clean with a damp cloth. Do not attempt to wash it, as there is a risk that it will swell. When first used, turn it over with the clean side up.
-
Clean the inside of the grinder with a brush and damp cloth, and the blades with a dishwashing brush. Ensure it is properly dried before use.
-
-
-
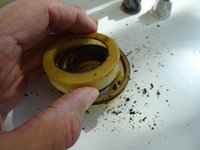
Push both of the small latches alternately. Then the ring cover should come out.
-
Two clamps hold the grinder ring in its place, push them aside and it should come free.
-
Again clean everything. Press the new ring and cover in its place. With that the grinder ring is exchanged.
-
-
-
First insert the cleaned driver, then the three sleeves, springs and balls. Now fit the grinding cone on the three balls.
-
Then fit the auger, screw in central screws. When screwing in, push the cone downwards and make sure that everything meshes.
-
-
-
Insert grinding ring. The black gear is turned to the right again until the three marks are aligned. Then reinstall the adjuster drive shaft as it was originally.
-
Then install the remaining parts in reverse order.
-
You can set the grinding degree nicely by placing an empty roll of toilet paper perpendicular to the open mill and filling it with a few coffee beans. Plug in the plug (be careful!), choose a cup of coffee and watch as the coffee grounds fall out of the grinder.
-
-
-
These two pictures are no fake: Before repairing the grinder the coffee is thin and transparent. With new stones the coffee is strong and has a fine crema. The repair was a real success!
-


To reassemble your device, follow these instructions in reverse order.
To reassemble your device, follow these instructions in reverse order.
İptal et: Bu kılavuzu tamamlamadım.
10 farklı kişi bu kılavuzu tamamladı.
Bu çevirmenlere özel teşekkürler:
100%


Bu çevirmenler dünyayı onarmamıza yardım ediyor! Katkıda bulunmak ister misiniz?
Çeviriye Başlayın ›
Ekip

Repair is War on Entropy Repair is War on Entropy üyesi
Community
29 Üyeler
1.759 adet Kılavuz yazıldı
4 Yorum
Hello there. Congratulations for you instructions. I am preparing to change the grinderstones on my Melitta too. Please tell me , probably it is necesary, which parts are better to be greased/regreased before reassembly ? Also do you have any knowledge of improved version of grindstones with better metal ? Some shop claim that they sell newer/improved version like for example version 5.2 . Any ideeas ? Thank you.
@ursanandrei I would buy the original ones. They do last for about 10 000 cups, I think this is OK ;-). The grinder (and the stones) for Jura, Melitta, Nivona, some Bosch, Siemens, AEG, Krups... are all the same. If you live in EU the price will be around 25€, e.g. here.
And: Normally there is no grease on the grinder. If the large gear wheel can no longer be turned easily because there are coffee grounds between the wheel and the grinder, you need to clean it and possibly lubricate it very thinly with food-safe silicone oil.
Thank you for your answer. Can you tell me if the grindstones kit with the code H432712 are suitable for my Melitta E 957-240 ? ******
I think so, yes it should fit. This is the standard kit for the normal Melitta. In the unlikely case it does not fit, be prepared to give it back.
VauWeh -