Bu sürüm, hatalı düzenlemeler içerebilir. En son doğrulanmış bellek kopyası dönün.
Neye ihtiyacın var
-
Bu adım çevrilmemiş. Çevrilmesine yardım edin
-
Using a heating pad or heating gun, heat the edges of the screen to soften the glue. This area extends roughly one inch from the edge of the device.
-
-
Bu adım çevrilmemiş. Çevrilmesine yardım edin
-
Using a plastic opening tool and a suction cup as needed for leverage, gently insert one edge of the opening tool under the corner of the screen.
-
Slowly work the tool around the entire edge of the screen.
-
-
-
Bu adım çevrilmemiş. Çevrilmesine yardım edin
-
Detach the orange cables that connect the screen to the motherboard by pulling on the small tabs. Using the nylon spudger, release these cables.
-
Allow the glue to cool before letting it come into contact with any other surface.
-
-
Bu adım çevrilmemiş. Çevrilmesine yardım edin
-
Make sure that the front-facing camera is completely disconnected, and then remove the plastic bracket.
-
Remove the 22 screws on the bezel.
-
Remove the left and right brackets; the left has 16 screws and the right has 15 screws.
-
-
Bu adım çevrilmemiş. Çevrilmesine yardım edin
-
Once the brackets are removed, set them aside.
-
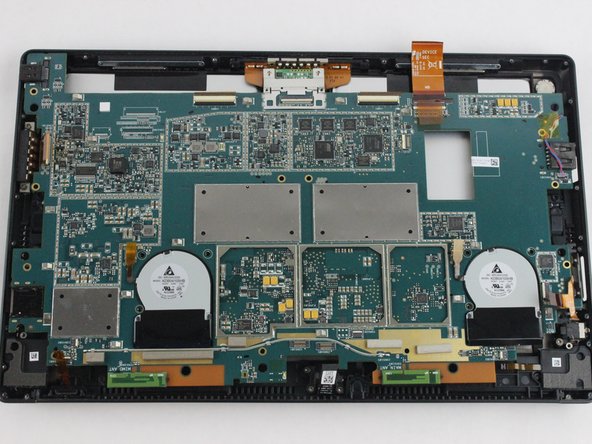
Remove the 25 screws of varying sizes that attach the motherboard to the back plate.
-
-
Bu adım çevrilmemiş. Çevrilmesine yardım edin
-
On the underside of the motherboard locate the heat shield which is located between the two fans near the top of the motherboard.
-
Remove the heat shield using an opening pick by lifting along the edges.
-
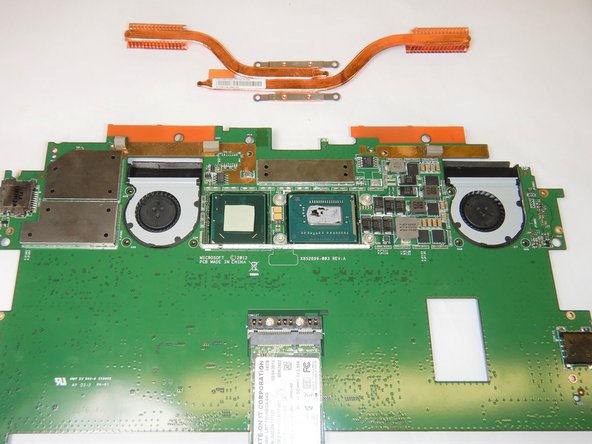
Remove all four Torx T5 screws located in each corner of the heat sink mounting frame.
-
Carefully lift off the heat sinks from the motherboard.
-


İptal et: Bu kılavuzu tamamlamadım.
Bir başkası bu kılavuzu tamamladı.

Ekip

The Citadel Military College of South Carolina, Team S3-G11, Eggleston Fall 2019 The Citadel Military College of South Carolina, Team S3-G11, Eggleston Fall 2019 üyesi
CMCSC-EGGLESTON-F19S3G11
3 Üyeler
4 adet Kılavuz yazıldı