Ana içeriğe geç
Onarım Topluluğuna Katılın - Hesap Oluşturun

Nest Dropcam Pro LEDs Replacement

Neye ihtiyacın var

  1. Nest Dropcam Pro LEDs Replacement, Outer Case: adım 1, 1 resimden 1.
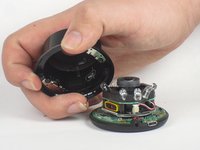
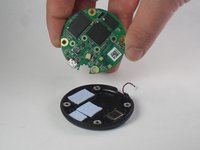
    • Press in the mounting clips on each side of the case to remove the camera from the mount.

    FixBot'a Sor

    Yorum Ekle

  2. Nest Dropcam Pro LEDs Replacement: adım 2, 2 resimden 1. Nest Dropcam Pro LEDs Replacement: adım 2, 2 resimden 2.
    • Using a Philips #0 screwdriver, remove the four 3 mm screws.

    FixBot'a Sor

    Yorum Ekle

  3. Nest Dropcam Pro LEDs Replacement: adım 3, 2 resimden 1. Nest Dropcam Pro LEDs Replacement: adım 3, 2 resimden 2.
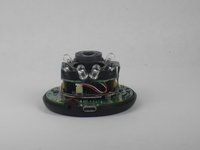
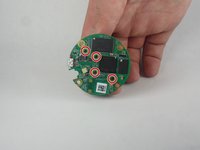
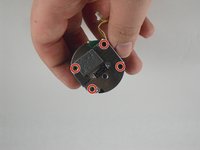
    • Lift the front of the case slowly, as there is an antenna cable attached to the motherboard.

    • Carefully disconnect the antenna cable from the motherboard. You will feel this cable "pop" out of place when disconnected.

    FixBot'a Sor

    Yorum Ekle

  4. Nest Dropcam Pro LEDs Replacement, Motherboard: adım 4, 2 resimden 1. Nest Dropcam Pro LEDs Replacement, Motherboard: adım 4, 2 resimden 2.
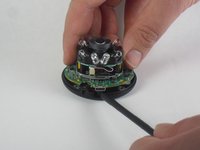
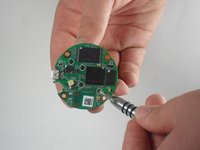
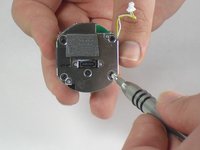
    • Insert a spudger tool under the micro-USB port and lift to separate the motherboard from the back case.

    FixBot'a Sor

    Yorum Ekle

  5. Nest Dropcam Pro LEDs Replacement: adım 5, 2 resimden 1. Nest Dropcam Pro LEDs Replacement: adım 5, 2 resimden 2.
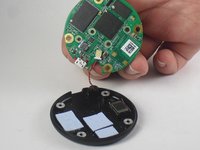
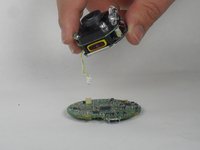
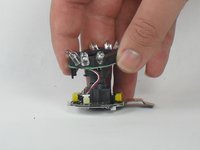
    • Pull the motherboard away from the back case.

    • Unplug the red and black cable connecting the motherboard to the back case.

    FixBot'a Sor

    Yorum Ekle

  6. Nest Dropcam Pro LEDs Replacement: adım 6, 2 resimden 1. Nest Dropcam Pro LEDs Replacement: adım 6, 2 resimden 2.
    • Using a Philips #0 screwdriver, remove the four 2 mm screws.

    FixBot'a Sor

    Yorum Ekle

  7. Nest Dropcam Pro LEDs Replacement: adım 7, 2 resimden 1. Nest Dropcam Pro LEDs Replacement: adım 7, 2 resimden 2.
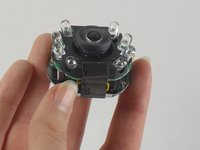
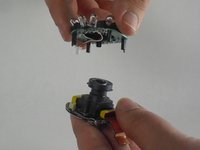
    • Lift the lens and LED assembly away from the motherboard.

    • Unplug the yellow and white cable from the motherboard.

    FixBot'a Sor

    Yorum Ekle

  8. Nest Dropcam Pro LEDs Replacement, LEDs: adım 8, 2 resimden 1. Nest Dropcam Pro LEDs Replacement, LEDs: adım 8, 2 resimden 2.
    • Using a Philips #0 screwdriver, remove the four 2mm screws.

    FixBot'a Sor

    Yorum Ekle

  9. Nest Dropcam Pro LEDs Replacement: adım 9, 3 resimden 1. Nest Dropcam Pro LEDs Replacement: adım 9, 3 resimden 2. Nest Dropcam Pro LEDs Replacement: adım 9, 3 resimden 3.
    • Peel off the paper seal holding the Lens and LEDs together.

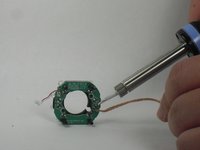
    • Disconnect the red and white wire from the bottom board.

    FixBot'a Sor

    Yorum Ekle

  10. Nest Dropcam Pro LEDs Replacement: adım 10, 2 resimden 1. Nest Dropcam Pro LEDs Replacement: adım 10, 2 resimden 2.
    • Using a de-soldering tool, disconnect the LEDs from the motherboard.

    • If you don't know how to solder, check out How To Solder and Desolder Connections.

    • Soldering irons are extremely hot and can burn you if you touch them!

    • If you hold the soldering iron tip at the same spot for too long, it can strip the metal from the plastic board. You may not be able to solder wire to that point again.

    FixBot'a Sor

    Yorum Ekle

Sonuç

To reassemble your device, follow these instructions in reverse order.

İptal et: Bu kılavuzu tamamlamadım.

David Foens

Üyelik tarihi: 09/03/15

896 İtibar

6 adet Kılavuz yazıldı

Ekip

USF Tampa, Team 15-4, Blackwell Fall 2015 USF Tampa, Team 15-4, Blackwell Fall 2015 üyesi

USFT-BLACKWELL-F15S15G4

3 Üyeler

12 adet Kılavuz yazıldı

0Kılavuz Yorumları

Yorum Ekle

İstatistikleri Görüntüle:

Son 24 Saat: 0

Son 7 gün: 3

Son 30 gün: 30

Her zaman: 1,800