Ana içeriğe geç

Nexus 6P Battery Disconnect prereq

Salt Önkoşul
Bu kılavuz yalnızca diğer kılavuzlar için bir ön koşul olarak kullanılmak üzere tasarlanmıştır. Tek başına eksiktir.

Neye ihtiyacın var

  1. Nexus 6P Battery Disconnect prereq, Back Cover: adım 1, 3 resimden 1. Nexus 6P Battery Disconnect prereq, Back Cover: adım 1, 3 resimden 2. Nexus 6P Battery Disconnect prereq, Back Cover: adım 1, 3 resimden 3.
    • It is possible to remove the back cover with an iOpener as seen in this guide but it's a lengthy and difficult procedure. We recommend a heat gun or something similar. The adhesive in the Nexus 6P is extremely sticky and especially the glass and plastic cover on the backside break or bend most of the time whilst doing this repair.

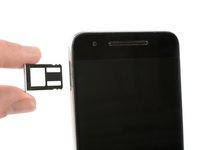
    • Use a SIM card eject tool, to pop out and remove the SIM card tray.

    • Use an iOpener to loosen the adhesive underneath the small plastic cover at the bottom of the phone.

  2. Nexus 6P Battery Disconnect prereq: adım 2, 3 resimden 1. Nexus 6P Battery Disconnect prereq: adım 2, 3 resimden 2. Nexus 6P Battery Disconnect prereq: adım 2, 3 resimden 3.
    • The knife is really sharp. Take care, not to cut yourself or your phone.

    • Insert a knife between the phone and the plastic cover. Pry up the plastic cover until you can insert an opening pick.

    • Slide the opening pick underneath the plastic cover to cut the adhesive.

  3. Nexus 6P Battery Disconnect prereq: adım 3, 2 resimden 1. Nexus 6P Battery Disconnect prereq: adım 3, 2 resimden 2.
    • Use an iOpener to loosen the adhesive underneath the glass cover at the top of the phone.

    • Insert a knife between the phone and the glass cover. Pry up the glass cover until you can insert an opening pick.

  4. Nexus 6P Battery Disconnect prereq: adım 4, 3 resimden 1. Nexus 6P Battery Disconnect prereq: adım 4, 3 resimden 2. Nexus 6P Battery Disconnect prereq: adım 4, 3 resimden 3.
    • Glass may break. Wear protective glasses and protective gloves.

    • Slide the opening pick underneath the glass cover and use it to cut the adhesive underneath.

    • Pry off the glass cover.

  5. Nexus 6P Battery Disconnect prereq: adım 5, 3 resimden 1. Nexus 6P Battery Disconnect prereq: adım 5, 3 resimden 2. Nexus 6P Battery Disconnect prereq: adım 5, 3 resimden 3.
    • Remove the six Phillips #00 screws.

    • Use tweezers to remove any stickers covering the screw to allow better seating for the driver.

  6. Nexus 6P Battery Disconnect prereq: adım 6, 3 resimden 1. Nexus 6P Battery Disconnect prereq: adım 6, 3 resimden 2. Nexus 6P Battery Disconnect prereq: adım 6, 3 resimden 3.
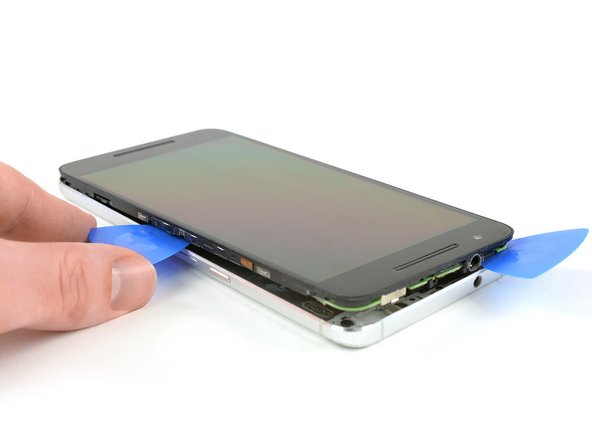
    • Insert a razor knife between the metal back cover and the front glass to create a gap. Insert an opening pick into the gap and slide it to the top right corner.

    • The knife is really sharp, be careful, not to cut yourself or your phone.

    • Insert a second opening pick and slide it to the top left corner.

    • Slide the opening picks along the edges to seperate the plastic clips, holding back cover and midframe together.

    • Remove the rear cover.

  7. Nexus 6P Battery Disconnect prereq, Battery Disconnection: adım 7, 3 resimden 1. Nexus 6P Battery Disconnect prereq, Battery Disconnection: adım 7, 3 resimden 2. Nexus 6P Battery Disconnect prereq, Battery Disconnection: adım 7, 3 resimden 3.
    • Remove the Philipps #000 screw.

    • Use tweezers to remove the metal plate.

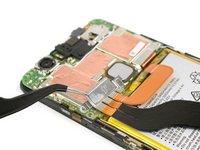
    • Use the flat end of a spudger, to disconnect the battery flex cable.

Sonuç

To reassemble your device, follow these instructions in reverse order.

Dominik Schnabelrauch

Üyelik tarihi: 11/23/16

201.099 İtibar

682 adet Kılavuz yazıldı

Ekip

iFixit iFixit üyesi

Staff

136 Üyeler

16.573 adet Kılavuz yazıldı

0 Yorum

Yorum Ekle

İstatistikleri Görüntüle:

Son 24 Saat: 0

Son 7 gün: 0

Son 30 gün: 0

Her zaman: 33