Giriş
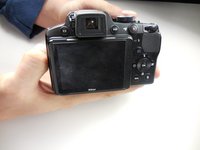
If you are having issues with your LCD, this guide will help you replace it with a minimal effort. This part is easy to get to, and easy to replace. Other than a screwdriver and a plastic opening tool, nothing else is needed to accomplish this.
Neye ihtiyacın var
-
-
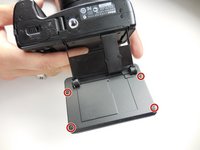
Flip the camera over and push the tab on the battery cover to open the battery compartment.
-
-
-
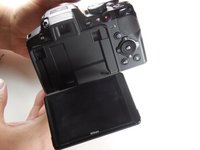
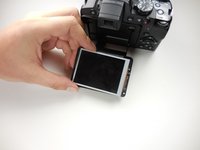
Extend the LCD screen out and turn the camera upside down to get access to the screws on the bottom.
-
-
-
-
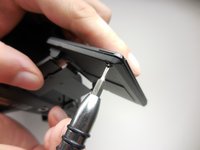
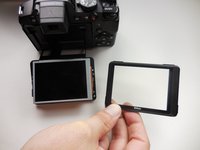
Use a plastic opening tool to trace around the screen to pop the front and back section apart.
i would not rate this as easy, you need patience and a steady hand for the replacing of the ribbion cable, it will test your patience and don’t for get to take the protective film on the replacement lens the i didn’t and had to take it apart again
-
-
-
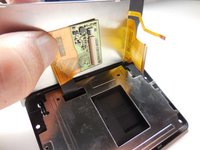
The chip has an adhesive on it to keep it attached to the LCD, and you will need to use a plastic opening tool to get it off.
A hair dryer (not a heat gun) is good for getting the adhesive loose. Use a playing card under the circuit board to loosen the bond. If its not coming up apply more heat. The board has parts soldered to it so it is not a good idea to bend the board much since this may break component connections.
One further point. When reinstalling the larger ribbon cable (it has two rows of contacts) make sure the cable is pushed into the connector as far as possible. I used a pocket knife blade edge on the stiff black part to force it into the connector. If it is not installed fully you will see the backlight but no display. Very discouraging..
Make sure display and window are both clean and dry before reassembly.
-


To reassemble your device, follow these instructions in reverse order.
To reassemble your device, follow these instructions in reverse order.
İptal et: Bu kılavuzu tamamlamadım.
6 farklı kişi bu kılavuzu tamamladı.
Ekip

Colorado Springs, Team 2-2, Panko Spring 2015 Colorado Springs, Team 2-2, Panko Spring 2015 üyesi
UCCS-PANKO-S15S2G2
3 Üyeler
12 adet Kılavuz yazıldı
2Kılavuz Yorumları
Esse LSD tem outro fita preta que conecta pode estar ruim
Porque a minha não sei se ela é LCD ou esse negócio preto que conecta que tá ruim