Ana içeriğe geç

Olympus TG-820 iHS Speaker Replacement

Neye ihtiyacın var

  1. Olympus TG-820 iHS Speaker Replacement, Battery: adım 1, 1 resimden 1.
    • Orient camera to look directly at battery compartment side as shown.

  2. Olympus TG-820 iHS Speaker Replacement: adım 2, 3 resimden 1. Olympus TG-820 iHS Speaker Replacement: adım 2, 3 resimden 2. Olympus TG-820 iHS Speaker Replacement: adım 2, 3 resimden 3.
    • Locate the two latches on the battery compartment.

    • First, move the "lock" switch left to reveal red indicator.

    • Next, move the "cover latch" switch downward to reveal red indicator.

    • You have to move the switches in that order for the compartment to unlatch.

  3. Olympus TG-820 iHS Speaker Replacement: adım 3, 2 resimden 1. Olympus TG-820 iHS Speaker Replacement: adım 3, 2 resimden 2.
    • Allow the battery compartment latch to completely open.

    • Insert battery with the writing face up.

    • The bigger slot is for the battery. The smaller slot is for the memory card.

    • Battery not shown.

  4. Olympus TG-820 iHS Speaker Replacement, Back Case: adım 4, 1 resimden 1.
    • Orient the camera so you are looking at the bottom.

    • Remove the three 3.85mm Phillips #00 screws from the bottom of the camera.

  5. Olympus TG-820 iHS Speaker Replacement: adım 5, 1 resimden 1.
    • Orient the camera so you are looking at the side plate.

    • Remove the two 3.15mm Phillips #00 screws from the side plate of the camera.

  6. Olympus TG-820 iHS Speaker Replacement: adım 6, 2 resimden 1. Olympus TG-820 iHS Speaker Replacement: adım 6, 2 resimden 2.
    • Orient the camera so you are looking at the front plate.

    • Remove the two 3.8mm with the Phillips H1.5 from the front plate.

    • Remove the "Olympus" plate.

  7. Olympus TG-820 iHS Speaker Replacement: adım 7, 1 resimden 1.
    • Remove face plate.

  8. Olympus TG-820 iHS Speaker Replacement: adım 8, 3 resimden 1. Olympus TG-820 iHS Speaker Replacement: adım 8, 3 resimden 2. Olympus TG-820 iHS Speaker Replacement: adım 8, 3 resimden 3.
    • Locate three small black screws inside of the battery compartment.

    • Remove the 3.85mm Phillips #00 screw on the far left side.

    • Remove the two 5mm Phillips #00 screws on the right side

  9. Olympus TG-820 iHS Speaker Replacement: adım 9, 3 resimden 1. Olympus TG-820 iHS Speaker Replacement: adım 9, 3 resimden 2. Olympus TG-820 iHS Speaker Replacement: adım 9, 3 resimden 3.
    • Orient the camera to be look at the top.

    • Remove the 5.4mm Phillips #00 screw on the top left side.

    • Remove the 7.4mm Phillips #00 screw next to the "ON/OFF" label.

    • Pry off top button plate with black nylon spudger.

  10. Olympus TG-820 iHS Speaker Replacement: adım 10, 2 resimden 1. Olympus TG-820 iHS Speaker Replacement: adım 10, 2 resimden 2.
    • Rotate to bottom of camera and locate bottom latch.

    • Wedge black nylon spudger in between bottom latch and camera base to release LCD Screen from camera.

    • Push firmly apart.

    • Some buttons might fall out.

  11. Olympus TG-820 iHS Speaker Replacement: adım 11, 3 resimden 1. Olympus TG-820 iHS Speaker Replacement: adım 11, 3 resimden 2. Olympus TG-820 iHS Speaker Replacement: adım 11, 3 resimden 3.
    • Orient the camera to the LCD screen side that is now wedged open.

    • Locate the white ribbon cable and pull out from motherboard.

    • Locate the brown ribbon cable and pull out from motherboard.

  12. Olympus TG-820 iHS Speaker Replacement, Speaker: adım 12, 3 resimden 1. Olympus TG-820 iHS Speaker Replacement, Speaker: adım 12, 3 resimden 2. Olympus TG-820 iHS Speaker Replacement, Speaker: adım 12, 3 resimden 3.
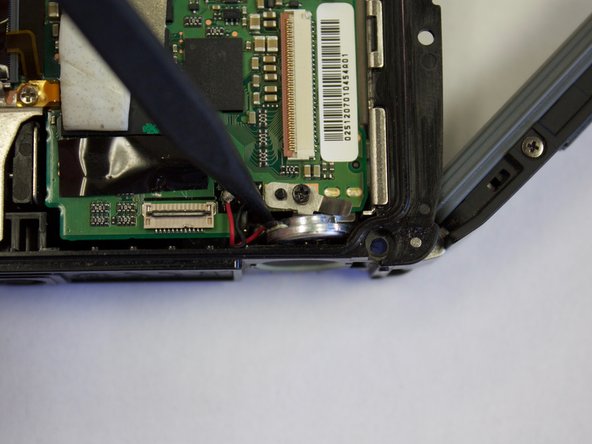
    • Locate the speaker on the bottom right side of the camera

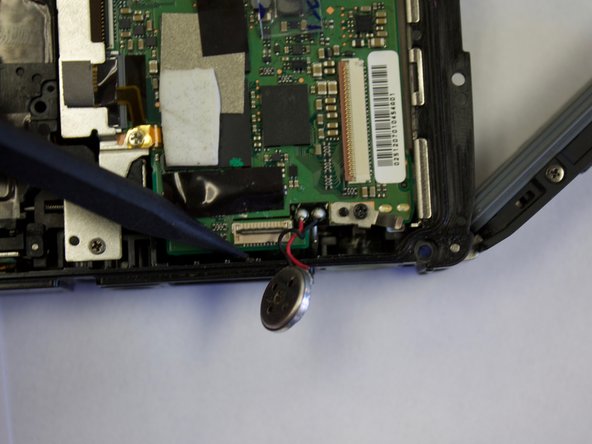
    • Use the spudger to lift the speaker out of the camera.

  13. Olympus TG-820 iHS Speaker Replacement: adım 13, 2 resimden 1. Olympus TG-820 iHS Speaker Replacement: adım 13, 2 resimden 2.
    • Next locate the solder points which connect the speaker to the motherboard, using the soldering kit(not pictured) the connection points can be removed, and the speaker can then be removed completely from the camera.

    • Learn how to solder here.

Sonuç

To reassemble your device, follow these instructions in reverse order.

Larissa Knight

Üyelik tarihi: 03/21/16

549 İtibar

5 adet Kılavuz yazıldı

Ekip

Clemson, Team 7-2, Benson Spring 2016 Clemson, Team 7-2, Benson Spring 2016 üyesi

CLEM-BENSON-S16S7G2

4 Üyeler

16 adet Kılavuz yazıldı

0 Yorum

Yorum Ekle

İstatistikleri Görüntüle:

Son 24 Saat: 0

Son 7 gün: 0

Son 30 gün: 3

Her zaman: 153