Ana içeriğe geç

One Education Infinity Hinge Assembly Replacement

Neye ihtiyacın var

  1. One Education Infinity Hinge Assembly Replacement, Back Case: adım 1, 3 resimden 1. One Education Infinity Hinge Assembly Replacement, Back Case: adım 1, 3 resimden 2. One Education Infinity Hinge Assembly Replacement, Back Case: adım 1, 3 resimden 3.
    • Always power off your device before beginning disassembly.

    • Remove the screw covers and rubber feet from the bottom of the laptop with a metal spudger.

  2. One Education Infinity Hinge Assembly Replacement: adım 2, 2 resimden 1. One Education Infinity Hinge Assembly Replacement: adım 2, 2 resimden 2.
    • Using a Phillips #00 screwdriver, remove the sixteen 5.0 mm black screws from the back panel.

  3. One Education Infinity Hinge Assembly Replacement: adım 3, 3 resimden 1. One Education Infinity Hinge Assembly Replacement: adım 3, 3 resimden 2. One Education Infinity Hinge Assembly Replacement: adım 3, 3 resimden 3.
    • Using the iFixit plastic opening tool or spudger, start near the white hinge of the device and lift along the outer edges of the device until all clips are released.

    • Lift the back case off of the device.

    • Removing the back may create a loud snapping noise.

  4. One Education Infinity Hinge Assembly Replacement, Battery: adım 4, 3 resimden 1. One Education Infinity Hinge Assembly Replacement, Battery: adım 4, 3 resimden 2. One Education Infinity Hinge Assembly Replacement, Battery: adım 4, 3 resimden 3.
    • There may be black tape inside your device covering components or holding down wires. This tape is unimportant for the function of the device, and can be removed.

    • Carefully wiggle the battery cable to the right and out of the port with a plastic spudger.

  5. One Education Infinity Hinge Assembly Replacement: adım 5, 3 resimden 1. One Education Infinity Hinge Assembly Replacement: adım 5, 3 resimden 2. One Education Infinity Hinge Assembly Replacement: adım 5, 3 resimden 3.
    • Wedge a plastic spudger underneath the battery from the upper edge and slide it carefully along the length of the battery to separate it from the case.

    • There is a mild adhesive holding down the battery. Take care not to puncture or excessively bend the battery while freeing it from the adhesive.

    • Lift the battery out from the internal case.

  6. One Education Infinity Hinge Assembly Replacement, Upper Case: adım 6, 3 resimden 1. One Education Infinity Hinge Assembly Replacement, Upper Case: adım 6, 3 resimden 2. One Education Infinity Hinge Assembly Replacement, Upper Case: adım 6, 3 resimden 3.
    • Flip open the laptop so that the screen is exposed.

    • We found it convenient to flip the laptop into tablet mode for added support.

    • Using a spudger, remove the six screw covers along the bezel of the screen.

  7. One Education Infinity Hinge Assembly Replacement: adım 7, 2 resimden 1. One Education Infinity Hinge Assembly Replacement: adım 7, 2 resimden 2.
    • Remove the six 2.8 mm Phillips #00 screws along the bezel.

  8. One Education Infinity Hinge Assembly Replacement: adım 8, 3 resimden 1. One Education Infinity Hinge Assembly Replacement: adım 8, 3 resimden 2. One Education Infinity Hinge Assembly Replacement: adım 8, 3 resimden 3.
    • Use the two tabs on the top edge of the screen to pry the case apart.

    • Once the two top clips have been disengaged, start to work your way around the rest of the screen.

  9. One Education Infinity Hinge Assembly Replacement: adım 9, 1 resimden 1.
    • Once all the clips have been popped off, remove the upper case from the back of the display assembly.

    • You may want to close the laptop while disconnecting the hinge-side edge, as it will give you extra clearance for the upper case.

  10. Dikkatli ol: adımlar 10-12 yapım altında olarak işaretlenen bir kılavuzdan alınmıştır.

    One Education Infinity Hinge Assembly Replacement, Upper Hinge Assembly: adım 10, 2 resimden 1. One Education Infinity Hinge Assembly Replacement, Upper Hinge Assembly: adım 10, 2 resimden 2.
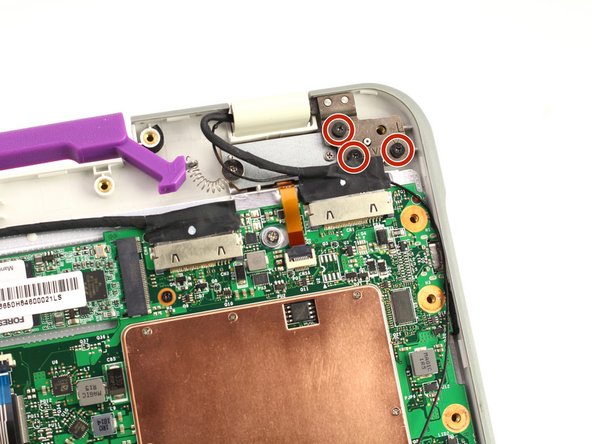
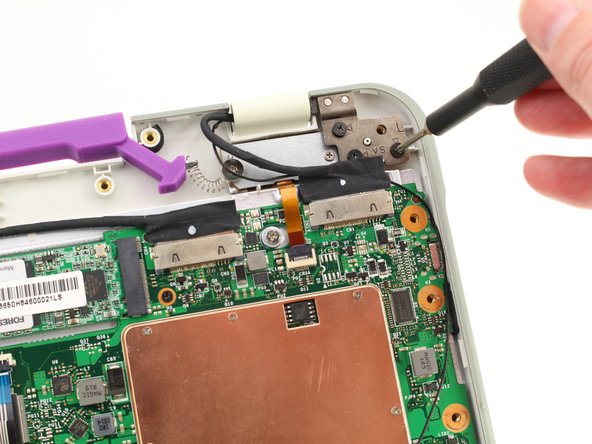
    • Remove the twelve 3.8 mm Phillips #00 screws from the hinge brackets extending along the height of the display.

  11. One Education Infinity Hinge Assembly Replacement: adım 11, 3 resimden 1. One Education Infinity Hinge Assembly Replacement: adım 11, 3 resimden 2. One Education Infinity Hinge Assembly Replacement: adım 11, 3 resimden 3.
    • Peel back the four pieces of black tape.

    • Peel back the antenna cable boards off of the display hinges.

    • Peel off the silver tape from the display hinges.

  12. One Education Infinity Hinge Assembly Replacement: adım 12, 3 resimden 1. One Education Infinity Hinge Assembly Replacement: adım 12, 3 resimden 2. One Education Infinity Hinge Assembly Replacement: adım 12, 3 resimden 3.
    • Lift up both hinges, ensuring that they clear all tape and wires.

  13. One Education Infinity Hinge Assembly Replacement, Hinge Assembly: adım 13, 3 resimden 1. One Education Infinity Hinge Assembly Replacement, Hinge Assembly: adım 13, 3 resimden 2. One Education Infinity Hinge Assembly Replacement, Hinge Assembly: adım 13, 3 resimden 3.
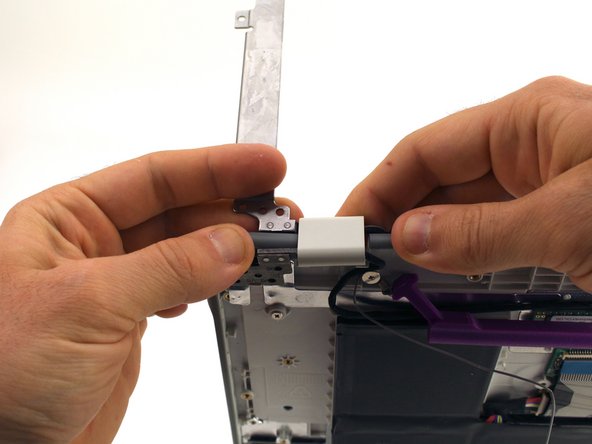
    • Flip the laptop over to expose the open bottom case.

    • Remove the six 5.6 mm Phillips #00 screws from the hinge brackets on the bottom case.

  14. One Education Infinity Hinge Assembly Replacement: adım 14, 3 resimden 1. One Education Infinity Hinge Assembly Replacement: adım 14, 3 resimden 2. One Education Infinity Hinge Assembly Replacement: adım 14, 3 resimden 3.
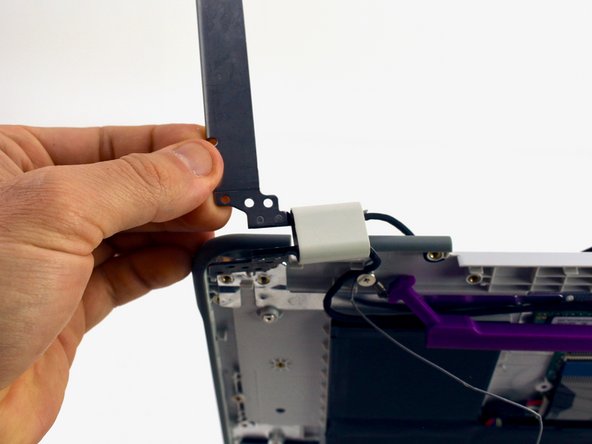
    • With the hinge still at a 90º angle, pull the hinge assembly clear from the bottom case.

    • You will need to apply a modest amount of force to squeeze the edge of the case between the two mounting brackets of the hinge.

  15. One Education Infinity Hinge Assembly Replacement: adım 15, 3 resimden 1. One Education Infinity Hinge Assembly Replacement: adım 15, 3 resimden 2. One Education Infinity Hinge Assembly Replacement: adım 15, 3 resimden 3.
    • Use a spudger to pop out a white plastic cable retaining bit from the hinge body.

    • Pull the cables out from the hinge body.

  16. One Education Infinity Hinge Assembly Replacement: adım 16, 1 resimden 1.
    • Remove the hinge assembly from the device.

    • Repeat the same steps for the other side.

Sonuç

To reassemble your device, follow these instructions in reverse order.

Austin Blakely

Üyelik tarihi: 03/11/19

19.539 İtibar

53 adet Kılavuz yazıldı

Ekip

iFixit iFixit üyesi

Staff

135 Üyeler

17.198 adet Kılavuz yazıldı

0 Yorum

Yorum Ekle

İstatistikleri Görüntüle:

Son 24 Saat: 0

Son 7 gün: 0

Son 30 gün: 4

Her zaman: 73