Neye ihtiyacın var
-
-
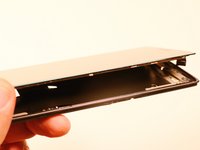
Remove the SIM tray.
-
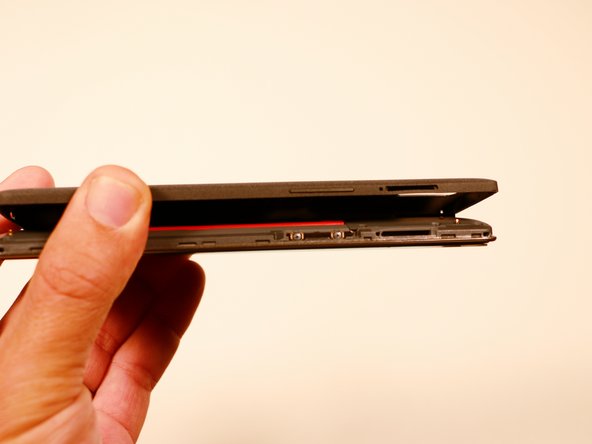
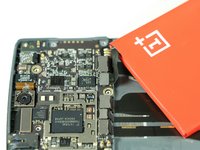
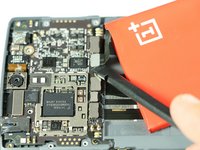
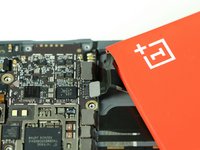
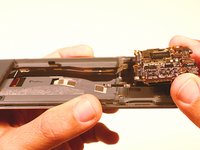
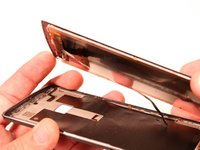
Using a plastic opening tool, carefully separate the back panel from the main body assembly of the phone. Be extra careful around the SIM slot or other weak areas.
-
You may encounter some resistance due to hidden locking clips around the inside edge of the phone. Not to worry; just move in one consistent direction around the phone as opposed to jumping from spot to spot!
-
Top to bottom, left to right, clockwise or counter clockwise, once we make it about half way around the device, the panel is easily removable by hand.
-
-
Bu adımda kullanılan alet:Tweezers$4.99
-
Using a pair of tweezers, remove the plastic plugs.
-
Once the hidden screws are revealed, use a PH #00 screwdriver to remove the three 3.175mm screws.
-
Use the PH #00 screwdriver to remove the remaining six 3.175 screws.
A needle works best to remove the plugs.
I second this. I used a sewing pin and the plugs came out in no time!
Liam Ong -
when I lifted the motherboard cover the battery cable stuck on it so that I lifted both, the plastic cover and the cable - step 4 below was not necessary to perform. Be careful!
anyone know what is the 6 orange screws in step 2 are called?
e.g. M2 x 2
I lost some screws.
So where can I buy some replacement of these screws?
-
-
-
Using a plastic opening tool, gently pry up the black plastic cover and remove it from the device.
-
-
-
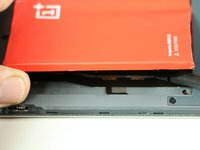
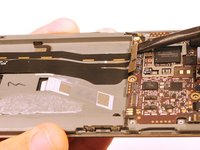
After we have removed the motherboard cover, we notice that the battery is intact and has a black ribbon attached to it, which is mounted on the logic board.
-
Using the spudger, carefully begin to lift the the battery up from the side opposite the ribbon. Be aware that there is high-grade adhesive holding the battery in its bay, so proceed with caution.
Is it OK to use the battery if I bent it during removal? I had to 'iron' it flat, but I think it might still be useable...
the best way to remove the battery is to lever the left side up from the bottom and remove it from the glue with an old credit card
Do this! it comes up very easily this way. All the adhesive is on the right side.
Great suggestion with a card to remove the battery!
Thanks for this trick saved me a lot of time
George P -
I second Dangerous Picture's suggestion. I found it very helpful to remove the ribbon from the dock (it was easy to do) before trying to remove the battery.
on my phone extensive use of glue was concentrated on just one side (right hand side). Not impossible to remove, little tricky
I mistakenly removed the battery with force, and the back peeled and brought out smoke, seemingly like it's gonna explode. Help !!!
Hola, después de cambiar la batería el telefono creo que sigue identificando que está gastada porque me dura igual que antes- He intentado un código de reteseteo pero me da error. Hay alguna forma de resetear la batería? el mío es el modelo 9 pro
-
-
-
-
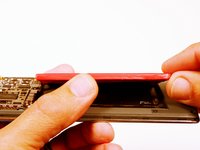
Once the battery has been freed, we use the ever handy black spudger to pry up and free the battery ribbon from its dock.
Thought I was going to snap my battery in half but patience and slight pressure did the trick.
Also agreeing the battery should be disconnected as soon as possible.
From where do I procure a new battery for it?????????
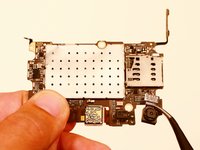
There are several connectors to the motherboard. In the picture above, one connector above and, below the screw thread, three more connectors. Be careful to reconnect any connectors accidentally disconnected while disconnecting / removeing the battery. In my case the connector shown at the top of the row came unconnected.
salut, pour moi le connecteur à la nappe était collé au cache en plastique qui couvrait la carte mère … mais le reste s’est bien passé.
Merci pour le tuto !
Thanks Buddy, I replaced battery of my one plus one and when I switched it on, touch was not working. It was heart sinking panic moment...Then I came across https://forum.xda-developers.com/oneplus... post, simple trick of sliding piece of paper below battery solved and infact improved the touch response. Thanks !
Kifch nikmandha
When putting in the new battery, the battery ribbon cable did not line up with the dock on the motherboard, on the replacement battery I ordered from iFixIt. I was able to carefully peel back the foil covering ribbon cable, align the cable, then press the foil back in place. Now, everything seems to be working.
-
-
-
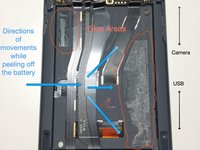
After the battery has been removed, use the spudger to disconnect the remaining ribbons.
-
Notice that there are two side ribbons, one on each side (volume up/down and power), and a top ribbon as well as those from the battery compartment.
the digitizer ribbon connector has a small plastic piece that blocks the connector from being removed through the slit. make sure to remove it (simple push with an opening tool). then you can remove the connector/ribbon cable.
All the ribbons came off easily after I found them, save for the volume buttons. Iended up tearing the ribbon trying to maneuver it out with the motherboard itself. Do you guys have any tips for removing the volume control ribbons? They seem to be held down by tiny extrusions in the phone.
Another method for the side ribbons (power/volume) is desoldering the connectors - since I couldn't find any promising way to detach the buttons without damage I took this route and had success. Also note that you do not need to remove the mainboard and cameras for replacing the screen - a slight tilt should be enough to access the top ribbon (which belongs to the display assembly and has to be removed) so the side ribbons can stay in place.
I removed the side ribbon for the volume buttons is really easy by using the plastic tool between the two volume buttons in direction from up (backside of the phone) to down (screen of the phone). Trying to remove it from the volume down direction end of the cable almost destroyed the volume down button, so don’t try it
I just had to replace my screen, I skipped the removal of the side ribons and that worked perfectly. So don’t consider this step as mandatory to a screen replacement.
-
-
-
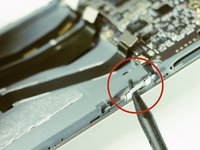
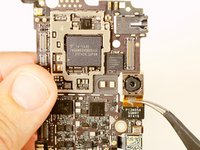
After removal of the ribbons, there is one final screw. Once you have removed this, the motherboard easily pries out with spudger.
-
This is the only screw that differs in size. This screw is a philips 00, 3.00 mm. in length.
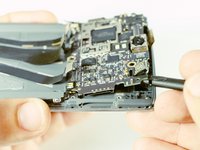
After removing the final screw that holds the motherboard in place, do not just lift away the motherboard. The antenna is fixed to the back of the motherboard in the bottom right corner. Lift the motherboard from the top, leaving the bottom part of the motherboard (the part that is nearest the battery) close to the phone body. The antenna is a black wire that runs from the motherboard around the right side of the battery recess. It is held to the back side of the motherboard by a small, round, brass-coloured connector. It can be unclipped from the motherboard using a small pair of tweezers.
There is a little tape in the battery box keep the antenna in place.
You can remove the tape and have a few centimeters of antenna free in case you accidentally disconnect it.
It is !&&* of a fiddeling to connect it again but it is feasible
The final screw is a Phillips 000
I encountered some resistance when lifting up the motherboard (and putting it back in later), from the corner near the sim card slot. Either because of a manufacturing defect or the plastic deforming due to age, the side of the PCB was snagging against the chassis. Got it out eventually but you have to be careful.
-
-
Bu adımda kullanılan alet:Tweezers$3.99
-
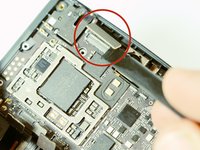
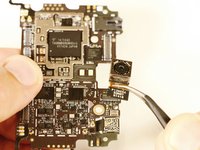
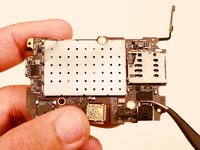
Once the motherboard has been removed simply pry off the rear facing camera with a spudger or angled tweezers.
you don't need to remove the front or rear camera - once the motherboard is free, nothing else has to be done to it.
The camera may fall off as the connector is pretty slack.
You don't have to remove it but be careful not drop or lose it
-
-
Bu adımda kullanılan alet:Tweezers$3.99
-
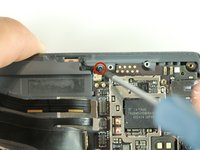
Once the motherboard has been removed simply pry the front facing camera off of its connector with a spudger or angled tweezers.
-
-
Bu adımda kullanılan alet:iOpener$17.99
-
After the motherboard and and other connected parts have been disconnected, apply heat to the screen/panel of the phone
-
We used an iOpener for this guide, but you can also use a heat gun or hairdryer for this step.
-
-
-
After heat has been applied use an opening pick to pry the screen away from the frame. Although a blue opening tool is preferred, you can use a guitar pick as well or similar hard plastic tool.
-
Now simply lift the screen away from the body of the phone and separate.
-
Watch it! There is i tiny frame to position the display. It is located on roundabout half the thickness of the display you see. Place the tool there to pry open or you will have to glue the positioning frame onto the phone first and then glue the display to the frame.
I got one from e-trade-supply without the copper and it worked!
Yep, the copper is just for additional an ESD ground. There are more than enough solder points on the LCD's back plate that you don't need to worry about additional ground, it's just something added in as a precaution.
Thanks for the guide, sadly one of the motherboard screws on mine is stripped out... mine was dropped into a toilet, and after replacing the battery it works great, except there is very bright areas on the screen, which I'm suspecting is trapped water or something. Can you not remove the screen with the mother board in place? I'm attempting to see if I can remove the water.
be careful not to remove the plastic bezel/frame connecting the lcd to the phone body. insert the guitar pick between the lcd glass and the plastic bezel.
Why can't you just remove the battery, disconnect the display connector and ultimately remove the screen without disassembling the whole phone ?
That's actually a very reasonable question ...
The risk of damaging or misconnecting while reassembling would diminsh substantiually !
Watch it!!!
There is a tiny tiny frame to position the display. It is located on roundabout half the thickness of the display you see. Place the tool there to pry open or you will have to glue the positioning frame onto the phone first and then glue the display to the frame.
I actually used a sharp cutter to get in between before using the pick to lift the display. works totally easy but you have to watch your fingers
Before I could get the top screen ribbon through the phone body, I had to remove a grey plastic filler by pushing through from the screen side. I never bothered to reattach this filler when reassembling.
Bless you for this comment. I was just worrying about that when it popped out.
Will the new screen sit nicely on the body without glue? Can I just pop it on or do I need some glue? If so, how much?
You need to buy some double sided adhesive strips/tape. I use this: https://www.banggood.com/3Pcs-Double-Sid...
Bro how about the silver will strip attached to display..where will I get???
-


To reassemble your device, follow these instructions in reverse order.
To reassemble your device, follow these instructions in reverse order.
İptal et: Bu kılavuzu tamamlamadım.
102 farklı kişi bu kılavuzu tamamladı.
Ekip

USF Tampa, Team 3-3, Brown Fall 2014 USF Tampa, Team 3-3, Brown Fall 2014 üyesi
USFT-BROWN-F14S3G3
3 Üyeler
20 adet Kılavuz yazıldı
22 Yorum
This was actually a lot easier than the guide makes it sound. I would suggest adding that you will need 1mm two sided foam tape to hold the screen in place.
0.o i did not know i'll need foam tape too. thanks a ton for suggestion.. i wld have just startef without tape to end up with a loose phone
Hello
Thanks a lot for this guide.
I bought the lcd assembly from ebay and tried replacing it. But there is very thin plastic ring around the assembly which on removal is bent and seems non reusable. Now the new assembly I have bought doesnot have the plastic ring around it. How to make sure that this ring is not bent or damaged ..? I hope you are able to understand my point..:) The new replacement assembly doesnot have that thin plastic copper type ring. While removing old assembly, it comes along. Am I missing on anything ..? Thanks in advance for help
I encountered the same issue. I actually removed the entire plastic frame with the old LCD. I had to gently remove it from the lcd, clean out the glue on it from both sides and on the phone body where it sits. try to straighten it out by bending it. After that I added dual sided tape on the phone body and added the frame on to it. and then only did I manage to put more dual sided tape on the upper side in order to glue the LCD onto it. I don't feel 100% comofortable with this solution so I recommend getting a case that will cover the sides of the lcd to prevent it from falling out in case the phone falls.
If you are wondering why the phone keeps dropping your cellular network connection, check if you forgot to reconnect either or both ends of the antenna cable. One is on the bottom side of the motherboard, lower right corner and the other is on the lower right corner of the phone casing.
stating to remove the buttons before pulling the board would have been nice. I now have a broken power button cable assuming that when it said "the board can be removed" it meant i had nothing else to do.
I now have a dead phone.
I made the same mistake. I came up with the following solution: http://gatlin.tumblr.com/post/1320946419...
http://www.aliexpress.com/store/product/...
I just fount a very nice seller, their LCD replacement looks nice. Now my Oneplus One is alive again, the color is bright, just looks the same as before!
Actually: You don't need to remove the motherboard. There is a small plastic tab on top of the motherboard, where the ribbon/connector comes around the edge. Remove that, and the other ribbon/connector for the display at the bottom of the motherboard. Turn the phone around, and remove the display.
To assemble, you need either a glue or double-sided foam tape for the display
The article is good but not perfect, for example I dont need to remove the camera to replace the screen! Also I was about to commit the same mistake that csbenit0 said, this is because it wasn't included it in the guide! but luckly the power button is working.
c spadire il mio telefono comprato da vo i il modello e ono plus one si e rotto il sispley con il vetro mi puoi inviare lindirizzo x spedirlo x ripararlo
mi si e rotto il tele fono comprato da voi e un onuplus one e si e rotto il displey con il vetro e possibile darmi lindirizzo x spedirlo x ripararlo
Is there anyway to fix a broken power button?
Skip the steps regarding removal of the motherboard. one you have removed the battery unplug the LCD and Digitizer cables, then heat and remove screen (remembering to remove plastic grommet holding digitizer cable in place).
As well as saving a lot of time this will also help people to avoid damaging the Volume/Power flexes - as this seems to be a common issue for people on here.
Whole repair took 10 minutes to complete, this guide definitely helped though so well done!
How did you fit the top LIF cable out from behind the motherboard, though? It seems the connector is wider than the hole...
ifixit3 -
i fixed the displayafter assemble the display was not working means its comeing just a litile bit of lightand vibrations only,nt working,,,whats the problem
Could I utilize this to replace my screen?
I did everthing as described above. I got no indicator lights and no visual but the LCD shows backlight bleed (So the screen seems to have power but nothing else). Apparently I damaged sth. Any idea what that might be?
Indicator lights are active now - maybe the battery is just really very empty?
Well either the display was DOA or I damaged one of the 2 display connectors.
It doesn't mention you have to remove SIM tray first.
pawel - Yanıt
I used the #0 for the rear panel screws. The #00 is too small and will slip, stripping the screws if you're not extra careful.
anonymous 2668 - Yanıt
where can i buy the battery??
Shaun Davis - Yanıt
Has anyone answered this? I am looking too.
Elie Daou -
They sell it on here, although I found mine on eBay.
Roger -
Aliexpress for $9 (original)
David van Ballegooijen -
The last three hidden screws are a !&&* of a time consumer to remove. probably you would need only a certain type of tweezers - I got stuck at midway and now I cannot get go have my phone detect the sim card either probably because the six screws are removed. I can now turn the phone back on but with no service or wifi connections are detected. This phone is a disaster!
Manan Shah - Yanıt
Ivdid that too but son in law found I had reinstalled sim card in backwards or upside down.
wildcat75666 -
Where did you buy the micro USB piece? Thanks a lot!
Davide Rota - Yanıt
EBay. I bought new battery cause old ibe was dead would not charge. Just ordered new cables fit 9.00 something free shipping. Anyway hope this fixes problem cause new battery did not fix problems.
wildcat75666 -
I was able to open going from the microusb slot and working my way around. The corners are tough, though.
Roger - Yanıt
in my phone the battery was glued with double sided adhesive tape, only on the right side. I pried the left side up first, and carefully removed the battery. to lift the battery I used first used a suction cup(?) followed by a plectrum like tool to lift te battery, and keep it lifted
Eelco Busch - Yanıt
A word of caution: the back panel is harder to remove than you might think. Especially because you may be removing the *screen* by mistake. When you have a "grip" with the tool make sure the metallic border is not coming off with it, and when you have removed enough to be able to lift the panel, make sure it isn't attached by ribbons - in that case you've been removing the screen. A good idea is to gently press your finger nail against the weak plastic located between the back and the SIM slot, and going up and down and sideways until you hear a click. Then you can start from there with the opening tool. As recommended be very gentle around the SIM slot.
Menahem Julien Raccah Lisei - Yanıt
Where do I get the plastic opening tool?
Julie Hejducek - Yanıt