Ana içeriğe geç

Oontz Angle 3 ULTRA Micro USB Port Replacement

Neye ihtiyacın var

  1. Oontz Angle 3 ULTRA Micro USB Port Replacement, Back Panel: adım 1, 3 resimden 1. Oontz Angle 3 ULTRA Micro USB Port Replacement, Back Panel: adım 1, 3 resimden 2. Oontz Angle 3 ULTRA Micro USB Port Replacement, Back Panel: adım 1, 3 resimden 3.
    • Remove the two black rubber sheaths around the edges of the speaker.

    • Under the symbol-marked sheath there is a white rubber covering for the buttons. Peel this away to reveal the panel underneath.

    • On two corners of its triangular face there is a small divot, which allows you to use your fingernails or a pair of tweezers to grip and peel away the covering.

  2. Oontz Angle 3 ULTRA Micro USB Port Replacement: adım 2, 3 resimden 1. Oontz Angle 3 ULTRA Micro USB Port Replacement: adım 2, 3 resimden 2. Oontz Angle 3 ULTRA Micro USB Port Replacement: adım 2, 3 resimden 3.
    • Use a JIS #0 screwdriver to remove the six screws to expose the motherboard.

  3. Oontz Angle 3 ULTRA Micro USB Port Replacement: adım 3, 3 resimden 1. Oontz Angle 3 ULTRA Micro USB Port Replacement: adım 3, 3 resimden 2. Oontz Angle 3 ULTRA Micro USB Port Replacement: adım 3, 3 resimden 3.
    • Using a pair of tweezers, pinch and pull the rubber fillings obstructing the screws.

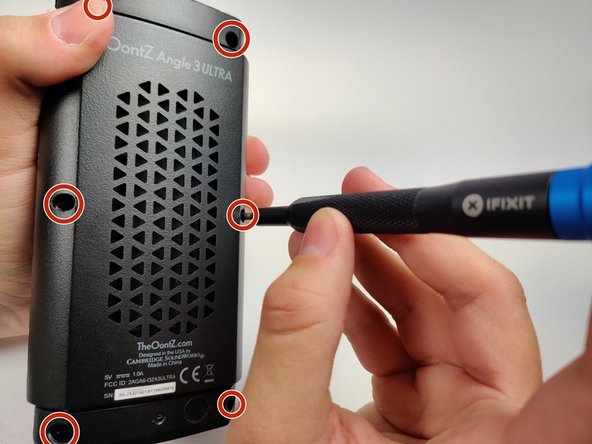
  4. Oontz Angle 3 ULTRA Micro USB Port Replacement: adım 4, 3 resimden 1. Oontz Angle 3 ULTRA Micro USB Port Replacement: adım 4, 3 resimden 2. Oontz Angle 3 ULTRA Micro USB Port Replacement: adım 4, 3 resimden 3.
    • Using a JIS #0 screwdriver, remove the 6 screws holding the backplate in.

    • Remove the back panel off of the device.

  5. Oontz Angle 3 ULTRA Micro USB Port Replacement, Micro USB Port: adım 5, 1 resimden 1.
    • Gently push the ports away from the speaker enclosure with the spudger to free the motherboard.

  6. Oontz Angle 3 ULTRA Micro USB Port Replacement: adım 6, 1 resimden 1.
    • With your solderwick and soldering iron, remove the solder at each point, and gently pull the micro USB port away from the motherboard with the tweezers.

    • More information on soldering, please read the How to Solder and Desolder Connections Guide.

Sonuç

To reassemble your device, follow these instructions in reverse order.

0 Yorum

Yorum Ekle

İstatistikleri Görüntüle:

Son 24 Saat: 0

Son 7 gün: 4

Son 30 gün: 32

Her zaman: 2,643