
PSP 300x Front Casing Replacement
Giriş
1. adıma gitSteps for replacing the outer casing of a Sony PSP-3000.
Neye ihtiyacın var


-
-
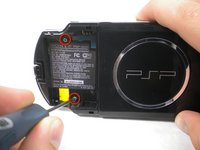
Place the PSP face down and locate the battery cover on the left side of the device.
-
Lift and remove the battery cover to reveal the battery.
-
Remove the battery.
-
-
-
Peel back the warranty sticker that is behind the battery with a spudger or your fingernail.
This will end your warranty, so do it on your own risk!
Even though warranties are long expired on these things.
“IF” your on this Site “I FIX IT(tm) to lean how to repair something on your own… you “Should NOT” be too concerned about warranty any longer, as if you were .. for your iPhone or Pad etc… you would have taken it to the supplier.. No??
-
-
-
Then, remove the single screw from the bottom edge of the PSP (which is positioned next to the barcode).
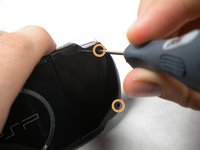
“DON’T” forget to put your screws separately on a mag mat (Or sticky tape) so to 1) Not loose them & 2) Remember where they go as they may be of differing sizes. (Refer time the pictures also helps, but you can take a pic on your camera as you go to remind you also.
-
-
-
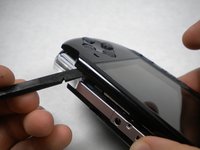
Slide the spudger in between the outer casing of the PSP, beginning at the "R" shoulder button, and gently pry off the casing.
-
Remove the front casing completely.
J’ai récemment fait cette réparation et le boîtier avant ne voulait pas venir à condition d’enlever les deux vis sur le boîtier arrière au niveau du joystick et de la croix directionnelle. Il manque donc selon moi une partie mais je peux me tromper !
-


To reassemble your device, follow these instructions in reverse order.
To reassemble your device, follow these instructions in reverse order.
İptal et: Bu kılavuzu tamamlamadım.
28 farklı kişi bu kılavuzu tamamladı.
Ekip

Cal Poly, Team 19-2, Maness Fall 2009 Cal Poly, Team 19-2, Maness Fall 2009 üyesi
CPSU-MANESS-F09S19G2
3 Üyeler
12 adet Kılavuz yazıldı