
Philips Bodygroom Series 7000 Battery Replacement
Giriş
1. adıma gitThis guide shows you how to replace the battery on a Philips Bodygroom Series 7000 (BG7020). It takes two 1.2V AAA NiMH batteries which can be bought online through sites such as AliExpress. Philips have intentionally made it difficult to open, so be aware that you may break some clips in the process. Mine still went back together ok and doesn’t have any issues. If you find an easier way to open the shell, please leave comments below.
Hopefully Right to Repair will stop companies like Philips from designing products like this which they intend to be thrown away and replaced when a $10 battery dies. But for now, I hope this guide helps you repair your device yourself.
Neye ihtiyacın var
Aletler


Daha fazlasını göster…
-
-
Open the Trimmer Head
-
Remove the two screws inside
-
The metal clip should easily come out
-
-
-
Slide the Trimmer Assembly in the direction shown
-
It should easily remove from the base
-
-
-
The part in red needs to come away from the base. The Motor Assembly is attached to this red part and comes out with it
-
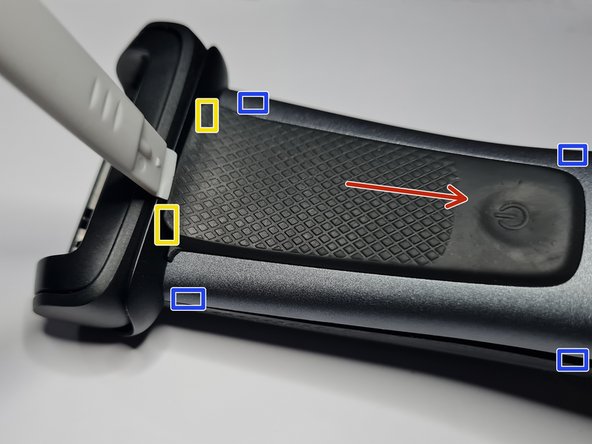
There are 6 clips (in blue) which look like they undo by sliding the housing to the right
-
But there are two clips (in yellow) which do not allow you to slide the housing. You would need to pry these two clips upwards to allow you to slide the housing to the right
-
-
-
Rather than sliding the clips as intended, pry the two blue clips at the bottom to unclip them.
-
Then slide a spudger up the side of the housing. This will break the middle clips and the top clips, but if you didn't break the bottom two, you should be able to put it back together without any issues.
-
Once you've unclipped (or broken) all 6 of the blue clips, you will need to pry the yellow clips upwards with some force to remove the shell.
-
-
-
There are two screws and two clips holding the Motor Housing to the shell
-
Remove the two screws
-
Pry the clips outwards on both sides and the housing should remove from the outer shell
-
-
-
Remove the 4 screws holding the clear housing lid onto the base
-
Gently pry the clear lid away from the base. There is a rubber gasket here, but no glue. Mine was pretty easy to pry open
-
-
-
You will need to pry the Circuitry Housing upwards on an angle as shown
-
There are two clips on the inside which look like they could make it difficult, but mine came out with some gentle prying upwards and no need to touch the clips
-
The Battery Circuitry Housing should then remove from the Motor Housing
-
-
-
First you will need to desolder the + and - battery terminals
-
After removing all the solder, flip over the housing and gently pry the batteries upwards. There is some glue holding them down so you do have to put some effort in.
-
-
-
From here, you should be able to solder in the new replacement battery and reassemble the device
-
The new batteries should come already connected together as one unit and with the tabs needed to solder them to the board
-
If you are planning on making the battery yourself, I've included a few dimensions to help. I believe normal AAA batteries should fit, but I can't speak for their compatibility
-


To reassemble your device, follow these instructions in reverse order.
Once reassembled, mine flashed red as though the battery was flat when I tried to turn it on. I plugged it in to charge and it only charged for about 10 minutes then stopped. I was then able to use it for over 30 minutes without it dying. So I assume it needs to complete a charging cycle before turning back on, even if the batteries are basically fully charged anyway.
İptal et: Bu kılavuzu tamamlamadım.
2 farklı kişi bu kılavuzu tamamladı.