Giriş
This guide will shows how to replace the thermal paste inside a PS4. Thermal paste is a silver liquid applied to a processor to transfer heat to a cooling solution. Thermal paste on any electronic should be replaced every couple of years or so since it will dry out.
In the PS4, the thermal paste board is right under the heat sink, and the heat sink is where most of the dust builds up. Cleaning the heat sink and replacing the thermal paste will help a PS4 run as if it was brand new. My PS4 is about six years old, and after completing this whole procedure, it quit overheating and is as quiet as a mouse. The only skills required for this task is to be able to screw and unscrew screws. It is very easy, but it is a tedious process, so pick a day when you are free if you are going to do this.
Neye ihtiyacın var
Videoya Genel Bakış
-
-
Grip the PS4 with both hands along the gap in the top cover.
-
Push the glossy side of the top cover with your thumbs until it pops to the side.
-
Lift the glossy top cover up and back to remove it from the PS4.
-
-
-
Use a Phillips screwdriver to remove the 6.5 mm screw securing the hard drive bracket to the enclosure.
-
-
Bu adımda kullanılan alet:Tweezers$4.99
-
Use tweezers to remove the two stickers in the center of the back of the PS4 exposing two case screws.
-
-
-
Use tweezers to carefully remove the plastic screw covers in each corner, exposing two more case screws.
-
-
-
Remove the four 7.2 mm Torx security screws on the back of the PS4.
-
-
-
Remove three 9.7 mm-long TR8 Torx security screws.
-
Remove two 41 mm-long Phillips screws and brackets.
-
-
-
-
Use the tip of a spudger to disconnect the antenna cable from the motherboard.
-
-
Bu adımda kullanılan alet:Tweezers$4.99
-
Use your fingernail to press down on the metal release lever of the ribbon cable on top of the optical drive.
-
Use your fingers or a pair of tweezers to disconnect the ribbon cable by pulling on the black tab.
-
-
-
Remove the four screws securing the optical drive.
-
Three 9.7 mm Torx screws
-
One 6.2 mm Phillips screw
-
-
-
Remove the twelve 9.7 mm Torx screws securing the upper EMI shield.
-
-
-
Insert the flat end of a spudger in between the fan cable and the motherboard.
-
Twist the spudger to lift the connector straight up and disconnect it from the motherboard.
-
-
-
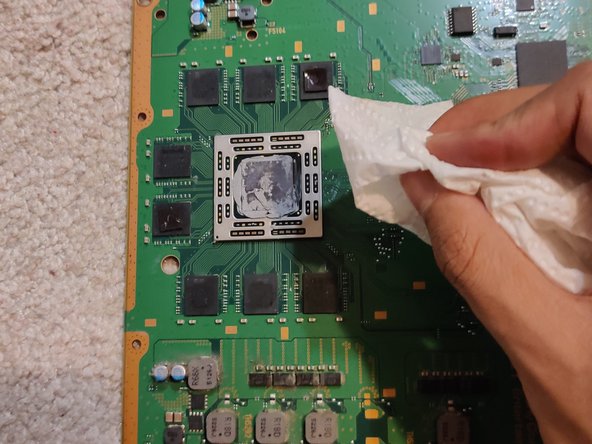
Using tissue paper, wipe off the existing thermal paste. Take the new thermal paste and apply a small amount to the middle of the component.
-


To reassemble your device, follow these instructions in reverse order.
To reassemble your device, follow these instructions in reverse order.
İptal et: Bu kılavuzu tamamlamadım.
175 farklı kişi bu kılavuzu tamamladı.
Ekip

CSU Los Angeles, Team S12-G1, Harris Fall 2020 CSU Los Angeles, Team S12-G1, Harris Fall 2020 üyesi
CSULA-HARRIS-F20S12G1
1 Üye
9 adet Kılavuz yazıldı
23Kılavuz Yorumları
Se me hizo muy buena la guia, sobre todo para no cometer algun error al trabajar en la reparacion, mi PS4 dejo de zumbar el abanico con el cambio de pasta termica y una limpieza general de polvo y pelusa.
I followed this guide step by step, including reversing the order to reassemble my unit.
My PS4 is still loud but not as loud as before, so everything worked well. Thanks for the writeup!
i might be a little late to reply, but i followed this guide aswell BUT after step 31 i took off the extra metal/aluminum plating and saw thats that where the bulk of the dust will be built up, this plate has the vents that go to the cooling fan on the opposite side of it after unscrewing. i bought an original ps4, it sounded like a jet engine taking off. The vents on my ps4 were just about covered in dust almost no airflow was able to get through, after taking the extra step and taking off the 1 extra panel (the one under the motherboard in step 31) and of course after replacing the thermal paste made my ps4 run and sound like new again,
Beau -
I cannot reply to Beau's comment.
I also went the extra step of taking that metal shroud that sits below the motherboard (step 31).
I completely recommend this step. It is then you can get access to the heat sink fins to remove dust. There are 3 screws that hold this metal shroud in place. Easy to get out.
Then you can also now remove the fan - 2 screws for this.
You can then clean out the accumulated dust from the fan and in the plastic shroud, that the fan sits in.
Holy cow, dust factory. :)
Great guide! Just did it and now the console is dead silent during gameplay of super demanding games <3 I just went a step further after Step 31 and removed the plate there so that I could properly take care of the heat sink underneath that had lots of dust on it.