Ana içeriğe geç

Razer Naga Epic Chroma Tracking Sensor Replacement

Neye ihtiyacın var

  1. Razer Naga Epic Chroma Tracking Sensor Replacement, Razer Naga Epic Chroma Disassembly: adım 1, 1 resimden 1.
    • Using a spudger, remove the teflon tape on the bottom of the mouse to reveal four screws.

  2. Razer Naga Epic Chroma Tracking Sensor Replacement: adım 2, 1 resimden 1.
    • Use a Phillips #00 screwdriver to remove the four screws.

  3. Razer Naga Epic Chroma Tracking Sensor Replacement: adım 3, 1 resimden 1.
    • Gently pull on the top plastic plate of the device and carefully unplug the white cord from the circuit board.

    • When removing the chassis, carefully unplug the cord connecting to the top mouse buttons.

  4. Razer Naga Epic Chroma Tracking Sensor Replacement: adım 4, 1 resimden 1.
    • Gently pull up on the right plate on the mouse; separating it.

    • Carefully repeat this step for the left side.

    • Be wary of the cable connecting to the twelve mouse buttons located on the left plate. This can be disconnected if needed.

  5. Razer Naga Epic Chroma Tracking Sensor Replacement, Battery: adım 5, 1 resimden 1.
    • Take your nylon spudger to gently pry the battery pack from the device.

    • Remove the foam on the battery shell for your new battery.

  6. Razer Naga Epic Chroma Tracking Sensor Replacement: adım 6, 1 resimden 1.
    • Unplug the power cord from the circuit board in the mouse.

  7. Razer Naga Epic Chroma Tracking Sensor Replacement: adım 7, 1 resimden 1.
    • Plug the cord of the new battery into the socket found in the bottom right of the circuit board.

    • Insert the new battery into the battery socket.

    • Place the foam on the surface of the new battery (reference Step 5).

  8. Razer Naga Epic Chroma Tracking Sensor Replacement, Tracking Sensor: adım 8, 1 resimden 1.
    • Remove the two screws holding the battery mount in place and remove the mount from the mouse.

  9. Razer Naga Epic Chroma Tracking Sensor Replacement: adım 9, 1 resimden 1.
    • Disconnect the white connection strip from the white connection port on the circuit board.

    • Disconnect the USB cable (the cable is located on the right and center of the circuit board).

  10. Razer Naga Epic Chroma Tracking Sensor Replacement: adım 10, 1 resimden 1.
    • Remove the two screws that were on either side of the battery mount. This will allow the circuit board to be removed.

  11. Razer Naga Epic Chroma Tracking Sensor Replacement: adım 11, 1 resimden 1.
    • Remove the circuit board and turn it over to its underside.

  12. Razer Naga Epic Chroma Tracking Sensor Replacement: adım 12, 1 resimden 1.
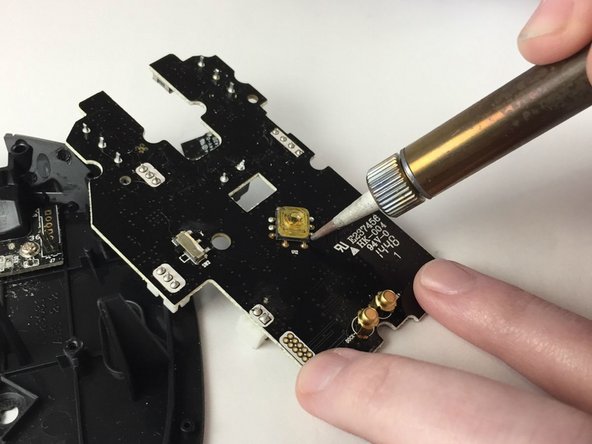
    • Around the yellow sensor, located in the middle of the back of the circuit board, locate the eleven "leads" (soldered connections) surrounding the yellow sensor.

  13. Razer Naga Epic Chroma Tracking Sensor Replacement: adım 13, 2 resimden 1. Razer Naga Epic Chroma Tracking Sensor Replacement: adım 13, 2 resimden 2.
    • Re-solder all eleven leads to the connection points of the sensor.

    • This should fix the problem with the mouse sensor tracking issues.

    • For soldering tips, refer to this guide.

Sonuç

To reassemble your device, follow these instructions in reverse order from steps 1-5.

Bir başkası bu kılavuzu tamamladı.

7 Yorum

Hi i’m adrian in nz. R76 on my board has corroded off. Is there any chance you know or could measure this value?

Adrian Leighton - Yanıt

It is just above the black chip above the top screw hole from step 10. Thanks!

Adrian Leighton - Yanıt

where could i buy a tracking sensor?

mescaline86 - Yanıt

The Philips PLN-2032 sensor on the Razer Naga Epic Chroma is purchased from the link.

https://www.aliexpress.com/item/1pc-mous...

Na Gyeongheum -

Worked on my regular chroma. Just a cold solder joint.

Yolo Swaggins - Yanıt

Yorum Ekle

İstatistikleri Görüntüle:

Son 24 Saat: 0

Son 7 gün: 2

Son 30 gün: 22

Her zaman: 4,728