Giriş
Laptop batteries will degrade over time. This can be accelerated due to constant use, exposure to temperature extremes, or overcharging.
If the laptop has trouble holding charge or is unable to be charge, then it is time to consider replacing the battery. Replacing the battery can be a cost-effective method of prolonging the life of the laptop, while being simple to perform.
This guide provides instructions on replacing the HP Spectre x360 13-ac023dx battery, and provides a list of parts and tools that are needed.
If the battery is hot, or smells bad, do not attempt to remove it, and proceed with caution.
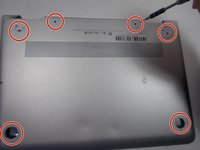
Before beginning the task, unplug the charger from the laptop, turn the laptop off and read about tool safety.
Neye ihtiyacın var


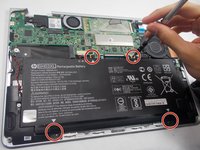
To reassemble your device, follow these instructions in reverse order.
To reassemble your device, follow these instructions in reverse order.
İptal et: Bu kılavuzu tamamlamadım.
5 farklı kişi bu kılavuzu tamamladı.
Ekip

UMass Dartmouth, Team S1-G6, Botvin Fall 2019 UMass Dartmouth, Team S1-G6, Botvin Fall 2019 üyesi
UMASSD-BOTVIN-F19S1G6
3 Üyeler
11 adet Kılavuz yazıldı
5Kılavuz Yorumları
The overall procedure is ok, however as others commented instructions on how to remove the feet would be helpful. I tried a heat gun to help loosen the glue, however that just melted the feat. Overall go the job done, but 2 out of the 4 feet were destroyed in the process.
Also in my case there were no screws under the top or bottom feet, so I could have probably removed the cover without removing the feet.
I think HP quietly refreshed the internals of this laptop or something, because despite appearing externally identical to the laptop shown in the pictures, mine has a smaller main board and differently sized battery. so you should open yours up and check before ordering the battery. mine has the PK03XL. this is double annoying because I was repairing this one for a friend, and she's the one who ordered the battery.
just finished my repair of my w-013 version. good to know that the top two feet have screws underneath them - small risk of denting the bottom cover if you're not gentle. also, the cable is slightly too long to fit neatly in the battery receptacle - it required some jamming that i'll probably be concerned about for a while.
This guide was helpful but my bottom two feet didn't have screws. I used a T4 instead of T5 and for the Phillips a T0 and a T1.
The battery had two metal stickers on it under the bottom feet so I put them on the replacement battery in the same place.
My model is 13-ac033dx