Bu sürüm, hatalı düzenlemeler içerebilir. En son doğrulanmış bellek kopyası dönün.
Neye ihtiyacın var
-
Bu adım çevrilmemiş. Çevrilmesine yardım edin
-
Power on your Mac and launch Terminal.
-
Copy and paste the following command (or type it exactly) into Terminal:
-
sudo nvram AutoBoot=%00
-
Press [return]. If prompted, enter your administrator password and press [return] again. Note: Your return key may also be labeled ⏎ or "enter."
-
sudo nvram AutoBoot=%03
-
-
Bu adım çevrilmemiş. Çevrilmesine yardım edin
-
Remove the following eight screws securing the lower case:
-
Two 1.8 mm P5 Pentalobe screws
-
Four 2.9 mm P5 Pentalobe screws
-
Two 6.1 mm P5 Pentalobe screws
-
-
Bu adım çevrilmemiş. Çevrilmesine yardım edin
-
Wedge your fingers between the upper case and the lower case, starting from the rear of the MacBook between the hinges.
-
Keeping a firm grip, lift steadily until the lower case separates slightly from the upper case.
-
-
Bu adım çevrilmemiş. Çevrilmesine yardım edin
-
While holding the lower case in place, carefully flip the MacBook over so the Apple logo faces up.
-
-
Bu adım çevrilmemiş. Çevrilmesine yardım edin
-
Lift the upper case and display together from the front edge and raise it to about a 45˚ angle.
-
-
Bu adım çevrilmemiş. Çevrilmesine yardım edin
-
Use the flat end of a spudger to press and hold the small gold 'battery disconnect' button.
-
If the power LED is lit up, continue holding the button until the LED goes dark, and then release. This may take up to 10 seconds.
-
If the LED does not light, release the button after 5-10 seconds. Press and hold it again for 5-10 seconds, and release. Finally, press and hold it a third time for 5-10 seconds, and release.
-
-
Bu adım çevrilmemiş. Çevrilmesine yardım edin
-
Lifting from the front edge, open the lower case to an angle of about 45°.
-
-
Bu adım çevrilmemiş. Çevrilmesine yardım edin
-
Use tweezers to peel back the tape covering the trackpad cable ZIF connector.
-
-
Bu adım çevrilmemiş. Çevrilmesine yardım edin
-
Use a spudger to carefully flip up the retaining flap on the trackpad cable ZIF connector.
-
-
Bu adım çevrilmemiş. Çevrilmesine yardım edin
-
Disconnect the trackpad ribbon cable from the trackpad by pulling it gently through its slot in the frame.
-
-
Bu adım çevrilmemiş. Çevrilmesine yardım edin
-
Carefully close the MacBook and flip it over once again, so that the Apple logo faces up.
-
Lifting from the front edge, raise the upper case/display assembly to about a 90° angle, and prop it up against something sturdy so you don't have to hold it.
-
Add a piece of tape near the track pad to secure the upper case and prevent accidental movement.
-
-
Bu adım çevrilmemiş. Çevrilmesine yardım edin
-
Remove the single 2.9 mm T5 Torx screw securing the battery connector to the logic board.
-
-
Bu adım çevrilmemiş. Çevrilmesine yardım edin
-
As an added precaution, you may physically disconnect the battery by inserting a battery isolation pick between the logic board and the battery connector.
-
-
Bu adım çevrilmemiş. Çevrilmesine yardım edin
-
Remove the two screws securing the USB-C port cable bracket:
-
1.1 mm Phillips #00 screw
-
3.5 mm T5 Torx screw
-
-
Bu adım çevrilmemiş. Çevrilmesine yardım edin
-
Use the flat end of a spudger to disconnect the USB-C port cable bracket by prying it straight up from the logic board.
-
-
Bu adım çevrilmemiş. Çevrilmesine yardım edin
-
Use a spudger to flip open the retaining flap on the audio jack board cable ZIF connector.
-
-
Bu adım çevrilmemiş. Çevrilmesine yardım edin
-
Disconnect the audio jack board ribbon cable by pulling it straight back out of the ZIF connector.
-
-
-
Bu adım çevrilmemiş. Çevrilmesine yardım edin
-
Use tweezers to peel back the tape covering the display cable connector.
-
-
Bu adım çevrilmemiş. Çevrilmesine yardım edin
-
If so, use the flat end of a spudger to hold down the retaining flap while peeling the tape away with the tweezers.
-
-
Bu adım çevrilmemiş. Çevrilmesine yardım edin
-
Use the flat end of a spudger to flip open the retaining flap on the display cable connector.
-
Try to keep it clear of the tape, or it may re-adhere and make cable removal difficult.
-
-
Bu adım çevrilmemiş. Çevrilmesine yardım edin
-
Carefully slide the flat end of a spudger underneath the display cable to separate the adhesive holding it to the lower case.
-
-
Bu adım çevrilmemiş. Çevrilmesine yardım edin
-
Hold the retaining flap open.
-
Disconnect the display cable by gently pulling it straight out of its connector.
-
-
Bu adım çevrilmemiş. Çevrilmesine yardım edin
-
Separate the upper case assembly from the lower case assembly.
-
-
Bu adım çevrilmemiş. Çevrilmesine yardım edin
-
Use tweezers to peel up the tape covering the two ZIF connectors—one for the right speaker cable, and one for the audio jack board cable.
-
-
Bu adım çevrilmemiş. Çevrilmesine yardım edin
-
Use the point of a spudger to flip up both ZIF connector retaining flaps.
-
-
Bu adım çevrilmemiş. Çevrilmesine yardım edin
-
Carefully pull straight back on the two pieces of tape you just peeled up to disconnect the two ribbon cables.
-
-
Bu adım çevrilmemiş. Çevrilmesine yardım edin
-
Use the point of a spudger to peel up the foam pad covering the two antenna connectors.
-
-
Bu adım çevrilmemiş. Çevrilmesine yardım edin
-
Insert one arm of your angled tweezers under the metal neck of the first antenna connector and pry up to disconnect it.
-
-
Bu adım çevrilmemiş. Çevrilmesine yardım edin
-
Use a spudger to disconnect the left speaker cable connector by prying it straight up from the logic board.
-
-
Bu adım çevrilmemiş. Çevrilmesine yardım edin
-
Use a spudger to flip up the retaining flap on the trackpad cable ZIF connector.
-
-
Bu adım çevrilmemiş. Çevrilmesine yardım edin
-
Disconnect the trackpad cable from the logic board by gently pulling it straight out of its connector.
-
-
Bu adım çevrilmemiş. Çevrilmesine yardım edin
-
Remove the single 3.5 mm T5 Torx screw securing the logic board to the lower case.
-
-
Bu adım çevrilmemiş. Çevrilmesine yardım edin
-
Flip up the front edge of the logic board.
-
Lift and detach the EMI tape securing the logic board to the lower case.
-
-
Bu adım çevrilmemiş. Çevrilmesine yardım edin
-
Lift the back edge of the lower case assembly and prop it up at an angle using a book or foam block.
-
-
Bu adım çevrilmemiş. Çevrilmesine yardım edin
-
Wear eye protection when handling and applying the adhesive remover. (Eye protection is included in your kit.)
-
Do not wear contact lenses without eye protection.
-
Protective gloves are also included in your kit. If you are concerned about skin irritation, put your gloves on now.
-
-
Bu adım çevrilmemiş. Çevrilmesine yardım edin
-
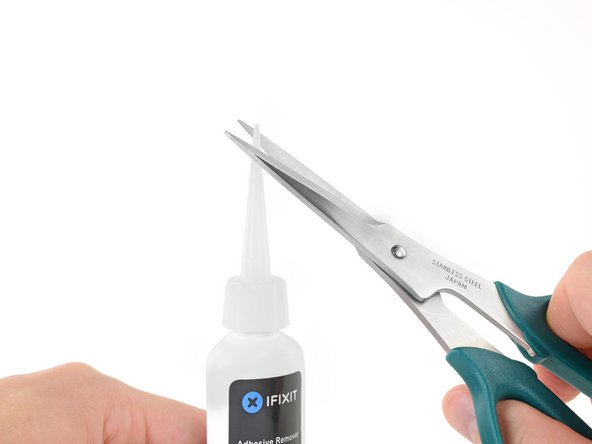
Pull off the black rubber stopper from your bottle of adhesive remover.
-
Use scissors to cut off the sealed tip of the applicator.
-
-
Bu adım çevrilmemiş. Çevrilmesine yardım edin
-
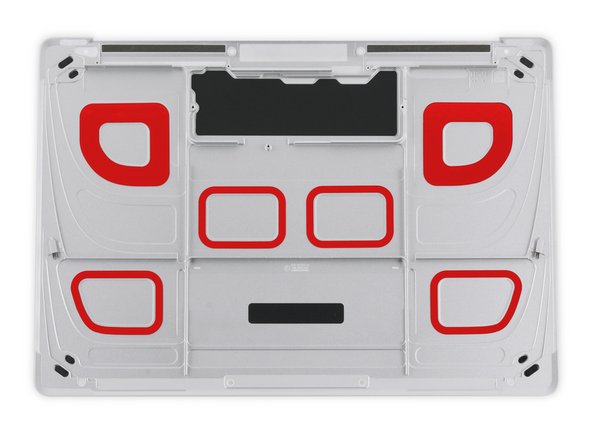
The adhesive securing the battery cells to the lower case is located in the areas marked in red.
-
-
Bu adım çevrilmemiş. Çevrilmesine yardım edin
-
Apply a few drops of adhesive remover along the top edge of the front right battery cell.
-
Wait 2-3 minutes for the liquid adhesive remover to penetrate underneath the battery cell before you proceed to the next step.
-
-
Bu adım çevrilmemiş. Çevrilmesine yardım edin
-
After 2-3 minutes, slide one corner of a plastic card underneath the battery cell.
-
Slide the card farther underneath the battery cell to separate it from the adhesive securing it to the case.
-
-
Bu adım çevrilmemiş. Çevrilmesine yardım edin
-
Lift the battery cell from the right edge to fully separate it from the adhesive, but don't try to remove it.
-
Leave the plastic card underneath the battery cell to prevent it from re-adhering as you proceed to the next step.
-
-
Bu adım çevrilmemiş. Çevrilmesine yardım edin
-
Repeat the previous three steps to separate the front left battery cell.
-
Leave the plastic card underneath the battery cell to prevent it from re-adhering as you proceed to the next step.
-
-
Bu adım çevrilmemiş. Çevrilmesine yardım edin
-
Repeat the previous steps to separate the large battery cell on the left side of the MacBook.
-
-
Bu adım çevrilmemiş. Çevrilmesine yardım edin
-
Repeat the previous steps to separate the large battery cell on the right side of the MacBook.
-
-
Bu adım çevrilmemiş. Çevrilmesine yardım edin
-
Lay the lower case assembly down flat, and apply adhesive remover to the two middle battery cells—at each side, and along the front edge (opposite the logic board area).
-
-
Bu adım çevrilmemiş. Çevrilmesine yardım edin
-
Apply some additional adhesive remover down the middle between the two battery cells.
-
Wait 2-3 minutes for the adhesive remover to penetrate before you proceed.
-
-
Bu adım çevrilmemiş. Çevrilmesine yardım edin
-
Insert your plastic card under the front edge one of the battery cells and separate it carefully.
-
-
Bu adım çevrilmemiş. Çevrilmesine yardım edin
-
Repeat the previous step to separate the final battery cell.
-
-
Bu adım çevrilmemiş. Çevrilmesine yardım edin
-
Remove the battery by lifting it away from the speaker and logic board area.
-
Peel off larger pieces of adhesive using tweezers or gloved fingers.
-
Scrape away any remaining adhesive with a plastic tool, and clean the underlying areas with adhesive remover or isopropyl alcohol. Wipe in one direction, not back and forth, until all the adhesive residue is gone.
-
-
Bu adım çevrilmemiş. Çevrilmesine yardım edin
-
Test your new battery's fit and alignment carefully before installing it.
-
Your replacement battery may come affixed to a thick plastic top liner to help keep the individual cells in position as you install it. Don't remove this liner until after the battery is installed.
-
If your battery came with adhesive pre-installed on the bottom, peel away the bottom plastic liners to expose the adhesive. If your battery did not come with adhesive, apply a thin double-sided adhesive tape such as Tesa 61395 to the lower case in the areas marked in red.
-
Carefully position the battery and set it into place. Press and hold each cell firmly for 5-10 seconds to secure it to the lower case. Afterward, peel off the plastic top liner along with any foam padding.
-


İptal et: Bu kılavuzu tamamlamadım.
29 farklı kişi bu kılavuzu tamamladı.


17 Yorum
Un coñazo vamos :D
When will the battery Start to swell?
Any warning sign for emergency replacement?
Is this Battery compatible with my Macbook 12-inch 2015 Retina?
Absolutely fantastic instructions. Just follow step by step. There will be no surprises. Took about 2-2,5 hours.
Guys! I did it! took me 2.5 hrs. really appreciate the thorough instructions!