Ana içeriğe geç
Ridgid R82005  2 Speed Gear Train  Replacement

Ridgid R82005 2 Speed Gear Train Replacement

Andrew McPherson

Andrew McPherson ve 3 diğer katkıda bulunanlar

En son April 25, 2020 tarihinde güncellendi

10 dakika
Kolay

The Ridgid R82005 speed gear switch alters the amount of power intended for specific drill-driver bits and the type of materials manipulated by operators. Forcing this tool to produce torque beyond the limits of a speed gear can cause jams that compromise the drill's versatility.

Neye ihtiyacın var

Parçalar

Aletler

Daha fazlasını göster…

  1. Ridgid R82005  2 Speed Gear Train  Replacement, Housing Assembly: adım 1, 1 resimden 1.
    • Eject the battery from the drill.

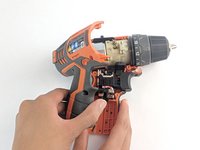
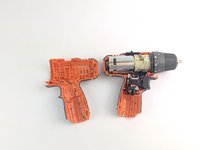
    • Unscrew the seven M3x15.3mm screws, with the 2mm hex screwdriver bit, that secures the Housing Assembly.

  2. Ridgid R82005  2 Speed Gear Train  Replacement: adım 2, 1 resimden 1.
    • Push the metallic Housing Connecting clip out with flat side of the plastic opening tool.

    • Eject battery before attempting this step.

  3. Ridgid R82005  2 Speed Gear Train  Replacement: adım 3, 2 resimden 1. Ridgid R82005  2 Speed Gear Train  Replacement: adım 3, 2 resimden 2.
    • Remove the top half of the Housing Assembly.

  4. Ridgid R82005  2 Speed Gear Train  Replacement: adım 4, 2 resimden 1. Ridgid R82005  2 Speed Gear Train  Replacement: adım 4, 2 resimden 2.
    • Grasp carefully the top and bottom of drill components.

    • LED light needs to be manually removed.

    • Lift and transfer, as a whole, the drill components from the old housing assembly to the new housing.

    • Make sure all drill components fit properly in the grooves of new Housing Assembly.

  5. Ridgid R82005  2 Speed Gear Train  Replacement, 2 Speed Gear Train: adım 5, 2 resimden 1. Ridgid R82005  2 Speed Gear Train  Replacement, 2 Speed Gear Train: adım 5, 2 resimden 2.
    • Remove the 2 speed gear selector by carefully lifting it out of the housing, making sure it is free from the speed switch rail.

    • The 2 speed gear selector may fall out on its own.

    • When reassembling, make sure all drill components fit properly in the grooves of the Housing Assembly.

Sonuç

To reassemble your device, follow these instructions in reverse order.

4 farklı kişi bu kılavuzu tamamladı.

Andrew McPherson

Üyelik tarihi: 02/14/19

479 İtibar

3 adet Kılavuz yazıldı

Ekip

USF Tampa, Team S1-G2, Leahy Spring 2019 USF Tampa, Team S1-G2, Leahy Spring 2019 üyesi

USFT-LEAHY-S19S1G2

4 Üyeler

10 adet Kılavuz yazıldı

0 Yorum

Yorum Ekle

İstatistikleri Görüntüle:

Son 24 Saat: 0

Son 7 gün: 0

Son 30 gün: 11

Her zaman: 600