Ana içeriğe geç

Samsung Galaxy J3 (2016) Screen Replacement

Neye ihtiyacın var

  1. Samsung Galaxy J3 (2016) Screen Replacement, Rear Cover: adım 1, 2 resimden 1. Samsung Galaxy J3 (2016) Screen Replacement, Rear Cover: adım 1, 2 resimden 2.
    • Insert a fingernail or the flat end of a spudger into the divot to the left of the rear-facing camera.

    • Gently pry the rear cover away from the phone until all the plastic clips holding the cover are released.

  2. Samsung Galaxy J3 (2016) Screen Replacement: adım 2, 1 resimden 1.
    • Remove the rear cover.

    • To reinstall the rear cover, align it to the back of the phone, and squeeze the perimeter of the phone to snap all the clips into place.

  3. Samsung Galaxy J3 (2016) Screen Replacement, Battery: adım 3, 3 resimden 1. Samsung Galaxy J3 (2016) Screen Replacement, Battery: adım 3, 3 resimden 2. Samsung Galaxy J3 (2016) Screen Replacement, Battery: adım 3, 3 resimden 3.
    • Insert a fingernail or the flat end of a spudger into the divot below the battery pack.

    • Pry the battery pack out of its recess.

    • If you use the spudger, do not push too hard or you will puncture the battery pack.

    • Remove the battery pack.

  4. Samsung Galaxy J3 (2016) Screen Replacement, Screen: adım 4, 3 resimden 1. Samsung Galaxy J3 (2016) Screen Replacement, Screen: adım 4, 3 resimden 2. Samsung Galaxy J3 (2016) Screen Replacement, Screen: adım 4, 3 resimden 3.
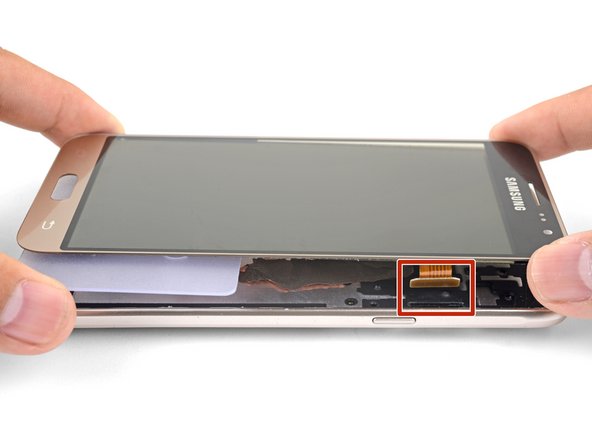
    • Insert the edge of an opening tool into the divot on the display connector cover. The cover is located on the left edge above the battery recess.

    • Pry the display connector cover out of its recess.

    • Remove the display connector cover.

  5. Samsung Galaxy J3 (2016) Screen Replacement: adım 5, 2 resimden 1. Samsung Galaxy J3 (2016) Screen Replacement: adım 5, 2 resimden 2.
    • Insert the flat end of a spudger underneath the display connector.

    • Pry up to disconnect the display connector.

    • To re-attach press connectors like this one, carefully align and press down on one side until it clicks into place, then repeat on the other side. Do not press down on the middle. If the connector is misaligned, the pins can bend, causing permanent damage.

  6. Samsung Galaxy J3 (2016) Screen Replacement: adım 6, 2 resimden 1. Samsung Galaxy J3 (2016) Screen Replacement: adım 6, 2 resimden 2.
    • Flip the phone over.

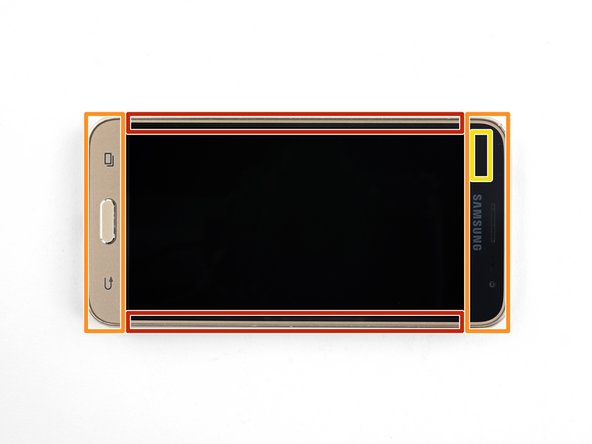
    • Heat an iOpener and apply it to the right edge of the phone for a minute.

    • The next five steps show how to loosen the phone's top glass panel in order to access the AMOLED panel. Before slicing, note the following areas:

    • Thin adhesive bordering the display panel

    • Thick adhesive holding the top and bottom bezels

    • The digitizer cable, which will hinder slicing if hit

  7. Samsung Galaxy J3 (2016) Screen Replacement: adım 7, 2 resimden 1. Samsung Galaxy J3 (2016) Screen Replacement: adım 7, 2 resimden 2.
    • Firmly press an opening pick into the right edge seam of the phone, until the point slides in between the frame and the display glass.

  8. Samsung Galaxy J3 (2016) Screen Replacement: adım 8, 3 resimden 1. Samsung Galaxy J3 (2016) Screen Replacement: adım 8, 3 resimden 2. Samsung Galaxy J3 (2016) Screen Replacement: adım 8, 3 resimden 3.
    • Once the pick's point is in the seam, slowly slide the opening pick along the right edge to separate the adhesive.

    • You do not need to insert the pick into the seam more than 3 mm to cut the adhesive.

  9. Samsung Galaxy J3 (2016) Screen Replacement: adım 9, 3 resimden 1. Samsung Galaxy J3 (2016) Screen Replacement: adım 9, 3 resimden 2. Samsung Galaxy J3 (2016) Screen Replacement: adım 9, 3 resimden 3.
    • Continue cutting the adhesive with the opening pick, rounding the bottom right corner and slicing through the bottom bezel area.

    • If you are having trouble cutting through the adhesive, apply a heated iOpener to the bottom edge for a minute before trying again.

    • Push the pick in as far as the bezel's thickness in order to slice through all of the adhesive. Slice around the Home button.

  10. Samsung Galaxy J3 (2016) Screen Replacement: adım 10, 2 resimden 1. Samsung Galaxy J3 (2016) Screen Replacement: adım 10, 2 resimden 2.
    • Repeat the heating and slicing procedure for the left and top edges of the phone.

    • If you have trouble slicing the top left corner, you may have hit the digitizer cable. Pull the pick out slightly and try again.

  11. Samsung Galaxy J3 (2016) Screen Replacement: adım 11, 2 resimden 1. Samsung Galaxy J3 (2016) Screen Replacement: adım 11, 2 resimden 2.
    • The goal is to loosen the top panel in order to access the AMOLED panel.

    • Grasp the top panel by the corners and slowly swing the bottom edge up slightly.

    • Gently wiggle the top panel and use an opening pick to slice any remaining adhesive.

    • The Home button will most likely fall out. Remove it and keep it in a safe location for re-assembly.

    • The top panel is still connected to the AMOLED display by a digitizer flex cable. Optionally, you can use scissors to cut the flex cable and completely remove the top panel. This will render your old display unusable.

  12. Samsung Galaxy J3 (2016) Screen Replacement: adım 12, 2 resimden 1. Samsung Galaxy J3 (2016) Screen Replacement: adım 12, 2 resimden 2.
    • Heat an iOpener and apply it to the front of the phone for a minute, covering as much of the screen as possible.

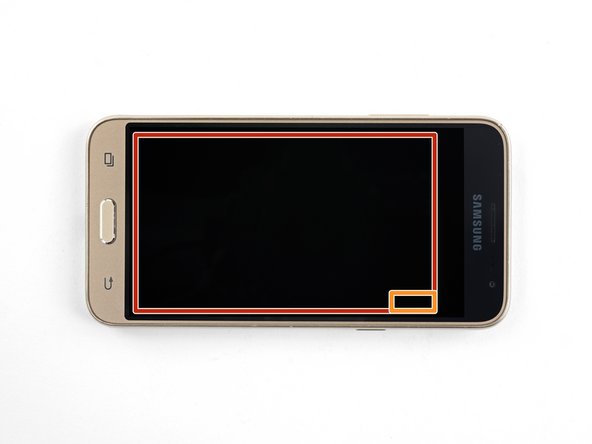
    • Take note of the following areas when prying the AMOLED panel:

    • Strong adhesive holding the AMOLED panel to the frame

    • Display flex cable, which will hinder slicing if hit

  13. Samsung Galaxy J3 (2016) Screen Replacement: adım 13, 3 resimden 1. Samsung Galaxy J3 (2016) Screen Replacement: adım 13, 3 resimden 2. Samsung Galaxy J3 (2016) Screen Replacement: adım 13, 3 resimden 3.
    • Insert the point of an opening pick under the bottom left corner of the AMOLED panel.

    • Use the indent on the edge of the frame to help getting the pick in place.

    • Slowly and firmly push the pick in to slice the adhesive underneath the AMOLED panel.

    • If you are having trouble inserting the pick, reheat an iOpener and apply it to the area for a minute before trying again.

  14. Samsung Galaxy J3 (2016) Screen Replacement: adım 14, 2 resimden 1. Samsung Galaxy J3 (2016) Screen Replacement: adım 14, 2 resimden 2.
    Bu adımda kullanılan alet:
    Plastic Cards
    $2.99
    Satın Al
    • The goal is to separate the AMOLED panel from the frame.

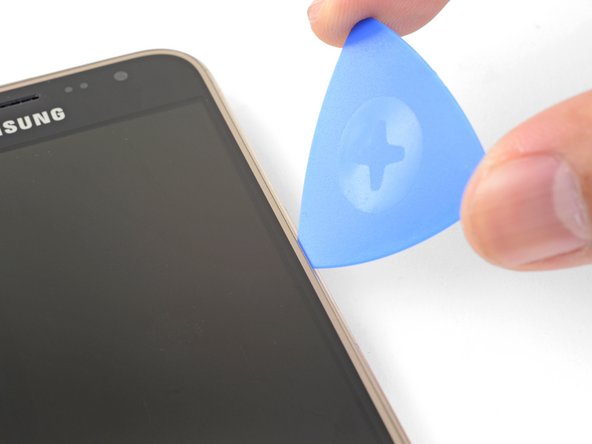
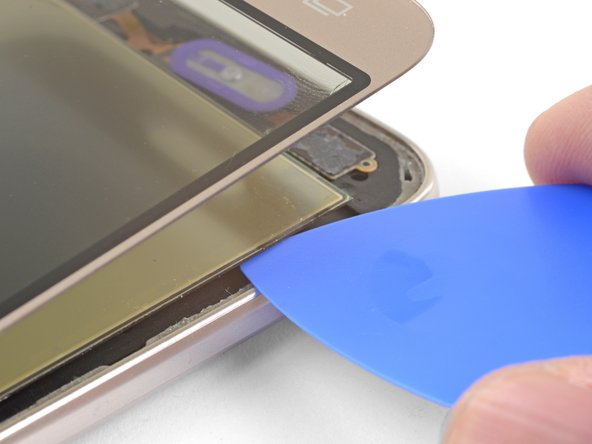
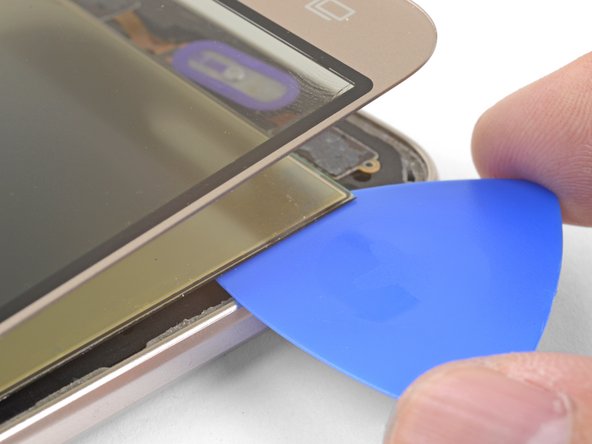
    • Insert a plastic opening card under the AMOLED panel, using the gap created by the opening pick to get the card started.

    • Slowly and firmly press the card inwards, wiggling it as needed, until it slices through the other side.

    • If the slicing becomes hard, you can always reheat an iOpener and apply it to the screen for a minute to help soften the adhesive.

  15. Samsung Galaxy J3 (2016) Screen Replacement: adım 15, 3 resimden 1. Samsung Galaxy J3 (2016) Screen Replacement: adım 15, 3 resimden 2. Samsung Galaxy J3 (2016) Screen Replacement: adım 15, 3 resimden 3.
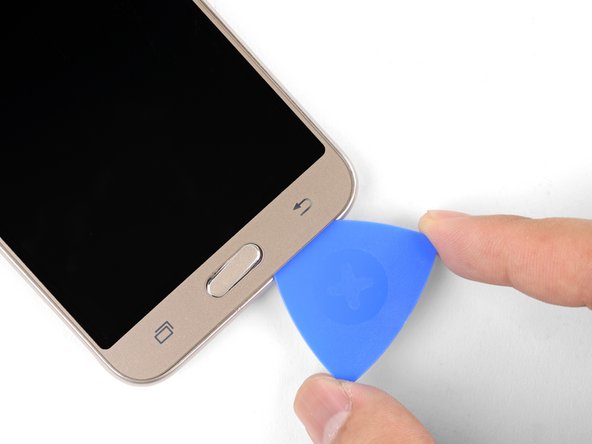
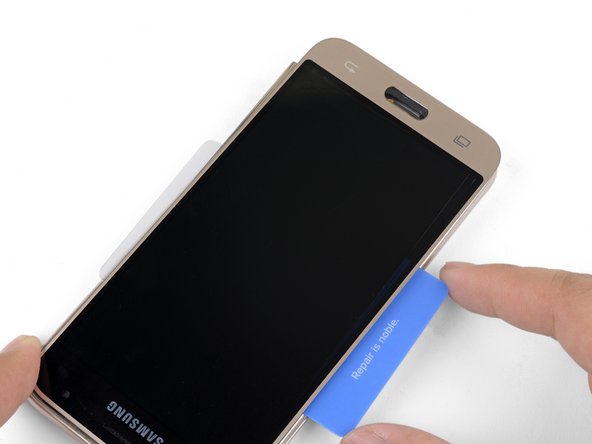
    • Once the plastic card cuts through the width of the phone, slowly and firmly push it towards the top, wiggling it as needed.

    • Continue until you release the AMOLED panel from the frame.

    • Apply a heated iOpener to help loosen stubborn adhesive.

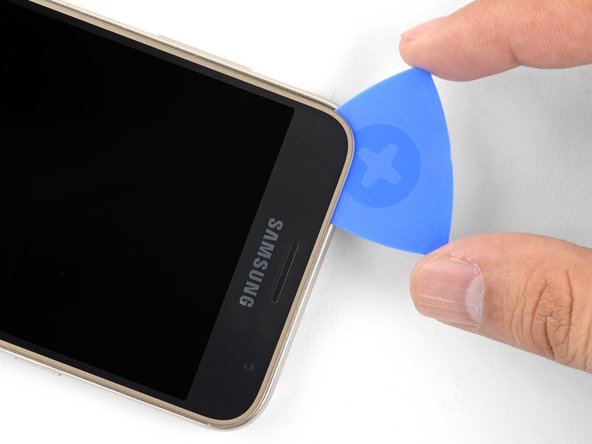
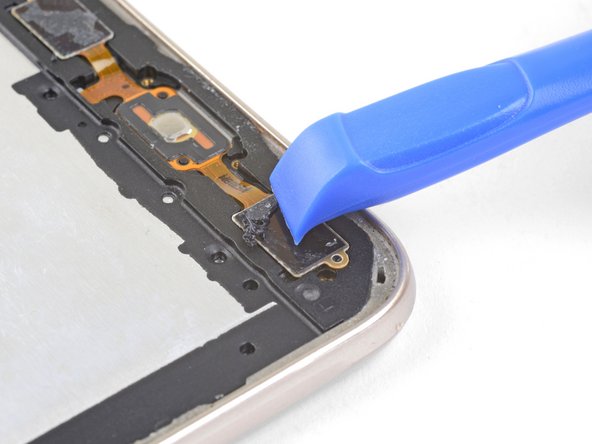
    • Use opening picks to slice through stray adhesive areas.

  16. Samsung Galaxy J3 (2016) Screen Replacement: adım 16, 3 resimden 1. Samsung Galaxy J3 (2016) Screen Replacement: adım 16, 3 resimden 2. Samsung Galaxy J3 (2016) Screen Replacement: adım 16, 3 resimden 3.
    • Slowly lift the AMOLED panel and digitizer together up from the frame. Use the plastic card to support the AMOLED panel.

    • As you lift the screen, thread the display flex cable out of its cutout.

    • Remove the screen.

  17. Samsung Galaxy J3 (2016) Screen Replacement: adım 17, 2 resimden 1. Samsung Galaxy J3 (2016) Screen Replacement: adım 17, 2 resimden 2.
    • Follow these tips as you install a new screen.

    • Scrape all adhesive residue from the frame surface. Use high concentration (over 90%) isopropyl alcohol to help. A replacement screen attached to an uneven surface will crack.

    • Use an opening tool to carefully scrape the adhesive off the capacitive button surfaces.

    • Connect your new screen by threading the display cable through the cutout and connecting it to the phone. Power on your phone and test it before re-adhering the screen.

    • Do not forget to replace the Home button during reinstallation.

    • Keep the replacement screen connected to the phone during the re-adhering process to help align the screen properly.

    • Be sure to peel all adhesive plastic liners on the replacement screen when re-adhering the screen.

Sonuç

To reassemble your device, follow these instructions in reverse order.

Take your e-waste to an R2 or e-Stewards certified recycler.

Repair didn’t go as planned? Check out our Samsung Galaxy J3 (2016) Answers community for troubleshooting help.

46 farklı kişi bu kılavuzu tamamladı.

Arthur Shi

Üyelik tarihi: 01/03/18

248.412 İtibar

503 adet Kılavuz yazıldı

Ekip

iFixit iFixit üyesi

Staff

136 Üyeler

16.562 adet Kılavuz yazıldı

7 Yorum

Ist es möglich nur das Glas ohne LCD zu wechseln?

RC Addicted - Yanıt

Yes! The LCD is not glued to the display.

Ja! Das LCD ist nicht mit dem Display verklebt.

Arthur Shi -

What kinds of adhesives can I use to put the new screen on? Double sided scotch ok?

William Crawford - Yanıt

Hi William,

Double-sided Scotch tape probably will not hold the display on for long. You will have to use something like Tesa tape along the perimeter. If you bought the part we sell in our store, it already has all the necessary adhesive pre-installed on the screen.

Arthur Shi -

-1-How does one remove the glass top , which is what is cracked in my cell, from the display digitizer without rendering the display unusable?

-2- do you have the LCD screen available for purchase? if not can you recommend a seller?

Joe Angarita - Yanıt

Yorum Ekle

İstatistikleri Görüntüle:

Son 24 Saat: 4

Son 7 gün: 37

Son 30 gün: 148

Her zaman: 41,413