Bu sürüm, hatalı düzenlemeler içerebilir. En son doğrulanmış bellek kopyası dönün.
Neye ihtiyacın var
-
Bu adım çevrilmemiş. Çevrilmesine yardım edin
-
Heat an iOpener and apply it to the back cover's bottom edge for two minutes.
-
-
Bu adım çevrilmemiş. Çevrilmesine yardım edin
-
Apply a suction cup to the back of the phone, as close to the center of the bottom edge as possible.
-
Pull on the suction cup with strong, steady force to create a gap between the back cover and the frame.
-
Insert the point of an opening pick into the gap.
-
-
Bu adım çevrilmemiş. Çevrilmesine yardım edin
-
Slide the pick back and forth along the bottom edge to slice through the adhesive.
-
Leave your opening pick in the seam to prevent the adhesive from resealing.
-
-
Bu adım çevrilmemiş. Çevrilmesine yardım edin
-
Apply a heated iOpener to the left edge of the back cover for two minutes.
-
-
Bu adım çevrilmemiş. Çevrilmesine yardım edin
-
Apply a suction cup to the back of the phone, as close to the center of the left edge as possible.
-
Pull on the suction cup with strong, steady force to create a gap between the back cover and the frame.
-
Insert the point of an opening pick into the gap.
-
You can try also applying a few drops of high concentration (over 90%) isopropyl alcohol into the seam to help loosen the adhesive.
-
-
Bu adım çevrilmemiş. Çevrilmesine yardım edin
-
Once the pick is underneath the glass's edge, tilt it downward and insert it further to fully separate the back cover's adhesive.
-
-
Bu adım çevrilmemiş. Çevrilmesine yardım edin
-
Slide the pick towards the bottom edge of the phone to separate the back cover's adhesive.
-
Leave your pick under the left edge of the glass near the bottom of the device to prevent the adhesive from resealing.
-
-
Bu adım çevrilmemiş. Çevrilmesine yardım edin
-
Insert another pick under the center of the left edge of the back cover.
-
Gradually slide the pick towards the top of the device to separate the back cover's adhesive.
-
Leave your pick under the left edge of the glass near the top of the device to prevent the adhesive from resealing.
-
-
Bu adım çevrilmemiş. Çevrilmesine yardım edin
-
Apply a heated iOpener to the right edge of the back cover for two minutes.
-
-
Bu adım çevrilmemiş. Çevrilmesine yardım edin
-
Apply a suction cup to the back of the phone, as close to the center of the right edge as possible.
-
Pull on the suction cup with strong, steady force to create a gap between the back cover and the frame.
-
Insert the point of an opening pick into the gap.
-
-
Bu adım çevrilmemiş. Çevrilmesine yardım edin
-
Slide the pick towards the bottom edge of the phone to separate the back cover's adhesive.
-
Leave your pick under the right edge of the glass near the bottom of the device to prevent the adhesive from resealing.
-
-
-
Bu adım çevrilmemiş. Çevrilmesine yardım edin
-
Insert another pick underneath the center of the right edge of the back cover.
-
Gradually slide the pick towards the top of the device to separate the back cover's adhesive.
-
-
Bu adım çevrilmemiş. Çevrilmesine yardım edin
-
Apply a heated iOpener to the top edge of the back cover for two minutes.
-
-
Bu adım çevrilmemiş. Çevrilmesine yardım edin
-
Gradually slide the pick from the right edge of the device around the top right corner.
-
Continue slicing along the top edge to fully separate the back cover adhesive.
-
-
Bu adım çevrilmemiş. Çevrilmesine yardım edin
-
Lift the back cover slowly. Use opening picks to slice any remaining adhesive.
-
Remove the back cover.
-
This is a good point to power on your phone and test all functions before sealing it up.
-
Remove any adhesive chunks with a pair of tweezers or your fingers. Apply heat if you're having trouble separating the adhesive.
-
If you're using Samsung custom-cut adhesives, follow this guide.
-
If you're using double-sided tape, follow this guide.
-
-
Bu adım çevrilmemiş. Çevrilmesine yardım edin
-
Use a spudger to pry up and disconnect the wireless charging coil connector.
-
-
Bu adım çevrilmemiş. Çevrilmesine yardım edin
-
Use a pair of tweezers to gently peel the wireless charging coil away from the device.
-
Remove the wireless charging coil.
-
-
Bu adım çevrilmemiş. Çevrilmesine yardım edin
-
Use a Phillips #00 screwdriver to remove the five 3.9 mm-long screws securing the motherboard bracket.
-
-
Bu adım çevrilmemiş. Çevrilmesine yardım edin
-
Use a pair of tweezers to unclip and remove the motherboard bracket.
-
-
Bu adım çevrilmemiş. Çevrilmesine yardım edin
-
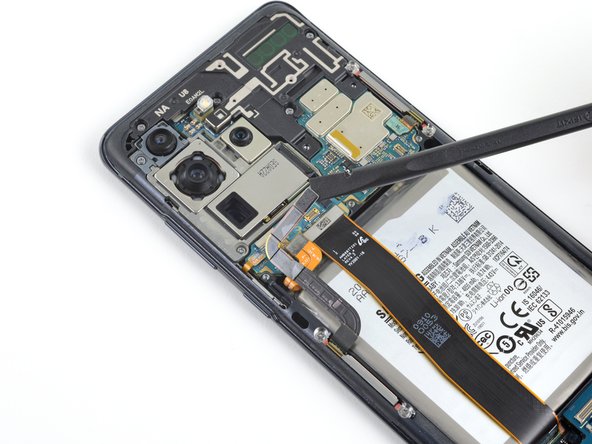
Use a spudger to pry up and disconnect the battery connector.
-
-
Bu adım çevrilmemiş. Çevrilmesine yardım edin
-
Use a Phillips #00 screwdriver to remove the five 3.9 mm-long screws securing the loudspeaker and lower midframe.
-
-
Bu adım çevrilmemiş. Çevrilmesine yardım edin
-
Insert the point of a spudger or a pair of tweezers into the notch in the top left corner of the midframe and pry up to release the clips holding it in place.
-
Remove the loudspeaker and lower midframe.
-
-
Bu adım çevrilmemiş. Çevrilmesine yardım edin
-
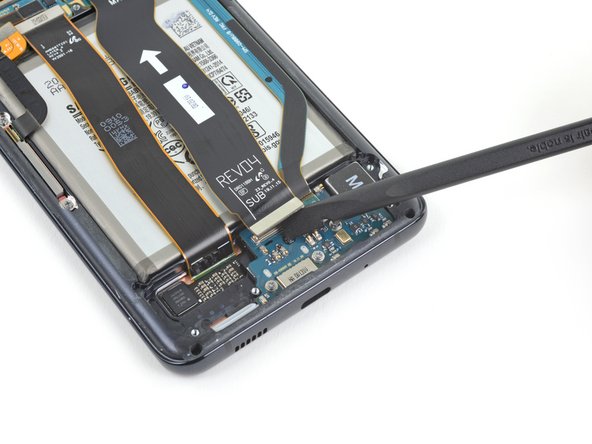
Use a spudger to pry up and disconnect the main and auxiliary flex cables from the daughterboard near the bottom of the device.
-
-
Bu adım çevrilmemiş. Çevrilmesine yardım edin
-
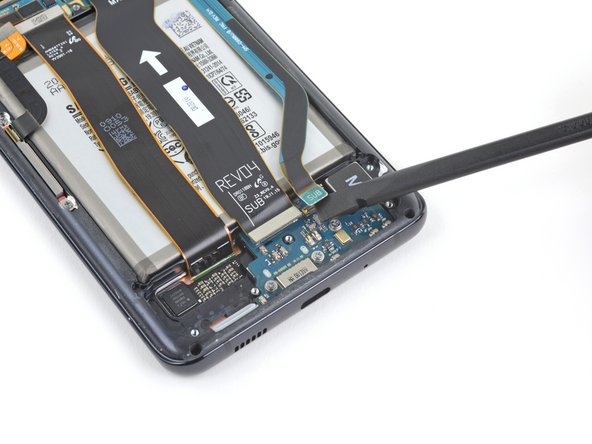
Use a spudger to pry up and disconnect the main and auxiliary flex cables from the motherboard.
-
-
Bu adım çevrilmemiş. Çevrilmesine yardım edin
-
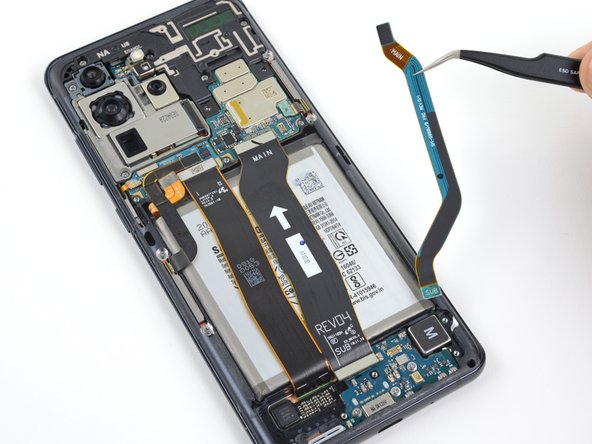
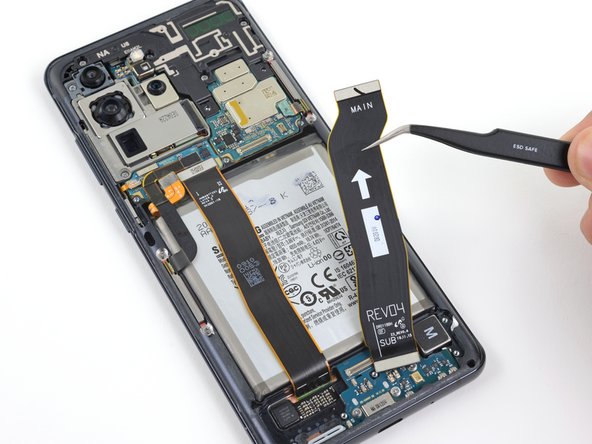
Gently peel up and remove the main and auxiliary flex cables.
-
-
Bu adım çevrilmemiş. Çevrilmesine yardım edin
-
Pry up and disconnect the left 5G antenna cable from the motherboard.
-
-
Bu adım çevrilmemiş. Çevrilmesine yardım edin
-
Pry up and disconnect the main display flex cable from the motherboard.
-
-
Bu adım çevrilmemiş. Çevrilmesine yardım edin
-
Gently peel up and bend the display and left 5G antenna flex cables out of the way of the motherboard and battery.
-
-
Bu adım çevrilmemiş. Çevrilmesine yardım edin
-
Apply a few drops of high concentration (over 90%) isopropyl alcohol to the gaps in between the frame and the edges of the battery.
-
Tilt the device gently as you apply the alcohol help it penetrate the adhesive underneath the battery.
-
After you apply the alcohol, continue tilting the phone gently in all directions for three to five minutes to help the alcohol penetrate further and evaporate.
-
-
Bu adım çevrilmemiş. Çevrilmesine yardım edin
-
Apply a suction handle to the center of the battery.
-
Brace the top and bottom of the device against your work surface with one hand and firmly pull up on the suction handle with the other.
-
Continue lifting until the battery separates from the phone.
-
-
Bu adım çevrilmemiş. Çevrilmesine yardım edin
-
Remove the battery.
-
Peel up and/or scrape away any remaining battery adhesive before cleaning the battery well surface with isopropyl alcohol and a lint free cloth.
-


İptal et: Bu kılavuzu tamamlamadım.
5 farklı kişi bu kılavuzu tamamladı.

6 Yorum
The new battery stays at zero percent when it’s charging
But it charges or not?
Where did you buy this battery, avoid ebay only buy from trusted sources with warranty like ifixit
I bought a galaxy s7 battery on eBay claiming to be original quality it swelled up badly in 2 days
I completed this repair yesterday and for awhile everything was working. Now it looks like there’s residual isopropyl alcohol in the camera assembly and the screen is no longer working. For awhile touch input stopped but the display remained and now the display has stopped as well. I’m worried I damaged something by using too much alcohol when getting the battery out, or maybe on the display cable when reattaching it during reassembly. How do I go about finding out what the issue is and hopefully fix it?
This exact issue happened to me as well, word for word how you put it. Took my phone to a repair store and they said the motherboard was damaged and there was nothing they could do. The wording this guide had before was extremely dangerous and probably killed a lot of people's phones.