Ana içeriğe geç

Bu sürüm, hatalı düzenlemeler içerebilir. En son doğrulanmış bellek kopyası dönün.

Neye ihtiyacın var

  1. Bu adım çevrilmemiş. Çevrilmesine yardım edin

    : adım 1, 2 resimden 1. : adım 1, 2 resimden 2.
  2. , SIM Kart Tepsisi: adım 2, 3 resimden 1. , SIM Kart Tepsisi: adım 2, 3 resimden 2. , SIM Kart Tepsisi: adım 2, 3 resimden 3.
    • Telefonun başlatma düğmesi tarafında bulunan SIM kart yerindeki deliğe, bir adet ataş ya da SIM çıkarma aleti yerleştirin.

    • Aleti yanlışlıkla mikrofon deliğine sokmayın; bu hasara sebep olur. Telefonun üzerinde SIM tepsisinin ana hatlarını arayın.

    • SIM kart tepsisini çıkarmak için bastırın.

    • SIM kart tepsisini telefondan ayırın.

  3. , iOpener'ı Isıtma: adım 3, 2 resimden 1. , iOpener'ı Isıtma: adım 3, 2 resimden 2.
    • İşleme başlamadan önce mikrodalganızı temizlenmenizi tavsiye ederiz. Aksi takdirde, yüzeydeki yağlı maddeler iOpener'a yapışabilir.

    • iOpener'ı mikrodalga fırının ortasına yerleştirin.

    • Döner tablalı mikrodalga fırınlar için: Tablanın sorunsuz bir şekilde döndüğünden emin olun. Aksi takdirde, iOpener'ınız takılıp fazla ısınabilir ve yanabilir.

  4. : adım 4, 1 resimden 1.
    • iOpener'ı otuz saniye boyunca ısıtın.

    • Tamir süresince iOpener ısınacağı için, tek seferde otuz saniye olmak üzere yeniden ısıtın.

    • Tamir süresince iOpener'ı fazla ısıtmamaya dikkat edin; fazla ısıtma iOpener'ın patlamasına sebep olabilir.

    • iOpener'ın kabarık bir görüntüsü varsa, kesinlikle dokunmayın.

    • iOpener'ın orta kısmı hala dokunulamayacak kadar sıcaksa, tekrar ısıtmadan önce biraz daha kullanabilirsiniz. Doğru bir şekilde ısıtılmış iOpener, yaklaşık 10 dakika kadar sıcak kalacaktır.

  5. : adım 5, 1 resimden 1.
    • iOpener'ı sıcak olan ortasından değil, herhangi iki ucun birinden tutarak mikrodalga fırından çıkartın.

    • iOpener fırından çıktığında epey sıcak olacaktır, dikkat edin. Gerekli ise, fırın eldiveni kullanabilirsiniz.

  6. Bu adım çevrilmemiş. Çevrilmesine yardım edin

    : adım 6, 2 resimden 1. : adım 6, 2 resimden 2.
    • If you don't have a microwave, follow this step to heat your iOpener in boiling water.

    • Fill a pot or pan with enough water to fully submerge an iOpener.

    • Heat the water to a boil. Turn off the heat.

    • Place an iOpener into the hot water for 2-3 minutes. Make sure the iOpener is fully submerged in the water.

    • Use tongs to extract the heated iOpener from the hot water.

    • Thoroughly dry the iOpener with a towel.

    • The iOpener will be very hot, so be careful to hold it only by the end tabs.

    • Your iOpener is ready for use! If you need to reheat the iOpener, heat the water to a boil, turn off the heat, and place the iOpener in the water for 2-3 minutes.

  7. , Arka Cam: adım 7, 2 resimden 1. , Arka Cam: adım 7, 2 resimden 2.
    • Telefonu yüzüstü yatırın.

    • Eğer camınız kırılmışsa, işlem esnasında etrafa saçılmasını önlemek için tüm panelin üstüne koli bandı yapıştırın.

    • iOpener'ı panelin üzerine koyun ve cam köşelerinin etrafındaki yapıştırıcıyı gevşetmesi için yaklaşık 60 saniye boyunca bekletin.

    • Kalan alanı da ısıtması için, iOpener'ı o tarafa kaydırın ve yine bir 60 saniye kadar bekleyin.

  8. : adım 8, 3 resimden 1. : adım 8, 3 resimden 2. : adım 8, 3 resimden 3.
    • Arka cam panelin alt yarısına bir adet ağır yük vantuzu yerleştirin.

    • Menteşeli kolu kaldırarak ve iki kolu da birbirine kenetleyecek şekilde mandalı çevirerek vantuzu sağlama alın.

  9. : adım 9, 2 resimden 1. : adım 9, 2 resimden 2.
    • Takip eden adımda arka paneli ara çerçeveden ayırmak için kanırtma aparatı kullanılacak. Eğer yapışkan çok kuvvetli ise, iOpener ile yeniden ısı uygulayın.

    • Tercümeyi buraya girin

  10. : adım 10, 3 resimden 1. : adım 10, 3 resimden 2. : adım 10, 3 resimden 3.
    • Yeteri kadar büyük bir aralığa ulaştığınızda, arka cam ve ara çerçeve arasına bir adet kanırtma aparatı yerleştirin.

  11. : adım 11, 2 resimden 1. : adım 11, 2 resimden 2.
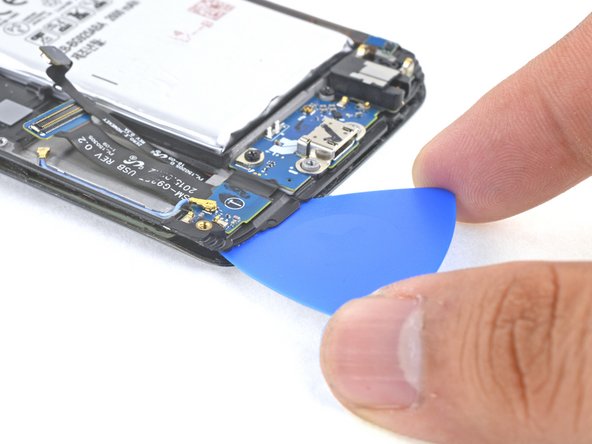
    • Kanırtma aparatını, arka cam panelin sol alt köşesinin etrafında gezdirin.

  12. : adım 12, 2 resimden 1. : adım 12, 2 resimden 2.
    • Bu noktada, yapışkan şerit iki tarafa bağlı da olsa, arka cam panel telefonun gövdesinden tamamen ayrılmış olmalıdır.

    • Arka paneli yukarıya çekerek tamamen ayırın.

    • Arka camı yeniden yerleştirmek için bu kılavuzu takip edin.

  13. Bu adım çevrilmemiş. Çevrilmesine yardım edin

    : adım 13, 1 resimden 1.
    • Remove the thirteen 3.3 mm Phillips #00 screws from the midframe.

  14. Bu adım çevrilmemiş. Çevrilmesine yardım edin

    : adım 14, 3 resimden 1. : adım 14, 3 resimden 2. : adım 14, 3 resimden 3.
    • Press down on the back of the battery and lift up on the edges of the midframe to separate it from the rest of the phone.

  15. Bu adım çevrilmemiş. Çevrilmesine yardım edin

    : adım 15, 2 resimden 1. : adım 15, 2 resimden 2.
    • Using the flat end of the spudger, disconnect the battery ribbon cable from the motherboard.

  16. Bu adım çevrilmemiş. Çevrilmesine yardım edin

    : adım 16, 2 resimden 1. : adım 16, 2 resimden 2.
    • Disconnect the home button ribbon cable from the motherboard.

  17. Bu adım çevrilmemiş. Çevrilmesine yardım edin

    : adım 17, 3 resimden 1. : adım 17, 3 resimden 2. : adım 17, 3 resimden 3.
    • Use the pointed end of a spudger to disconnect the two antenna interconnect cables from the motherboard.

  18. Bu adım çevrilmemiş. Çevrilmesine yardım edin

    : adım 18, 2 resimden 1. : adım 18, 2 resimden 2.
    • Disconnect the display ribbon cable from the motherboard using the flat end of the spudger.

  19. Bu adım çevrilmemiş. Çevrilmesine yardım edin

    : adım 19, 2 resimden 1. : adım 19, 2 resimden 2.
    • Disconnect the earpiece ribbon cable from the motherboard.

  20. Bu adım çevrilmemiş. Çevrilmesine yardım edin

    : adım 20, 2 resimden 1. : adım 20, 2 resimden 2.
    • The motherboard is an ESD sensitive component and should be handled with care. iFixit recommends using a anti-static bracelet whenever handling components of this nature to avoid damage.

    • Grip the motherboard on both edges toward the top of the device.

    • Do not lift the motherboard all the way out in this step; the ribbon cable on the underside needs to be disconnected first.

    • Lift the motherboard up and away from the display, taking care not to put too much stress on the daughterboard ribbon cable.

  21. Bu adım çevrilmemiş. Çevrilmesine yardım edin

    : adım 21, 2 resimden 1. : adım 21, 2 resimden 2.
    • Disconnect the daughterboard ribbon cable from the underside of the motherboard.

  22. Bu adım çevrilmemiş. Çevrilmesine yardım edin

    : adım 22, 1 resimden 1.
    • Prepare an iOpener and apply to the left edge of the phone for about a minute.

    • You may need to reheat and reapply the iOpener several times to get the phone warm enough. Follow the iOpener instructions to avoid overheating.

    • While you are waiting, read through the next step to get an idea of where to pry.

  23. Bu adım çevrilmemiş. Çevrilmesine yardım edin

    : adım 23, 3 resimden 1. : adım 23, 3 resimden 2. : adım 23, 3 resimden 3.
    • The display edges are secured by strips of strong foam adhesive.

    • Strong double-sided tape covers the entire copper surface.

    • Cut very carefully near the "recent" and "back" capacitive buttons near the bottom of the display. These are adhered to the display and are very easy to tear.

    • While the OLED panel and display cable will be replaced with the new display, the capacitive buttons must be reused, so take care not to damage them.

  24. Bu adım çevrilmemiş. Çevrilmesine yardım edin

    : adım 24, 2 resimden 1. : adım 24, 2 resimden 2.
    • Insert an opening pick into the heated edge of the phone, between the plastic frame and the display.

    • The pick should slide underneath the plastic and remain above the copper colored shielding.

    • If you can see the pick through front glass, the pick is riding on top of the display panel. Pull the pick out, angle it so that the point aims more towards the plastic frame side, and try again.

    • Keep in mind that the display cable threads through the midframe just above the midpoint of the right edge. It may interfere with your cutting if the pick is too deep.

  25. Bu adım çevrilmemiş. Çevrilmesine yardım edin

    : adım 25, 3 resimden 1. : adım 25, 3 resimden 2. : adım 25, 3 resimden 3.
    • Slide the pick along the edge to cut through the adhesive.

  26. Bu adım çevrilmemiş. Çevrilmesine yardım edin

    : adım 26, 2 resimden 1. : adım 26, 2 resimden 2.
    • Repeat the cutting process for the top edge.

    • Use a little extra caution when prying near the top edge so as not to damage the front-facing sensors and earpiece speaker.

    • Keep an opening pick in the edge you've worked on to prevent it from re-adhering.

    • If the cutting becomes difficult, heat an iOpener and apply it to the edge.

  27. Bu adım çevrilmemiş. Çevrilmesine yardım edin

    : adım 27, 3 resimden 1. : adım 27, 3 resimden 2. : adım 27, 3 resimden 3.
    • Continue to cut through the adhesive on the other long side of the phone. Try to slice as deep as you can to separate the double-sided tape.

    • Leave a pick in the edge you just cut to prevent the edge from resealing.

  28. Bu adım çevrilmemiş. Çevrilmesine yardım edin

    : adım 28, 2 resimden 1. : adım 28, 2 resimden 2.
    • Apply a heated iOpener to the bottom edge of the display for about one minute.

    • Gently insert an opening pick between the display and the "back" button, no more than 0.5 (~12 mm) inches deep to avoid damaging the display.

    • Leave the pick there to keep the edge from resealing.

  29. Bu adım çevrilmemiş. Çevrilmesine yardım edin

    : adım 29, 2 resimden 1. : adım 29, 2 resimden 2.
    • Repeat the same procedure for the "recents" button.

  30. Bu adım çevrilmemiş. Çevrilmesine yardım edin

    : adım 30, 2 resimden 1. : adım 30, 2 resimden 2.
    • Use your picks as needed to finish separating the adhesive beneath all areas of the display.

    • Do not completely remove the plastic frame from the display yet, the display cable is still threaded through the midframe.

    • Gently lift the battery edge of the plastic frame upwards, separating the plastic frame from the display.

  31. Bu adım çevrilmemiş. Çevrilmesine yardım edin

    : adım 31, 3 resimden 1. : adım 31, 3 resimden 2. : adım 31, 3 resimden 3.
    • As you lift the plastic frame away from the display, carefully thread the display ribbon and connector out of the frame.

    • Remove the plastic frame.

  32. Bu adım çevrilmemiş. Çevrilmesine yardım edin

    : adım 32, 1 resimden 1.
    • Before installing a new display, it's very important to remove all traces of the old adhesive from the frame, while taking special care to remove any small glass fragments.

    • After removing all traces of glue and glass from the frame, clean the adhesion areas with 90% (or higher) isopropyl alcohol and a lint-free cloth or coffee filter. Swipe in one direction only, not back and forth.

    • If the frame is bent, or if any glue or glass remnants are left behind, the new display will not mount correctly and may be damaged. If necessary, replace the frame.

    • The best way to secure the new screen is with a sheet of custom-cut double-sided tape. Apply the tape to the back of the screen, then carefully feed the display cable through the frame. Align the screen and press it into place.

Bitiş Çizgisi

20 farklı kişi bu kılavuzu tamamladı.

Arthur Shi

Üyelik tarihi: 01/03/18

253.422 İtibar

526 adet Kılavuz yazıldı

Ekip

iFixit iFixit üyesi

Staff

135 Üyeler

17.198 adet Kılavuz yazıldı

0 Yorum

Yorum Ekle

İstatistikleri Görüntüle:

Son 24 Saat: 5

Son 7 gün: 43

Son 30 gün: 186

Her zaman: 28,600