Bu çeviri, kaynak kılavuzdaki en son güncellemeleri yansıtmayabilir. Çeviriyi güncellemeye yardımcı olun veya kaynak kılavuzunu görüntüleyin.
Giriş
Samsung Galaxy S6'nızın ara çerçeve takımını değiştirmek için bu kılavuzu kullanın. Ara çerçeve takımı; endüksiyon bobini, güç ve ses düğmeleri, kamera objektifi ve hoparlörden oluşur.
Bu kılavuzda arka cam yerinden çıkarılmaktadır. Arka camı ayırmak, camı yerinde tutan yapışkana zarar verir.
Arka camı tekrardan yerine takmak için bu kılavuzu takip edin.
Neye ihtiyacın var
-
-
Telefonu başlatma düğmesinin olduğu tarafta bulunan SIM kart yerindeki deliğe bir adet ataş ya da SIM çıkartma aleti yerleştirin.
-
SIM kart tepsisini çıkarmak için bastırın.
-
-
-
iOpener'ı panelin üzerine koyun ve cam köşelerinin etrafındaki yapıştırıcıyı gevşetmesi için yaklaşık 60 saniye boyunca bekletin.
-
Kalan alanı da ısıtması için, iOpener'ı o tarafa kaydırın ve yine bir 60 saniye kadar bekleyin.
-
-
-
-
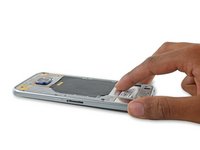
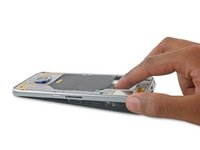
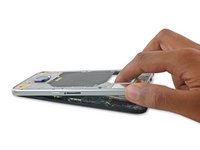
Ara çerçeveyi telefona sabitleyen 13 adet 3.5mm Phillips #00 vidayı sökün.
-


Cihazınızı tekrar birleştirmek için, bu talimatları sondan başa doğru uygulayın. Arka camı yeniden takarken arka cam yapışkanı değişim kılavuzuna başvurun.
Cihazınızı tekrar birleştirmek için, bu talimatları sondan başa doğru uygulayın. Arka camı yeniden takarken arka cam yapışkanı değişim kılavuzuna başvurun.
İptal et: Bu kılavuzu tamamlamadım.
18 farklı kişi bu kılavuzu tamamladı.
Bu çevirmenlere özel teşekkürler:
71%

Gözde dünyayı onarmamıza yardım ediyor! Katkıda bulunmak ister misiniz?
Çeviriye Başlayın ›

6Kılavuz Yorumları
Step 18
Is it really that "simple" to separate the midframe from the front of the phone? In most videos (even the one on ifixit) a suction cup is used (after warming the front) with some prying tools.
So, does Step 18 really work?
It appears that the front is hold together by only 4 adhesives in the corners. Are this damaged during the front removal process? (is there a replacement kit?)
Just another question, I damaged the heart sensor plastic cover, is it possible to buy just that part or do I need to buy a complete midframe?
Can this step be exactly with a simple push as stated? Other sources required focusing heat on the 4 corners and run through with a pick....?
Secondly, how can one avoid damaging the lamination under the glass while removing it or trying to get the first foothold with the pick. Most guides I have seen appear to skip this step.
I have seen one phone parts site (EtradeSupply) list all different variants of the mid housing (G920F, G920V, G920R etc). But another site (WitRigs) has just one, as if they aren't specific.
Does anyone know? Because i'm in Australia and can't find G920i variant.
Also, has anyone simply swapped over the antennas, and crimped them onto the new housing?
Ok Guys I am definitely !#^&@@ off right now.... but to the point.
Please Edit to this guide --> @Step 18:
First of all: Heat the for corners with your iOpener to lose the adhesive which sits in the corners.
Be very very gentle when you push down on the battery and try to put a little pressure onto or maybe into the headphone jack when you first encounter that the display gets lose, because the headphone-jack fits very well in the frame and holds on a little corner.
Only go around the whole display with a spudger when the adhesive is really warm to lose it when it doesn't come out as easy as you thought. Because otherwise you may face that the display to display-glass laminate gets damaged. That just happened to me at the upper display side... so to get a perfect new looking phone I have to replace that as well....EXPENSIVE :(
Hope this may help you guys.
but ... nevertheless ... thank you guys from IFixit for your continous effort to help people repairing there stuff - heads up :-)
Hi Jakob, thanks for your input! When writing this guide we used a device that had been previously disassembled, so our experience may have been different from yours. Just to be clear: you have an issue with step 18 because the adhesive between the midframe and front assembly is very strong and simply pushing the battery is not adequate? Are there other steps that need to be adjusted?
And, as a general note, you can edit this guide yourself! When you hover your cursor over any particular step, an "Edit" button will appear. Alternatively, you can scroll to the top of the page and click the "Edit" tab up there.