Ana içeriğe geç

Sharp Aquos Crystal Screen Replacement

Neye ihtiyacın var

  1. Sharp Aquos Crystal Screen Replacement, Back Panel: adım 1, 3 resimden 1. Sharp Aquos Crystal Screen Replacement, Back Panel: adım 1, 3 resimden 2. Sharp Aquos Crystal Screen Replacement, Back Panel: adım 1, 3 resimden 3.
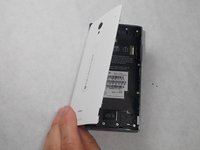
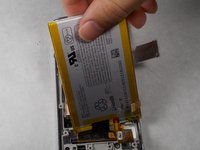
    • Peel back the back cover of the phone from the access point to remove it. It should come off easily using your hands.

  2. Sharp Aquos Crystal Screen Replacement, USB Port: adım 2, 2 resimden 1. Sharp Aquos Crystal Screen Replacement, USB Port: adım 2, 2 resimden 2.
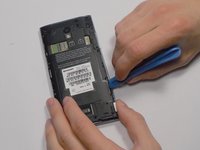
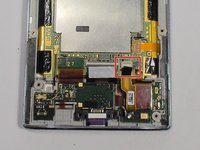
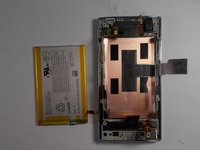
    • Remove seven 3mm Star #5 screws shown in the picture with a screwdriver.

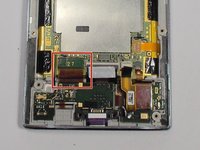
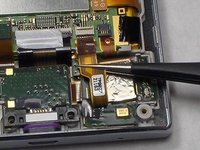
    • Remove two 3.5mm Star #5 screws shown in the picture with a screwdriver.

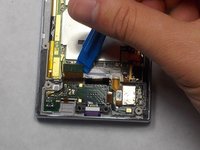
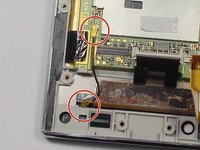
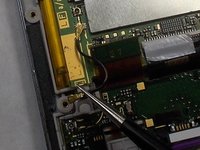
    • Remove two 5mm Star #5 screws shown in the picture with a screwdriver.

  3. Sharp Aquos Crystal Screen Replacement: adım 3, 2 resimden 1. Sharp Aquos Crystal Screen Replacement: adım 3, 2 resimden 2.
    • Pry open the back panel using a plastic opening tool. Do this around the edges until you are able to lift it off.

  4. Sharp Aquos Crystal Screen Replacement: adım 4, 2 resimden 1. Sharp Aquos Crystal Screen Replacement: adım 4, 2 resimden 2.
    • Disconnect the wire by lifting it up with a plastic opening tool.

  5. Sharp Aquos Crystal Screen Replacement: adım 5, 3 resimden 1. Sharp Aquos Crystal Screen Replacement: adım 5, 3 resimden 2. Sharp Aquos Crystal Screen Replacement: adım 5, 3 resimden 3.
    • To disconnect the cable, use the tip of a spudger or your fingernail to flip up the small retaining flap. Then, you can safely pull the ribbon cable out.

  6. Sharp Aquos Crystal Screen Replacement: adım 6, 1 resimden 1.
    • After removing the wires, carefully snap out the usb port with your hands. It is held down by some plastic clips, so some force may be needed.

  7. Sharp Aquos Crystal Screen Replacement, Motherboard: adım 7, 1 resimden 1.
    • Peel off the black pieces of tape.

  8. Sharp Aquos Crystal Screen Replacement: adım 8, 1 resimden 1.
    • Use the tip of a spudger or your fingernail to flip up the small retaining flap. Then pull the cable out using tweezers.

  9. Sharp Aquos Crystal Screen Replacement: adım 9, 2 resimden 1. Sharp Aquos Crystal Screen Replacement: adım 9, 2 resimden 2.
    • Remove the wire from the two marked connections using tweezers to pull the wire apart from the device.

  10. Sharp Aquos Crystal Screen Replacement: adım 10, 1 resimden 1.
    • Peel the tape off with your hands.

  11. Sharp Aquos Crystal Screen Replacement: adım 11, 1 resimden 1.
    • Lift the motherboard out with your hands.

  12. Sharp Aquos Crystal Screen Replacement, Battery: adım 12, 1 resimden 1.
    • Peel off the tape holding the battery down.

  13. Sharp Aquos Crystal Screen Replacement: adım 13, 2 resimden 1. Sharp Aquos Crystal Screen Replacement: adım 13, 2 resimden 2.
    • Lift the battery out with your hands.

  14. Sharp Aquos Crystal Screen Replacement, Screen: adım 14, 1 resimden 1.
    • Replace this component with the new one.

Sonuç

To reassemble your device, follow these instructions in reverse order.

2 farklı kişi bu kılavuzu tamamladı.

Felicia Imbriano

Üyelik tarihi: 03/08/16

1.169 İtibar

8 adet Kılavuz yazıldı

Ekip

UMass Dartmouth, Team 7-4, Catania Spring 2016 UMass Dartmouth, Team 7-4, Catania Spring 2016 üyesi

UMASSD-CATANIA-S16S7G4

3 Üyeler

24 adet Kılavuz yazıldı

Bir Yorum

Thanks! I did it!

Matteo Favero - Yanıt

Yorum Ekle

İstatistikleri Görüntüle:

Son 24 Saat: 1

Son 7 gün: 14

Son 30 gün: 58

Her zaman: 8,850