Ana içeriğe geç
Sony Alpha NEX-6 Control Wheel Replacement

Sony Alpha NEX-6 Control Wheel Replacement

Clayton Dale

Clayton Dale ve 3 diğer katkıda bulunanlar

En son May 7, 2024 tarihinde güncellendi

15 - 20 dakika
Orta

This guide will illustrate how to dis-assemble the back camera case to gain access the control wheel assembly. Then it will show how to replace the control wheel and adjacent soft keys.

Neye ihtiyacın var

Aletler

Daha fazlasını göster…

  1. Sony Alpha NEX-6 Control Wheel Replacement, Battery: adım 1, 1 resimden 1.
    • Prior to operating on this device, be sure the camera is turned OFF. With power, the camera can be a dangerous device to work with.

    • Turn the camera off by switching the power knob "OFF" text to the white selector dot.

  2. Sony Alpha NEX-6 Control Wheel Replacement: adım 2, 1 resimden 1.
    • Flip the camera upside-down and carefully place it on a flat surface.

    • With the lens facing outward, locate the battery compartment - indicated by a grooved latch.

    • Push the latch to the right to unlock the battery compartment. The door should flip upward.

  3. Sony Alpha NEX-6 Control Wheel Replacement: adım 3, 1 resimden 1.
    • With the compartment open, locate a blue tab shown with spudger

    • Press the tab to the side (to the left, or toward the camera wall). This will eject the camera battery.

  4. Sony Alpha NEX-6 Control Wheel Replacement, Battery compartment screws: adım 4, 1 resimden 1.
    • Remove the two 3.5mm Phillips #00 screws that hold the back case - located inside the battery compartment.

  5. Sony Alpha NEX-6 Control Wheel Replacement, Bottom screws: adım 5, 1 resimden 1.
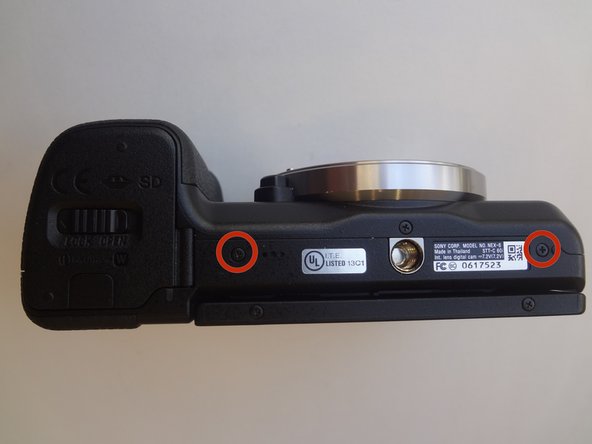
    • Remove the two 3.5mm Phillips #00 screws that hold the back case - located on the bottom of the camera.

  6. Sony Alpha NEX-6 Control Wheel Replacement, Side screws: adım 6, 1 resimden 1.
    • Remove the 3.5 mm Phillips #00 screw on the side of camera - located between the charging and HDMI ports.

    • Remove the 4.0 mm Phillips #00 screw on the side of the camera - located next to the WiFi sign.

  7. Sony Alpha NEX-6 Control Wheel Replacement, Dis-attaching procedure: adım 7, 2 resimden 1. Sony Alpha NEX-6 Control Wheel Replacement, Dis-attaching procedure: adım 7, 2 resimden 2.
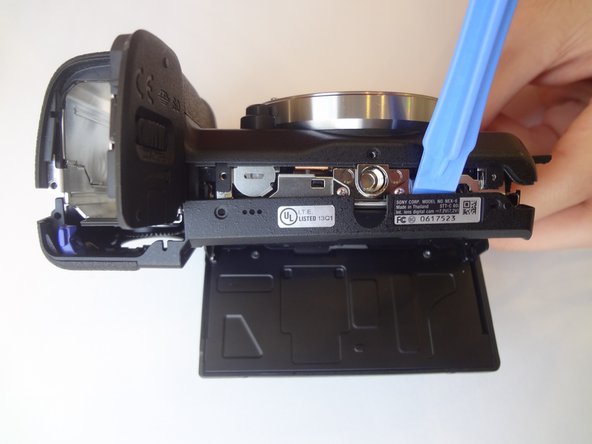
    • Starting with the battery compartment gently begin to separate the back case front the camera.

    • Using a plastic opening tool, separate the bottom of the back case from the camera. Then proceed by separating the sides.

    • Gently lift the back case away from the camera an slide it down to completely remove the back case.

  8. Sony Alpha NEX-6 Control Wheel Replacement, Control Wheel: adım 8, 2 resimden 1. Sony Alpha NEX-6 Control Wheel Replacement, Control Wheel: adım 8, 2 resimden 2.
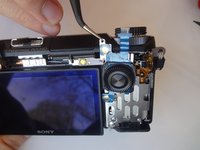
    • Pry out the ribbon cable by carefully pushing on its side tabs with a spudger.

  9. Sony Alpha NEX-6 Control Wheel Replacement, Control wheel romoval: adım 9, 2 resimden 1. Sony Alpha NEX-6 Control Wheel Replacement, Control wheel romoval: adım 9, 2 resimden 2.
    Bu adımda kullanılan alet:
    Tweezers
    $4.99
    • Using a spudger, lift the metal locking tab located at the top right corner of control wheel assembly.

    • Using tweezers, carefully slide the assembly up to release it.

Sonuç

To reassemble your device, follow these instructions in reverse order.

5 farklı kişi bu kılavuzu tamamladı.

Clayton Dale

Üyelik tarihi: 01/20/15

1.067 İtibar

7 adet Kılavuz yazıldı

Ekip

USF Tampa, Team 11-2, Blackwell Winter 2015 USF Tampa, Team 11-2, Blackwell Winter 2015 üyesi

USFT-BLACKWELL-W15S11G2

4 Üyeler

14 adet Kılavuz yazıldı

0 Yorum

Yorum Ekle

İstatistikleri Görüntüle:

Son 24 Saat: 0

Son 7 gün: 14

Son 30 gün: 39

Her zaman: 5,084