Ana içeriğe geç

Sony Cyber-Shot DSC-S90 LCD Display Replacement

Neye ihtiyacın var

  1. Sony Cyber-Shot DSC-S90 LCD Display Replacement, Batteries: adım 1, 2 resimden 1. Sony Cyber-Shot DSC-S90 LCD Display Replacement, Batteries: adım 1, 2 resimden 2.
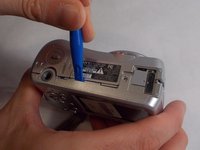
    • Hold down the "open"button (gray oval with arrow pointing upwards) on the battery port door.

    • While holding the button downwards, slide the door upwards to unlock and open the door.

  2. Sony Cyber-Shot DSC-S90 LCD Display Replacement: adım 2, 1 resimden 1.
    • Pull open the door and allow the batteries to fall out.

  3. Sony Cyber-Shot DSC-S90 LCD Display Replacement, Back Case: adım 3, 2 resimden 1. Sony Cyber-Shot DSC-S90 LCD Display Replacement, Back Case: adım 3, 2 resimden 2.
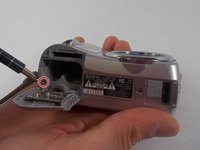
    • Remove the 2mm Phillips #00 screw under the battery port door.

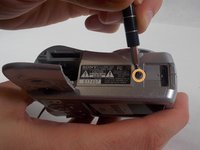
    • Remove the 2mm Phillips #00 screw towards the right of the bottom-side of the camera.

  4. Sony Cyber-Shot DSC-S90 LCD Display Replacement: adım 4, 2 resimden 1. Sony Cyber-Shot DSC-S90 LCD Display Replacement: adım 4, 2 resimden 2.
    • Remove the two 2mm Phillips #00 screws (one on each side of the camera).

  5. Sony Cyber-Shot DSC-S90 LCD Display Replacement: adım 5, 2 resimden 1. Sony Cyber-Shot DSC-S90 LCD Display Replacement: adım 5, 2 resimden 2.
    • Use an opening tool to unlock the front case from the main body of the camera. Use the tool on the right side and bottom of the camera with the LCD screen facing you.

  6. Sony Cyber-Shot DSC-S90 LCD Display Replacement: adım 6, 1 resimden 1.
    • Pull apart the back case from the main body of the camera.

  7. Sony Cyber-Shot DSC-S90 LCD Display Replacement, Front Case: adım 7, 1 resimden 1.
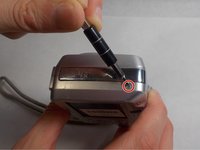
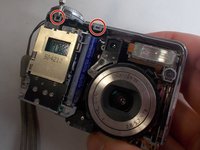
    • Use an opening tool to unlock the front case from the main body of the camera. Use the tool on the top of the camera.

  8. Sony Cyber-Shot DSC-S90 LCD Display Replacement: adım 8, 1 resimden 1.
    • Pull apart the front case from the main body of the camera.

  9. Sony Cyber-Shot DSC-S90 LCD Display Replacement, Top/Side Case: adım 9, 3 resimden 1. Sony Cyber-Shot DSC-S90 LCD Display Replacement, Top/Side Case: adım 9, 3 resimden 2. Sony Cyber-Shot DSC-S90 LCD Display Replacement, Top/Side Case: adım 9, 3 resimden 3.
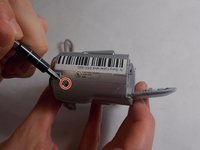
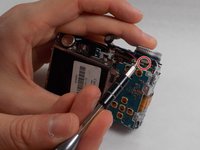
    • Release all clips and latches keeping the casing in place using a spudger, opening tool, or screwdriver.

  10. Sony Cyber-Shot DSC-S90 LCD Display Replacement: adım 10, 1 resimden 1.
    • Now the casing can be removed after all latches have been undone.

  11. Sony Cyber-Shot DSC-S90 LCD Display Replacement, Battery Terminal: adım 11, 3 resimden 1. Sony Cyber-Shot DSC-S90 LCD Display Replacement, Battery Terminal: adım 11, 3 resimden 2. Sony Cyber-Shot DSC-S90 LCD Display Replacement, Battery Terminal: adım 11, 3 resimden 3.
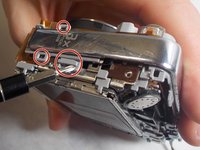
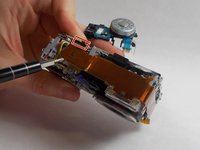
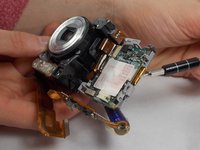
    • Disconnect the ribbon cables on top of the battery terminal using a spudger or screwdriver.

  12. Sony Cyber-Shot DSC-S90 LCD Display Replacement: adım 12, 1 resimden 1.
    • Disconnect the remaining ribbon cable on the side of the camera using a spudger or screwdriver.

  13. Sony Cyber-Shot DSC-S90 LCD Display Replacement: adım 13, 1 resimden 1.
    • Use a spudger or screwdriver to unhinge the clips. This releases the battery terminal.

  14. Sony Cyber-Shot DSC-S90 LCD Display Replacement: adım 14, 1 resimden 1.
    • Once the battery terminal is unclipped, pull this ribbon cable out with a spudger or screwdriver to finish freeing the battery terminal.

  15. Sony Cyber-Shot DSC-S90 LCD Display Replacement: adım 15, 1 resimden 1.
    • Now the battery terminal can be separated from the main body of the camera.

  16. Sony Cyber-Shot DSC-S90 LCD Display Replacement, Motherboard: adım 16, 3 resimden 1. Sony Cyber-Shot DSC-S90 LCD Display Replacement, Motherboard: adım 16, 3 resimden 2. Sony Cyber-Shot DSC-S90 LCD Display Replacement, Motherboard: adım 16, 3 resimden 3.
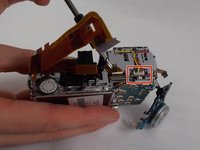
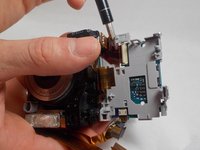
    • Disconnect the three pictured ribbon cables using a spudger or screwdriver.

  17. Sony Cyber-Shot DSC-S90 LCD Display Replacement: adım 17, 1 resimden 1.
    • Push the clip to the left and lift the motherboard upwards and away from the camera.

  18. Sony Cyber-Shot DSC-S90 LCD Display Replacement: adım 18, 2 resimden 1. Sony Cyber-Shot DSC-S90 LCD Display Replacement: adım 18, 2 resimden 2.
    • Disconnect the two ribbon cables using a spudger or screwdriver.

  19. Sony Cyber-Shot DSC-S90 LCD Display Replacement: adım 19, 1 resimden 1.
    • Unlatch the clip and lift the motherboard upwards and away from the camera.

  20. Sony Cyber-Shot DSC-S90 LCD Display Replacement, LCD Display: adım 20, 2 resimden 1. Sony Cyber-Shot DSC-S90 LCD Display Replacement, LCD Display: adım 20, 2 resimden 2.
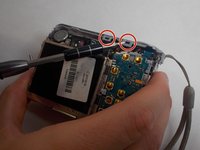
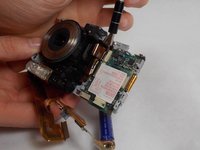
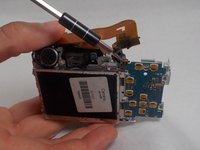
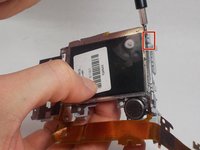
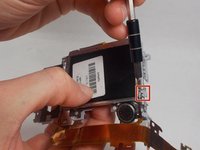
    • Unlatch the two clips holding the LCD display onto the main camera housing using a spudger.

  21. Sony Cyber-Shot DSC-S90 LCD Display Replacement: adım 21, 1 resimden 1.
    • Remove the LCD.

Sonuç

To reassemble your device, follow these instructions in reverse order.

Jonathan Arns

Üyelik tarihi: 10/28/19

745 İtibar

8 adet Kılavuz yazıldı

Ekip

UMass Dartmouth, Team S4-G5, Saloman Fall 2019 UMass Dartmouth, Team S4-G5, Saloman Fall 2019 üyesi

UMASSD-SALOMAN-F19S4G5

3 Üyeler

20 adet Kılavuz yazıldı

0 Yorum

Yorum Ekle

İstatistikleri Görüntüle:

Son 24 Saat: 0

Son 7 gün: 6

Son 30 gün: 13

Her zaman: 241