Ana içeriğe geç
Toshiba Satellite A105-S4284 Disc Drive Replacement

Toshiba Satellite A105-S4284 Disc Drive Replacement

pfedigan

pfedigan ve 8 diğer katkıda bulunanlar

En son May 14, 2023 tarihinde güncellendi

10 dakika
Orta
Daha iyi giriş

If your CDs or DVDs are not running correctly or at all on your computer, then it is either due to the disc drive being dirty, loose parts and/or broken. This guide will show the user how to safely remove the disc drive.

Neye ihtiyacın var

Aletler

Daha fazlasını göster…

  1. Toshiba Satellite A105-S4284 Disc Drive Replacement, Battery: adım 1, 2 resimden 1. Toshiba Satellite A105-S4284 Disc Drive Replacement, Battery: adım 1, 2 resimden 2.
    • Make sure your computer is turned off and the computer is not plugged in.

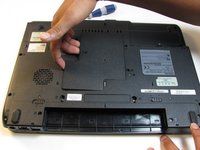
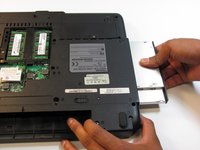
    • Turn your laptop upside down, and slide the right release tab outward.

    • Using you left hand, hold the left release tab towards the left side and then pull the battery out.

  2. Toshiba Satellite A105-S4284 Disc Drive Replacement, Disc Drive: adım 2, 2 resimden 1. Toshiba Satellite A105-S4284 Disc Drive Replacement, Disc Drive: adım 2, 2 resimden 2.
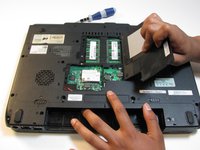
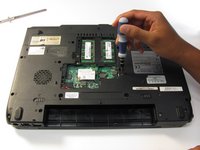
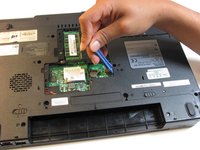
    • Loosen the screw located on the cover of the RAM using Phillips #1 screwdriver.

    • You will not be able to remove the screw from the panel as it is designed to stay in the panel.

  3. Toshiba Satellite A105-S4284 Disc Drive Replacement: adım 3, 2 resimden 1. Toshiba Satellite A105-S4284 Disc Drive Replacement: adım 3, 2 resimden 2.
    • With your fingers, carefully remove the middle panel by lifting the edge with the indent.

  4. Toshiba Satellite A105-S4284 Disc Drive Replacement: adım 4, 2 resimden 1. Toshiba Satellite A105-S4284 Disc Drive Replacement: adım 4, 2 resimden 2.
    • Remove the 4.0 mm screw above the small metal tab with a Phillips 00 screwdriver.

  5. Toshiba Satellite A105-S4284 Disc Drive Replacement: adım 5, 2 resimden 1. Toshiba Satellite A105-S4284 Disc Drive Replacement: adım 5, 2 resimden 2.
    • Push down on the metal tab under the cover with the plastic opening tool and push the disc drive partially out.

    • Grab the drive and pull it out of the laptop.

Sonuç

To reassemble your device, follow these instructions in reverse order.

pfedigan

Üyelik tarihi: 04/12/13

11 İtibar

4 adet Kılavuz yazıldı

Ekip

Cal Poly, Team 2-23, Maness Spring 2013 Cal Poly, Team 2-23, Maness Spring 2013 üyesi

CPSU-MANESS-S13S2G23

4 Üyeler

13 adet Kılavuz yazıldı

0 Yorum

Yorum Ekle

İstatistikleri Görüntüle:

Son 24 Saat: 0

Son 7 gün: 0

Son 30 gün: 24

Her zaman: 909