Ana içeriğe geç

Toshiba Satellite CL15t-B1204X Power Connector Replacement

Neye ihtiyacın var

  1. Toshiba Satellite CL15t-B1204X Power Connector Replacement, Battery: adım 1, 1 resimden 1.
    • Flip the laptop over so the bottom of the device is facing upward.

  2. Toshiba Satellite CL15t-B1204X Power Connector Replacement: adım 2, 1 resimden 1.
    • Unscrew the 10 5mm Phillips screws, located on the bottom side of the notebook using the PH1 bit and the Magnetic Driver.

  3. Toshiba Satellite CL15t-B1204X Power Connector Replacement: adım 3, 1 resimden 1.
    • Pry open the bottom cover of the notebook with the plastic spudger tools. Slide a thin tool along the edges without ports to pop open the latches.

    • Be careful not to bend or crack the plastic back cover.

  4. Toshiba Satellite CL15t-B1204X Power Connector Replacement: adım 4, 1 resimden 1.
    • Remove the 1" yellow tape on top of the battery. This piece of tape is holding down the battery connection cable.

  5. Toshiba Satellite CL15t-B1204X Power Connector Replacement: adım 5, 1 resimden 1.
    • Lightly grip the battery on the two longest sides. Gently pull up until the adhesive on the notebook is separated from the battery.

  6. Toshiba Satellite CL15t-B1204X Power Connector Replacement: adım 6, 1 resimden 1.
    • Carefully unplug the battery from the device motherboard.

  7. Toshiba Satellite CL15t-B1204X Power Connector Replacement, Power Connector: adım 7, 3 resimden 1. Toshiba Satellite CL15t-B1204X Power Connector Replacement, Power Connector: adım 7, 3 resimden 2. Toshiba Satellite CL15t-B1204X Power Connector Replacement, Power Connector: adım 7, 3 resimden 3.
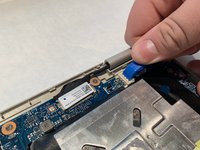
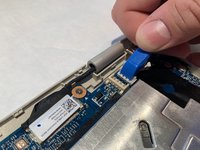
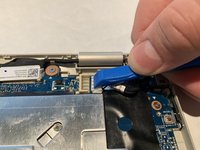
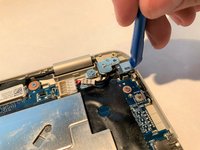
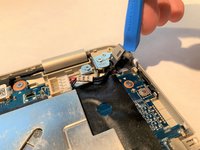
    • Disconnect the charging connector from the motherboard using the blue iFixIt opening tool by sliding it away from the connector.

  8. Toshiba Satellite CL15t-B1204X Power Connector Replacement: adım 8, 3 resimden 1. Toshiba Satellite CL15t-B1204X Power Connector Replacement: adım 8, 3 resimden 2. Toshiba Satellite CL15t-B1204X Power Connector Replacement: adım 8, 3 resimden 3.
    • Pry the power connector upwards from the side of the laptop using the opening tool, then remove the part from the laptop.

Sonuç

To reassemble your device, follow these instructions in reverse order.

Bir başkası bu kılavuzu tamamladı.

Matthew Hook

Üyelik tarihi: 03/25/19

439 İtibar

4 adet Kılavuz yazıldı

Ekip

IUPUI, Team S1-G6, Hovde Fall 2019 IUPUI, Team S1-G6, Hovde Fall 2019 üyesi

IUPUI-HOVDE-F19S1G6

4 Üyeler

6 adet Kılavuz yazıldı

0 Yorum

Yorum Ekle

İstatistikleri Görüntüle:

Son 24 Saat: 0

Son 7 gün: 3

Son 30 gün: 5

Her zaman: 277