Ana içeriğe geç
Toshiba Satellite L655D-S5095 Keyboard Replacement

Toshiba Satellite L655D-S5095 Keyboard Replacement

Jerry Wakai

Jerry Wakai ve 7 diğer katkıda bulunanlar

En son July 19, 2021 tarihinde güncellendi

5 - 7 dakika
Kolay
Daha Fazla Görsel Gerekli

Replacing the keyboard is an intermediate level repair. Following the instructions carefully will help you successfully replace your keyboard.

Neye ihtiyacın var

Aletler

  1. Toshiba Satellite L655D-S5095 Keyboard Replacement, Battery: adım 1, 3 resimden 1. Toshiba Satellite L655D-S5095 Keyboard Replacement, Battery: adım 1, 3 resimden 2. Toshiba Satellite L655D-S5095 Keyboard Replacement, Battery: adım 1, 3 resimden 3.
    • Locate the battery locks on the bottom of the laptop.

    • Slide the right lock outwards, until it locks into place.

    • Slide and hold the left lock outwards and hold it in place.

  2. Toshiba Satellite L655D-S5095 Keyboard Replacement: adım 2, 1 resimden 1.
    • While holding the lock in place, slide the battery out towards you.

  3. Toshiba Satellite L655D-S5095 Keyboard Replacement, Keyboard: adım 3, 1 resimden 1.
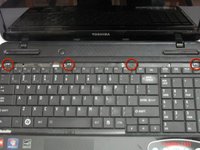
    • Using a #1 Phillips screwdriver, remove the 5.8 mm screw in the battery slot.

  4. Toshiba Satellite L655D-S5095 Keyboard Replacement: adım 4, 1 resimden 1.
    • Use a plastic opening tool to pry off the plastic panel above the keyboard.

  5. Toshiba Satellite L655D-S5095 Keyboard Replacement: adım 5, 2 resimden 1. Toshiba Satellite L655D-S5095 Keyboard Replacement: adım 5, 2 resimden 2.
    • Unscrew the four 3.7 mm screws at the top of the keyboard using a #1 Phillips screwdriver.

  6. Toshiba Satellite L655D-S5095 Keyboard Replacement: adım 6, 1 resimden 1.
    • Slowly lift the keyboard out, up and towards the screen.

    • Do not try to remove the keyboard completely because it is still attached to the motherboard.

  7. Toshiba Satellite L655D-S5095 Keyboard Replacement: adım 7, 1 resimden 1.
    • Using a plastic opening tool, flip the ZIF connector up to release the ribbon and the keyboard.

Sonuç

To reassemble your device, follow these instructions in reverse order.

5 farklı kişi bu kılavuzu tamamladı.

Jerry Wakai

Üyelik tarihi: 01/31/13

377 İtibar

4 adet Kılavuz yazıldı

Ekip

Cal Poly, Team 7-7, Maness Winter 2013 Cal Poly, Team 7-7, Maness Winter 2013 üyesi

CPSU-MANESS-W13S7G7

5 Üyeler

6 adet Kılavuz yazıldı

2 Yorum

Nice little guide. The only thing I can really think to add would be on the last part for those of us who are super-paranoid about breaking something. If you could add a picture of what the ZIF connector looks like after it's opened would help some.

I appreciate the guide, thanks. :)

Christopher Tidwell - Yanıt

Ditto on all of it. I think I broke my ZIF connector !! Help!! 😔

salirizz67@gmail.com -

Yorum Ekle

İstatistikleri Görüntüle:

Son 24 Saat: 17

Son 7 gün: 19

Son 30 gün: 23

Her zaman: 5,020