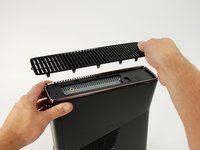
Ana içeriğe geç

Xbox 360 S Top Panel Replacement

Neye ihtiyacın var

  1. Xbox 360 S Top Panel Replacement, Top Panel: adım 1, 1 resimden 1.
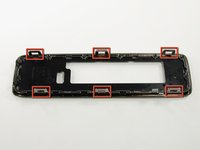
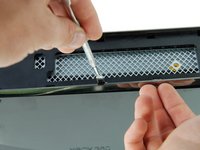
    • In the following steps, you will remove the top vent, secured to the top panel by the thirteen clips shown.

    • Take care when removing the fan vent not to break any of the plastic clips.

  2. Xbox 360 S Top Panel Replacement: adım 2, 2 resimden 1. Xbox 360 S Top Panel Replacement: adım 2, 2 resimden 2.
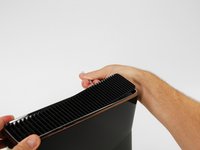
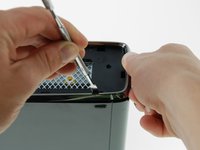
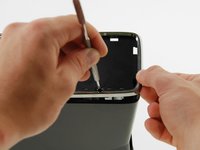
    • Orient the console so that the words "XBOX 360" on the sides are right-side up, and the faceplate is facing to the left.

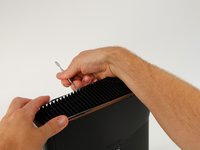
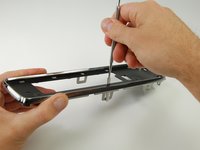
    • Insert a metal spudger between the top vent and the top bezel near the rear of the Xbox.

    • Rotate the spudger away from the console, prying the edge of the fan vent up until the two plastic clips come free.

    • Be sure to rotate the spudger far enough so that the plastic clips clear the silver rim of the top bezel.

  3. Xbox 360 S Top Panel Replacement: adım 3, 3 resimden 1. Xbox 360 S Top Panel Replacement: adım 3, 3 resimden 2. Xbox 360 S Top Panel Replacement: adım 3, 3 resimden 3.
    • Insert a metal spudger between the fan vent and top bezel along the left side of the console.

    • In the same manner described above, begin prying the left side of the top vent away from the top bezel.

    • Continue prying along the left side of the device, freeing all the clips on that side.

  4. Xbox 360 S Top Panel Replacement: adım 4, 2 resimden 1. Xbox 360 S Top Panel Replacement: adım 4, 2 resimden 2.
    • Lift the fan vent up from the freed left side to disengage the clips along the right side.

    • Remove the entire fan vent.

  5. Xbox 360 S Top Panel Replacement: adım 5, 2 resimden 1. Xbox 360 S Top Panel Replacement: adım 5, 2 resimden 2.
    • In the following steps, you will be releasing the six clips highlighted in red.

    • Each clip can be undone by inserting a metal spudger underneath the bottom edge of the clip. Once underneath the bottom edge, simply prying away from the console will free the clip.

  6. Xbox 360 S Top Panel Replacement: adım 6, 2 resimden 1. Xbox 360 S Top Panel Replacement: adım 6, 2 resimden 2.
    • Orient the console so that the left case is facing toward you and the faceplate is facing toward the right.

    • Insert a metal spudger through the front-most slit on the left edge of the top bezel and between the bottom edge of the clip and the left case, as described above.

    • Simultaneously rotate the spudger away from the console and pull up on the top bezel to free the clip.

    • You will hear a "pop" signifying that the clip cleared its catch.

  7. Xbox 360 S Top Panel Replacement: adım 7, 2 resimden 1. Xbox 360 S Top Panel Replacement: adım 7, 2 resimden 2.
    • Using the same method described above, free the two remaining clips along the left edge of the top bezel.

  8. Xbox 360 S Top Panel Replacement: adım 8, 1 resimden 1.
    • Grab the entire top panel with your hands, lift up the entire left edge high enough to rest the separated clips on top of the left case.

    • You may have to go back with a spudger and undo any clips that have re-attached.

    • The top panel will not come free of the console yet.

  9. Xbox 360 S Top Panel Replacement: adım 9, 2 resimden 1. Xbox 360 S Top Panel Replacement: adım 9, 2 resimden 2.
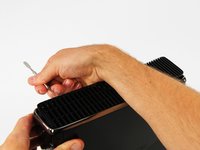
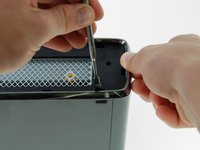
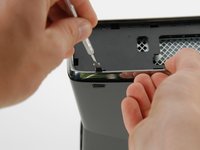
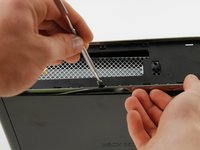
    • Rotate the console so that the rear of the Xbox 360 S is facing to the right, and the right case is facing you.

    • Insert a metal spudger through the rear-most slit on the right edge of the top bezel and between the bottom edge of the clip and the right case.

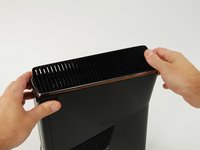
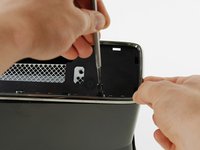
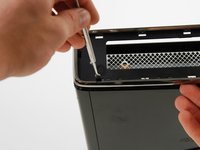
    • While lifting up on the top bezel with your fingers, rotate the spudger away from the console to free the clip.

  10. Xbox 360 S Top Panel Replacement: adım 10, 2 resimden 1. Xbox 360 S Top Panel Replacement: adım 10, 2 resimden 2.
    • In the same manner as described in the previous steps, release the middle and front clips along the right edge of the top panel.

  11. Xbox 360 S Top Panel Replacement: adım 11, 1 resimden 1.
    • Lift the top panel off the device.

    • You may have to go back with a spudger and undo any clips that have re-attached to the console.

Sonuç

To reassemble your device, follow these instructions in reverse order.

23 farklı kişi bu kılavuzu tamamladı.

Brett Hartt

Üyelik tarihi: 04/12/10

127.749 İtibar

143 adet Kılavuz yazıldı

Ekip

iFixit iFixit üyesi

Staff

136 Üyeler

16.560 adet Kılavuz yazıldı

0 Yorum

Yorum Ekle

İstatistikleri Görüntüle:

Son 24 Saat: 0

Son 7 gün: 9

Son 30 gün: 54

Her zaman: 19,153