Ana içeriğe geç

Xbox One Wireless Controller Model 1708 Top Motherboard Replacement

Neye ihtiyacın var

  1. Xbox One Wireless Controller Model 1708 Top Motherboard Replacement, Cover Plate: adım 1, 2 resimden 1. Xbox One Wireless Controller Model 1708 Top Motherboard Replacement, Cover Plate: adım 1, 2 resimden 2.
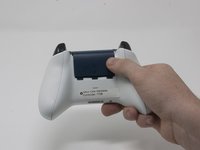
    • Slide the battery cover toward the top of the controller to remove it.

    • Lift up the batteries or the battery pack from the battery compartment.

  2. Xbox One Wireless Controller Model 1708 Top Motherboard Replacement: adım 2, 2 resimden 1. Xbox One Wireless Controller Model 1708 Top Motherboard Replacement: adım 2, 2 resimden 2.
    • Insert a plastic opening tool into the top seam, and gently work the opening tool to the bottom of the controller.

    • Continue using the opening tool to gently pry the side plate off of the controller.

    • Repeat this process for the second side plate.

  3. Xbox One Wireless Controller Model 1708 Top Motherboard Replacement: adım 3, 1 resimden 1.
    • Gently peel the battery label or punch a hole in the center of the sticker in the battery compartment to reveal the hidden screw.

    • Remove the five 9mm torx-9 security screws from the back of the controller.

  4. Xbox One Wireless Controller Model 1708 Top Motherboard Replacement, Tape Shock Motors in place: adım 4, 3 resimden 1. Xbox One Wireless Controller Model 1708 Top Motherboard Replacement, Tape Shock Motors in place: adım 4, 3 resimden 2. Xbox One Wireless Controller Model 1708 Top Motherboard Replacement, Tape Shock Motors in place: adım 4, 3 resimden 3.
    • Tape the Rumbler/shock motors in place.

    • This will prevent the motors from falling out.

  5. Xbox One Wireless Controller Model 1708 Top Motherboard Replacement: adım 5, 2 resimden 1. Xbox One Wireless Controller Model 1708 Top Motherboard Replacement: adım 5, 2 resimden 2.
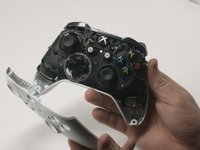
    • Orient the controller so the front plate is facing up.

    • Lift the front cover off of the controller.
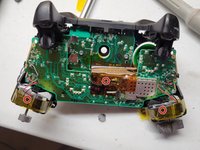
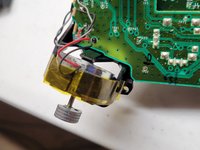
  6. Xbox One Wireless Controller Model 1708 Top Motherboard Replacement: adım 6, 1 resimden 1.
    • Turn the controller face down and gently lift the rear plate.

    • Be careful with the rumble motors, as they tend to fall out, risking damage to the motherboard.

  7. Xbox One Wireless Controller Model 1708 Top Motherboard Replacement, Directional Pad: adım 7, 1 resimden 1.
    • Turn the device over and remove the directional pad by gently pulling it away from the controller.

  8. Xbox One Wireless Controller Model 1708 Top Motherboard Replacement, Joystick Caps: adım 8, 1 resimden 1.
    • Pull the joysticks off of the controller.

  9. Xbox One Wireless Controller Model 1708 Top Motherboard Replacement, Top Motherboard: adım 9, 1 resimden 1.
    • If the rumble motors fall out of frame, the wires may disconnect from the motherboard . The wires will have to be soldered to reattach the motor.

    • Turn the device over and remove the two 7mm torx-6 screws in the bottom left and right corners.

  10. Xbox One Wireless Controller Model 1708 Top Motherboard Replacement, De-soldering required: adım 10, 3 resimden 1. Xbox One Wireless Controller Model 1708 Top Motherboard Replacement, De-soldering required: adım 10, 3 resimden 2. Xbox One Wireless Controller Model 1708 Top Motherboard Replacement, De-soldering required: adım 10, 3 resimden 3.
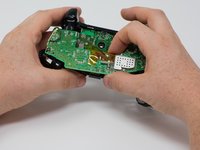
    • Firmly grasp the top and bottom motherboards in opposite hands, then gently pull them apart.

    • The top motherboard is still connected to the bottom motherboard. To fully separate the top motherboard, you will need to use a soldering iron.

    • Warning: Do not attempt to disconnect the shielded (gold colored) connector as it is extremely fragile you will break it. It runs between the two boards.

    • De-solder the shielded cable from the lower board instead of attempting to disconnect the connector. De-solder using micro soldering techniquest.

Sonuç

To reassemble your device, follow these instructions in reverse order.

20 farklı kişi bu kılavuzu tamamladı.

Lien (Ally) Quan

Üyelik tarihi: 09/25/17

915 İtibar

1 Kılavuz yazıldı

Ekip

Cal Poly, Team S18-G3, Forte Fall 2017 Cal Poly, Team S18-G3, Forte Fall 2017 üyesi

CPSU-FORTE-F17S18G3

4 Üyeler

32 adet Kılavuz yazıldı

0 Yorum

Yorum Ekle

İstatistikleri Görüntüle:

Son 24 Saat: 13

Son 7 gün: 69

Son 30 gün: 357

Her zaman: 24,616