Bu sürüm, hatalı düzenlemeler içerebilir. En son doğrulanmış bellek kopyası dönün.
Neye ihtiyacın var
-
Bu adım çevrilmemiş. Çevrilmesine yardım edin
-
Loosen the single Phillips screw in the center of the access door.
-
Remove the access door from your iMac.
-
-
Bu adım çevrilmemiş. Çevrilmesine yardım edin
-
Stick two suction cups to opposing corners of the glass panel.
-
-
Bu adım çevrilmemiş. Çevrilmesine yardım edin
-
Remove the following 12 screws securing the front bezel to the rear case:
-
Eight 13 mm T8 Torx.
-
Four 25 mm T8 Torx.
-
-
Bu adım çevrilmemiş. Çevrilmesine yardım edin
-
Place your hands at the top corners of the bezel (to the side) and lift the bezel 2-3cm from the body by working from the top. After this you can also disengage the bottom of the bezel (the memory modules will prevent the bottom of the bezel to detach first). When reassembling, start with the bottom of the bezel.
-
To fully detach the bezel: disconnect the microphone cable connector, removing tape as necessary.
-
To keep it attached, leave the microphone cable attached to the logic board, and place the bezel 'above' the chassis, with the microphone cable forming a hinge.
-
-
Bu adım çevrilmemiş. Çevrilmesine yardım edin
-
be sure to tuck the microphone cable and connector into the void next to the camera board.
-
Gently guide the microphone connector and cables through the ±1in long slot at the right of the iSight camera. Once the bezel is properly assembled, gently push the microphone connector and cable into the bezel through that slot.
-
-
Bu adım çevrilmemiş. Çevrilmesine yardım edin
-
Pull the LCD temperature sensor connector straight up out of its socket on the logic board.
-
If necessary, de-route the LCD temperature sensor cable from behind the logic board.
-
-
Bu adım çevrilmemiş. Çevrilmesine yardım edin
-
Remove the two 5.3 mm T6 Torx screws securing the data display cable to the logic board.
-
-
Bu adım çevrilmemiş. Çevrilmesine yardım edin
-
Use the attached black tab to pull the data display cable connector away from the logic board.
-
-
Bu adım çevrilmemiş. Çevrilmesine yardım edin
-
Remove the eight 12 mm T8 Torx screws securing the display panel to the rear case.
-
Lift the display panel from its left edge and rotate it toward the right edge of the iMac.
-
-
Bu adım çevrilmemiş. Çevrilmesine yardım edin
-
With the display panel still lifted, disconnect the four inverter cables.
-
If you are replacing a hard drive and have an extra set of hands, it is possible to reach in and remove the drive without disconnecting anything but the LCD temp and display connector in the previous step with the LCD in its propped position.
-
-
Bu adım çevrilmemiş. Çevrilmesine yardım edin
-
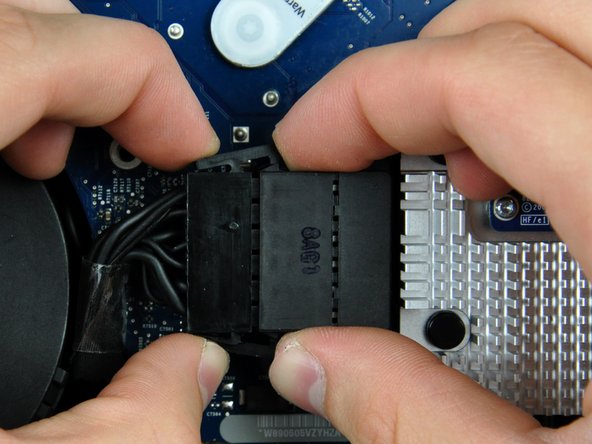
Disconnect the left speaker cable connector from the audio board by pulling it straight away from its socket.
-
-
Bu adım çevrilmemiş. Çevrilmesine yardım edin
-
De-route the left speaker cable from the channel in the CPU fan. Continue completely de-routing the cable through the undersides of the IR board and heat sink.
-
-
Bu adım çevrilmemiş. Çevrilmesine yardım edin
-
Disconnect the ambient temperature sensor cable by pulling its connector straight up off the logic board.
-
-
-
Bu adım çevrilmemiş. Çevrilmesine yardım edin
-
If necessary, de-route the ambient temperature sensor cable from under the power button cables.
-
-
Bu adım çevrilmemiş. Çevrilmesine yardım edin
-
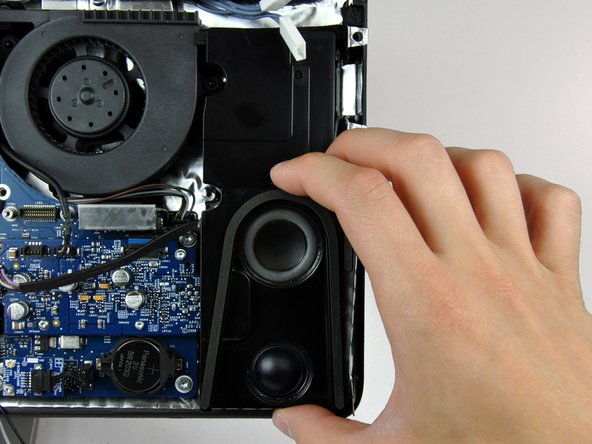
Remove the single 28 mm T10 Torx screw securing the left speaker to the rear case.
-
Lift the left speaker up and out of the rear case. Don't try to slide the speaker out, since there is a plastic mounting pin under the top end of the speaker housing that holds it in place.
-
-
Bu adım çevrilmemiş. Çevrilmesine yardım edin
-
Disconnect the power button and CPU fan by lifting their connectors straight up off the logic board.
-
-
Bu adım çevrilmemiş. Çevrilmesine yardım edin
-
Disconnect the SATA data cable from the logic board by carefully pulling it straight away from its socket.
-
-
Bu adım çevrilmemiş. Çevrilmesine yardım edin
-
Pull the SATA data cable out of its channel in the logic board and tuck it aside near the left edge of the rear case.
-
-
Bu adım çevrilmemiş. Çevrilmesine yardım edin
-
Disconnect the DC-in cable by simultaneously depressing both locking arms and pulling its connector away from the socket on the logic board.
-
-
Bu adım çevrilmemiş. Çevrilmesine yardım edin
-
Use the flat end of a spudger to pry both AirPort antenna connectors up off the AirPort card.
-
-
Bu adım çevrilmemiş. Çevrilmesine yardım edin
-
Move both AirPort antennas toward the lower edge of your iMac, out of the way of the logic board.
-
-
Bu adım çevrilmemiş. Çevrilmesine yardım edin
-
Use the flat end of a spudger to pry the Bluetooth antenna connector up off the Bluetooth board.
-
-
Bu adım çevrilmemiş. Çevrilmesine yardım edin
-
Pull the camera cable connector straight up out of its socket on the logic board.
-
-
Bu adım çevrilmemiş. Çevrilmesine yardım edin
-
Pull the right speaker cable connector straight up out of its socket on the audio board.
-
-
Bu adım çevrilmemiş. Çevrilmesine yardım edin
-
Remove the single 12 mm T10 Torx screw securing the right speaker to the rear case.
-
Lift the right speaker up and out of the rear case, to clear the plastic mounting pins underneath it.
-
-
Bu adım çevrilmemiş. Çevrilmesine yardım edin
-
Lift the optical drive fan connector straight up out of its socket on the logic board.
-
-
Bu adım çevrilmemiş. Çevrilmesine yardım edin
-
Use the flat end of a spudger to pry the optical drive cable clip up off the optical drive connector.
-
Lift the optical drive cable clip off the logic board.
-
-
Bu adım çevrilmemiş. Çevrilmesine yardım edin
-
Push the optical drive cable connector toward the top of your iMac to disconnect it from the logic board.
-
-
Bu adım çevrilmemiş. Çevrilmesine yardım edin
-
Lift the microphone cable connector straight up out of its socket on the audio board.
-
-
Bu adım çevrilmemiş. Çevrilmesine yardım edin
-
If necessary, remove the piece of tape securing the thermal sensor and fan cables to the chassis.
-
-
Bu adım çevrilmemiş. Çevrilmesine yardım edin
-
Disconnect the following three cables from the logic board:
-
Hard drive thermal sensor.
-
Optical drive thermal sensor.
-
Hard drive fan.
-
-
Bu adım çevrilmemiş. Çevrilmesine yardım edin
-
Remove the following 13 screws securing the logic board to the rear case:
-
Six 7.2 mm coarse-thread T10 Torx.
-
Two 6.8 mm T8 Torx. When reinstalling these two screws, don't overtighten them, as the plastic tabs they hold down are thin and brittle, and can crack.
-
Three 7 mm fine-thread T10 Torx.
-
Two 24 mm T10 Torx.
-
-
Bu adım çevrilmemiş. Çevrilmesine yardım edin
-
Lift the logic board out of the rear case, minding any cables that may get caught.
-
-
Bu adım çevrilmemiş. Çevrilmesine yardım edin
-
Disconnect the video card thermal sensor by pulling its connector away from the socket on the logic board.
-
-
Bu adım çevrilmemiş. Çevrilmesine yardım edin
-
Remove the two 5 mm T8 Torx screws securing the video card to the framework on the logic board.
-
-
Bu adım çevrilmemiş. Çevrilmesine yardım edin
-
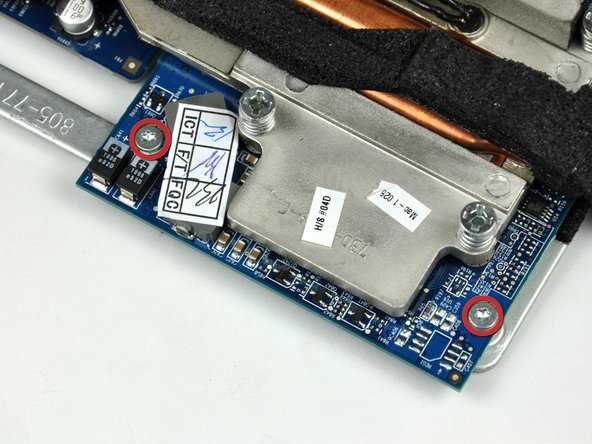
Remove the 4.3 mm T8 Torx screw securing the video card heat sink to the framework attached to the logic board.
-
-
Bu adım çevrilmemiş. Çevrilmesine yardım edin
-
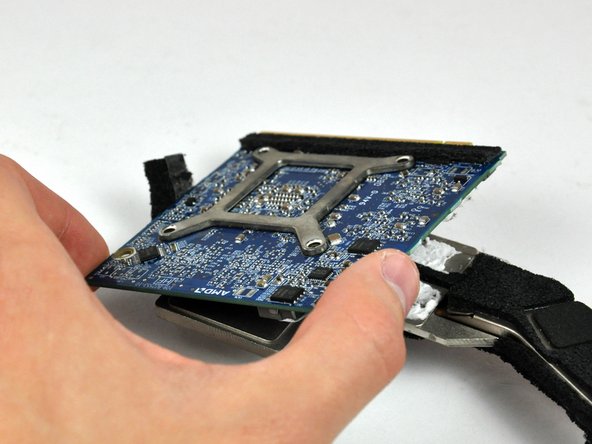
Gently lift the video card assembly from its top edge and rotate it slightly toward the center of the logic board.
-
Pull the video card away from its socket on the logic board.
-
-
Bu adım çevrilmemiş. Çevrilmesine yardım edin
-
Remove the four 7.5 mm T10 Torx screws securing the heat sink to the video card.
-
-
Bu adım çevrilmemiş. Çevrilmesine yardım edin
-
Gently lift the video card off the video card heat sink.
-
-
Bu adım çevrilmemiş. Çevrilmesine yardım edin
-
Video card remains.
-
Be sure to apply a new layer of thermal paste to the face of the graphics processor (shown in red).
-


İptal et: Bu kılavuzu tamamlamadım.
107 farklı kişi bu kılavuzu tamamladı.

18 Yorum
What video/graphics card can I upgrade to from a ATI Mobility Radeon HD 2600 XT? I have a 2008 EMC 2210 iMac and would like upgrade my video/graphics card but I don't know how high of a upgrade is possible!?
please which card should i buy to replace my old one?
which card should we buy for a early 2008 imac? and how do you put it all back together ?
No its the iMac model.