Bu sürüm, hatalı düzenlemeler içerebilir. En son doğrulanmış bellek kopyası dönün.
Neye ihtiyacın var
-
Bu adım çevrilmemiş. Çevrilmesine yardım edin
-
With the hinge free to move, the iMac will be unbalanced and hard to work on. Repairs can be completed with the iMac laying down, but are faster and easier with an iMac service wedge.
-
If you are using the iFixit cardboard service wedge, follow these assembly directions to put it together.
-
-
Bu adım çevrilmemiş. Çevrilmesine yardım edin
-
Starting on the left of the display, near the power button, insert the iMac Opening Tool into the gap between the glass panel and the rear case.
-
-
Bu adım çevrilmemiş. Çevrilmesine yardım edin
-
Use the tool like a pizza cutter—roll it along through the gap, and it will cut the foam adhesive through the center.
-
Run the tool up along the left side of the display.
-
-
Bu adım çevrilmemiş. Çevrilmesine yardım edin
-
Continue wheeling the tool up around the top left corner.
-
-
Bu adım çevrilmemiş. Çevrilmesine yardım edin
-
Push the tool around the top right corner of the display.
-
-
Bu adım çevrilmemiş. Çevrilmesine yardım edin
-
Wheel the tool down along the right side of the display.
-
-
Bu adım çevrilmemiş. Çevrilmesine yardım edin
-
Finish pushing the opening tool to the bottom of the right side of the display.
-
-
Bu adım çevrilmemiş. Çevrilmesine yardım edin
-
Set the iMac face-up on a table.
-
Starting from the top right corner of the iMac, insert a plastic card between the display and frame.
-
-
Bu adım çevrilmemiş. Çevrilmesine yardım edin
-
Gently twist the plastic card to open the space between the display and frame, and cut any remaining adhesive near the corner.
-
-
Bu adım çevrilmemiş. Çevrilmesine yardım edin
-
Slide the card toward the center of the display, to cut any remaining adhesive.
-
-
Bu adım çevrilmemiş. Çevrilmesine yardım edin
-
Put the card into the corner again and let it stay there to keep the adhesive from resettling.
-
-
-
Bu adım çevrilmemiş. Çevrilmesine yardım edin
-
Insert a second card into the gap between the display and frame in the top left corner.
-
-
Bu adım çevrilmemiş. Çevrilmesine yardım edin
-
Gently twist the card, slightly increasing the space between the display and frame.
-
-
Bu adım çevrilmemiş. Çevrilmesine yardım edin
-
Slide the plastic card toward the center, again stopping just before the iSight camera.
-
-
Bu adım çevrilmemiş. Çevrilmesine yardım edin
-
With the cards inserted as shown near the corners, gently twist the cards to increase the gap between display and case.
-
If there are any sections that seem to stick and won't separate, stop twisting and use one of the cards to cut the adhesive in the problem area.
-
Begin to lift the top of the display up from the frame.
-
-
Bu adım çevrilmemiş. Çevrilmesine yardım edin
-
While holding the display up with one hand, use the other to unplug the display power cable.
-
-
Bu adım çevrilmemiş. Çevrilmesine yardım edin
-
Flip up the metal retaining bracket on the display data cable.
-
Disconnect the display data cable.
-
-
Bu adım çevrilmemiş. Çevrilmesine yardım edin
-
Lift the display up to a near-vertical position.
-
Remove as much of the adhesive as possible by grabbing it at the outer edges, and then pulling or rolling it towards the middle.
-
-
Bu adım çevrilmemiş. Çevrilmesine yardım edin
-
If necessary, a plastic card can be used to cut any remaining sections of the bottom adhesive strip.
-
-
Bu adım çevrilmemiş. Çevrilmesine yardım edin
-
Lift the display up from the frame and remove it from the iMac. Lay the display face down on a flat, soft surface.
-
It may be necessary to slowly lift from one side, to peel against the remaining adhesive.
-
-
Bu adım çevrilmemiş. Çevrilmesine yardım edin
-
If there is a wire or cable underneath adhesive tape, always pull the tape off first.
-
If the cable is glued to the chassis, use a heated iOpener or a hair dryer to soften the adhesive first. You can then slide an opening pick underneath the cable to loosen it. Never pull directly on the delicate connectors.
-
Slide an opening pick underneath the foam cushion pieces to separate them from the display, and gently pull them off. You may need some double sided tape to re-attach them to the new display.
-
-
Bu adım çevrilmemiş. Çevrilmesine yardım edin
-
Use a T10 driver to remove the two 10 mm screws securing the left speaker.
-
-
Bu adım çevrilmemiş. Çevrilmesine yardım edin
-
Shift the loosened left speaker to the left—enough to uncover the hard drive bracket screws.
-
-
Bu adım çevrilmemiş. Çevrilmesine yardım edin
-
Pull straight up on the SATA combo cable to disconnect it from the drive.
-
-
Bu adım çevrilmemiş. Çevrilmesine yardım edin
-
Use a T8 driver to remove the two 7.3 mm screws securing the left hard drive bracket to the rear case.
-
-
Bu adım çevrilmemiş. Çevrilmesine yardım edin
-
Grab the hard drive and left hard drive bracket together.
-
Tilt the left side away from the rear case, and slide the assembly to the left.
-
Remove the hard drive and left hard drive bracket from the iMac.
-
-
Bu adım çevrilmemiş. Çevrilmesine yardım edin
-
Remove the four 8.1 mm T8 screw posts from the hard drive, and transfer them to the replacement drive enclosure.
-
-
Bu adım çevrilmemiş. Çevrilmesine yardım edin
-
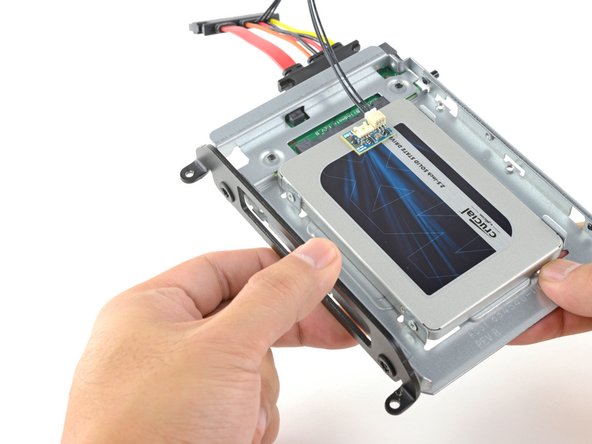
Line up the SSD connectors with the metal enclosure's sockets.
-
Press the drive against the enclosure sockets until the SSD is firmly seated.
-
-
Bu adım çevrilmemiş. Çevrilmesine yardım edin
-
Use a Phillips screwdriver to install the four silver screws (two on each side) along the edges of the SSD to secure it to the enclosure.
-
-
Bu adım çevrilmemiş. Çevrilmesine yardım edin
-
Plug the included sensor-enabled combo cable into the enclosure's port.
-
-
Bu adım çevrilmemiş. Çevrilmesine yardım edin
-
Peel the white liner off the back of the small temperature sensor board in order to expose the adhesive.
-
Adhere the temperature sensor board to an exposed, metal surface of the SSD, close to the SATA connector.
-
Fold the excess temperature sensor wires so that they are out of the way while you install the enclosure.
-
-
Bu adım çevrilmemiş. Çevrilmesine yardım edin
-
Use a T8 driver to install the mounting pins from the old hard drive onto the sides of the enclosure.
-
-
Bu adım çevrilmemiş. Çevrilmesine yardım edin
-
Attach any mounting brackets removed from the old hard drive onto the enclosure.
-
-
Bu adım çevrilmemiş. Çevrilmesine yardım edin
-
Connect the iMac's combo cable to the new temperature-enabled combo cable.
-
-
Bu adım çevrilmemiş. Çevrilmesine yardım edin
-
Slide the SSD enclosure into the space previously occupied by the hard drive.
-
Route the cables so that they will not interfere with any other components.
-


İptal et: Bu kılavuzu tamamlamadım.
269 farklı kişi bu kılavuzu tamamladı.

54 Yorum
My experience in upgrading this unit to a Seagate 4TB hybrid ST4000DX001 went fine except for the fans running at a constant higher RPM. Using Macs Fan Control is solving my issue for now. As a tip, you do not need to remove the left speaker, you can loosen the two screws and angle it leaning to the left.
What setting do you change in Macs Fan Control? Im looking at getting a SSD fitted to my Late 2013 iMac by a certified repair centre who have said they will do it for me if I provide the SSD but they did mention that the fans would most likely speed up as there won't be a temp sensor in the SSD. Thanks.
Lewis -
I didn't have a fan problem, since the adapter comes with a temperature sensor, my problem was the adapter wasn't long enough.
Lewis: simply running the Macs Fan Control app will do it. Otherwise the fans run at full speed because they have no temperature measurement.
I'm wondering what drive apple uses for the 1TB SSD version? Is it an OEM type PCIE Sandisk as well or a larger 2.5" drive?
I'm very tempted to upgrade my Fusion drive.