Bu sürüm, hatalı düzenlemeler içerebilir. En son doğrulanmış bellek kopyası dönün.
Neye ihtiyacın var
-
-
Sökme işlemine başlamadan önce iPhone'unuzu kapatın.
-
Tercümeyi buraya girin
-
-
Bu adım çevrilmemiş. Çevrilmesine yardım edin
-
Regardless of the tool you use, you need to be sure you pull up the entire display.
-
If the glass begins to separate from the plastic, as shown in the first image, slide a plastic opening tool between the plastic frame and the metal phone body to pry the metal clips out of the case.
-
-
Bu adım çevrilmemiş. Çevrilmesine yardım edin
-
Pull the blue handle backwards to unlock the Anti-Clamp's arms.
-
Slide the arms over either the left or right edge of your iPhone.
-
Position the suction cups near the bottom edge of the iPhone just above the home button—one on the front, and one on the back.
-
Squeeze the cups together to apply suction to the desired area.
-
-
Bu adım çevrilmemiş. Çevrilmesine yardım edin
-
Pull the blue handle forwards to lock the arms.
-
Turn the handle clockwise 360 degrees or until the cups start to stretch.
-
Insert an opening pick under the screen when the Anti-Clamp creates a large enough gap.
-
Skip the next two steps.
-
-
Bu adım çevrilmemiş. Çevrilmesine yardım edin
-
If you don't have an Anti-Clamp, use a single suction cup to lift the front panel:
-
Press a suction cup onto the screen, just above the home button.
-
-
Bu adım çevrilmemiş. Çevrilmesine yardım edin
-
While holding the iPhone down with one hand, pull up on the suction cup to slightly separate the home button end of the front panel from the rear case.
-
With a plastic opening tool, gently pry the edges of the rear case down, away from the front panel assembly, while you pull up with the suction cup.
-
-
Bu adım çevrilmemiş. Çevrilmesine yardım edin
-
Pull the plastic nub to release the vacuum seal on the suction cup.
-
Remove the suction cup from the screen.
-
-
Bu adım çevrilmemiş. Çevrilmesine yardım edin
-
Open the phone just enough to reveal the metal bracket covering the home button cable.
-
Only the phone's original home button assembly will be capable of using the Touch ID functionality. If you rip the cable, installing a new home button will only restore ordinary home button functions, not the Touch ID features.
-
Use the tip of a spudger to push the bracket free and remove it with tweezers.
-
-
-
Bu adım çevrilmemiş. Çevrilmesine yardım edin
-
Use the tip of a spudger to pry the home button cable connector up out of its socket.
-
-
Bu adım çevrilmemiş. Çevrilmesine yardım edin
-
Once the connector has been released, pull the home button end of the assembly away from the rear case, using the top of the phone as a hinge.
-
Open the display to about a 90º angle, and lean it against something to keep it propped up while you're working on the phone.
-
Add a rubber band to keep the display securely in place while you work. This prevents undue strain on the display cables.
-
-
Bu adım çevrilmemiş. Çevrilmesine yardım edin
-
Remove the two 1.6 mm Phillips #000 screws securing the metal battery connector bracket to the logic board.
-
-
Bu adım çevrilmemiş. Çevrilmesine yardım edin
-
Remove the metal battery connector bracket from the iPhone.
-
-
Bu adım çevrilmemiş. Çevrilmesine yardım edin
-
Use the flat end of a spudger to gently pry the battery connector up from its socket on the logic board.
-
-
Bu adım çevrilmemiş. Çevrilmesine yardım edin
-
Remove the following screws securing the front panel assembly cable bracket to the logic board:
-
One 1.7 mm Phillips #000 screw
-
One 1.2 mm Phillips #000 screw
-
One 1.3 mm Phillips #000 screw
-
One more 1.7 mm Phillips #000 screw
-
-
Bu adım çevrilmemiş. Çevrilmesine yardım edin
-
Remove the front panel assembly cable bracket from the logic board.
-
-
Bu adım çevrilmemiş. Çevrilmesine yardım edin
-
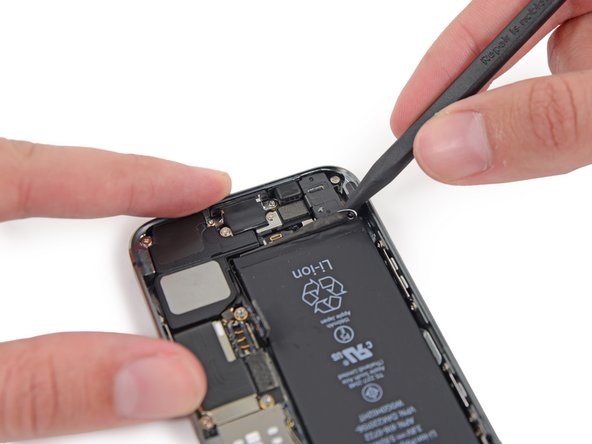
Use a spudger or a fingernail to disconnect the front-facing camera and sensor cable.
-
-
-
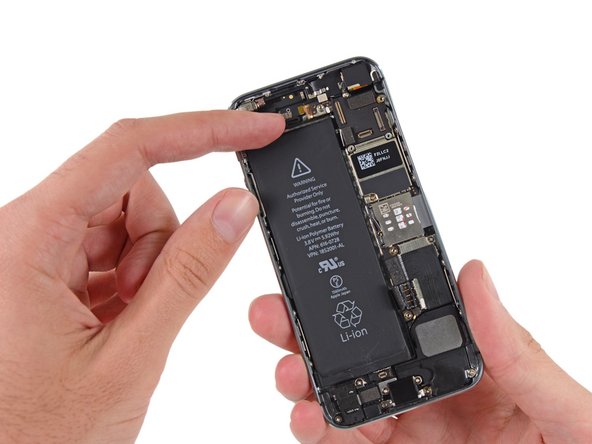
Spudger'ın ucunu, pil yapışkan şeridinin ortaya çıkması için pil ve kulaklık girişi arasında gezdirin.
-
-
-
Pil yapışkan şeritlerinden bir tanesini yavaşça, iPhone'un aşağısına ve pilden uzağa doğru çekin.
-
Şerit pil ve arka kasanın arasından sıyrılana kadar, aralıksız bir şekilde sabit bir kuvvet uygulayarak şeridi çekmeyi sürdürün. En iyi sonucu elde etmek için, şeridi 60º ya da daha küçük bir açıyla çekin.
-
Şeridi, pilin etrafından ve yukarı doğru dikkatlice yönlendirin. İşlem esnasında şeridin, iPhone'un herhangi bir başka iç parçasına takılmamasına dikkat edin.
-
-
-
iPhone'u ters çevirip, kasa tarafından olmak üzere pilin ve arka kasanın arasına plastik bir kart yerleştirin.
-
Kartı iyice ileri doğru iterek, pilin arkasındaki yapışkanı kopartın.
-
Pilin üst köşelerinden diş ipini ya da teli geçirip, uçları yanyana getirin, sonrasında bunları katlanmış bir kumaş parçasının etrafına sararak eşit bir şekilde çekin.
-
-
Bu adım çevrilmemiş. Çevrilmesine yardım edin
-
Remove the following screws securing the volume button and ringer switch brackets to the side of the rear case:
-
One 1.9 mm Phillips screw
-
Two 1.6 mm Phillips screws
-
-
Bu adım çevrilmemiş. Çevrilmesine yardım edin
-
Use the tip of a spudger to pry the ringer switch bracket away from the side of the case.
-
Remove the ringer switch from its recess between the ringer switch bracket and the case.
-
-
Bu adım çevrilmemiş. Çevrilmesine yardım edin
-
Use a spudger to pry the volume button bracket from the side of the rear case.
-
Remove the volume buttons.
-


İptal et: Bu kılavuzu tamamlamadım.
56 farklı kişi bu kılavuzu tamamladı.


4 Yorum
My phone was shattered and i did a total replacement of the rear case and the screen. All went well except... the volume controls do not work. The silence button above it does, but the +- dont. They feel wrong when pressed. They don't make the clicking sound. Anyone a suggestion of what went wrong?
I had to replace the power flex cable, which means taking almost everything out. Scary! When I restarted, my power button and flash were fixed but my volume was the same as yours and my home button didn't work. :( That Touch ID cable and cover are from h#$l! Anyway, I went back in and everything is working now. Instead of doing them like in the photos and videos, I attached the silence button first and then the volume buttons. So when you put in the middle screw that holds them both in, the screw goes through volume first and then silence.
Oh ya, ifixit is a great resource. Thanks!
I noticed one thing during my replacement that may affect others doing this repair. Upon reaching step 30 I noticed that my volume button bracket appeared to be bent slightly near the lower screw (the one toward the bottom of the case). Ultimately I had to bend the bracket to make the volume button work correctly. When I reassembled the bracket with the new buttons before bending it the - button would not come back fully to its normal position. After careful bending with a pair of needle nose pliers and the button worked correctly.
It is CRITICAL that you test your volume buttons and the ringer switch before you reassemble your phone!