Ana içeriğe geç

Bu sürüm, hatalı düzenlemeler içerebilir. En son doğrulanmış bellek kopyası dönün.

Salt Önkoşul
Bu kılavuz yalnızca diğer kılavuzlar için bir ön koşul olarak kullanılmak üzere tasarlanmıştır. Tek başına eksiktir.

Neye ihtiyacın var

  1. Bu adım çevrilmemiş. Çevrilmesine yardım edin

    : adım 1, 2 resimden 1. : adım 1, 2 resimden 2.
    • Use the flat end of a spudger to disconnect the Taptic Engine connector from its socket on the logic board.

  2. Bu adım çevrilmemiş. Çevrilmesine yardım edin

    : adım 2, 1 resimden 1.
    • Remove the three 1.6 mm Phillips screws securing the Taptic Engine to the rear case.

  3. Bu adım çevrilmemiş. Çevrilmesine yardım edin

    : adım 3, 2 resimden 1. : adım 3, 2 resimden 2.
    • Remove the Taptic Engine.

  4. Bu adım çevrilmemiş. Çevrilmesine yardım edin

    : adım 4, 3 resimden 1. : adım 4, 3 resimden 2. : adım 4, 3 resimden 3.
    Bu adımda kullanılan alet:
    Tweezers
    $4.99
    Satın Al
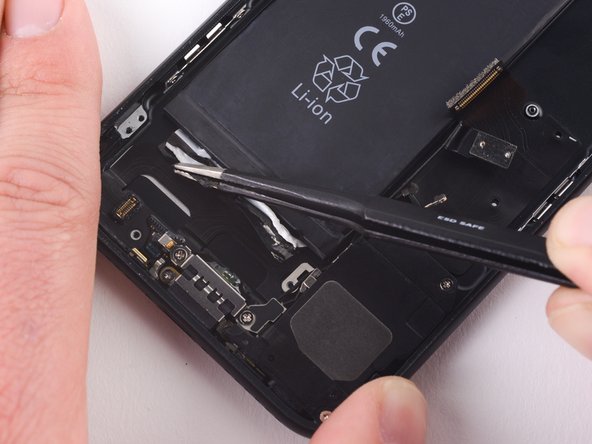
    • Use a pair of tweezers with blunt tips to peel back one of the adhesive strips on the lower edge of the battery.

  5. Bu adım çevrilmemiş. Çevrilmesine yardım edin

    : adım 5, 2 resimden 1. : adım 5, 2 resimden 2.
    • Use a pair of tweezers with blunt tips to peel back the other adhesive strip on the lower edge of the battery.

  6. Bu adım çevrilmemiş. Çevrilmesine yardım edin

    : adım 6, 3 resimden 1. : adım 6, 3 resimden 2. : adım 6, 3 resimden 3.
    • Try to keep the strips flat and unwrinkled during this procedure; wrinkled strips will stick together and break instead of pulling out cleanly.

    • Slowly pull one battery adhesive tab away from the battery, toward the bottom of the iPhone.

    • Pull steadily, maintaining constant tension on the strip until it slips out from between the battery and the rear case. For best results, pull the strip at a 60º angle or less.

    • The strip will stretch to many times its original length. Continue pulling and re-grab the strip near the battery if necessary.

  7. Bu adım çevrilmemiş. Çevrilmesine yardım edin

    : adım 7, 1 resimden 1.
    • Repeat the previous step for the second strip.

    • Hold down the battery as you remove the second strip, or the strip may fling the battery when it separates from the case.

    • If you removed both adhesive strips successfully, skip the next step.

    • Otherwise, if either of the adhesive strips broke off underneath the battery and could not be retrieved, continue with the next step below.

  8. Bu adım çevrilmemiş. Çevrilmesine yardım edin

    : adım 8, 2 resimden 1. : adım 8, 2 resimden 2.
    Bu adımda kullanılan alet:
    Plastic Cards
    $2.99
    Satın Al
    • If you successfully removed both adhesive strips, move on to the next step. Otherwise, you will need to pry the battery from the rear case.

    • Prepare an iOpener and apply it to the back of the rear case, directly over the battery. Alternatively, you can apply heat using a heat gun or hair dryer.

    • After about a minute, remove the iOpener, flip the phone over and use a plastic card to break up any remaining adhesive behind the battery.

    • Avoid bending the battery. Damage to the battery may release dangerous chemicals, and could start a fire.

    • Do not pry under the top third of the battery, you may damage the volume button ribbon cable.

  9. Bu adım çevrilmemiş. Çevrilmesine yardım edin

    : adım 9, 1 resimden 1.
    • Remove the battery.

    • When installing the battery, refer to this guide to replace your battery's adhesive strips.

Bitiş Çizgisi

Scott Havard

Üyelik tarihi: 06/27/16

49.702 İtibar

31 adet Kılavuz yazıldı

0 Yorum

Yorum Ekle

İstatistikleri Görüntüle:

Son 24 Saat: 0

Son 7 gün: 0

Son 30 gün: 12

Her zaman: 148