Giriş
Battery not lasting long? Swap it out (requires soldering).
Neye ihtiyacın var
-
-
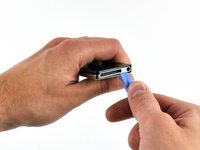
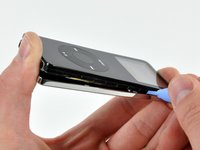
Insert the large iPod opening tool into the seam between the front case and rear panel of the iPod, below the dock connector. Run the tool back and forth to create an opening. The tool's edge should point toward the rear panel to prevent any accidental scratching of the aluminum front case.
-
-
-
Remove the following 3 screws:
-
Two 3 mm Phillips screws near the dock connector.
-
One 4 mm Phillips screw along the edge of the logic board.
Note that the 4mm screw has slightly wider pitch; you'll need this when putting the unit back together.
-
-
-
-
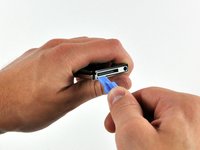
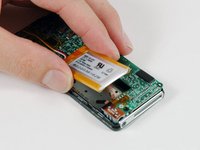
Insert the flat end of a spudger between the battery and the headphone jack side of the front case to pry the battery up off the adhesive securing it to the front case.
-
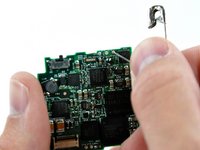
Rotate the battery out of the iPod and lay it next to the iPod. The battery is still soldered to the logic board by three wires, so don't remove it entirely.
-
-
-
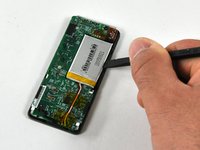
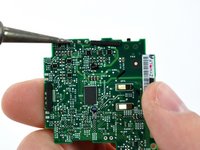
Grasp the end of the logic board near the battery connector with one hand, and hold onto the rest of the iPod with your other hand.
-
Slide the logic board out of its holding brackets on the rear of the display.
During the disassembly of the board I somehow "delaminated" the display. The result was that the display (after the battery was changed and the device closed again) looked "cloudy". From some angle you couldn't see anything at all anymore. The solution was to heat up the hole device with a hair dryer and rest it on it's front side for about an hour. After that it looked absolutely perfect again. I am not sure whether the heating is really necessary (maybe just lying the ipod on the front side over night would have the same effect) and surely one should be careful to not overheat the device.
-
-
-
Use a spudger to flip up the black plastic tab holding the orange display ribbon in place. The black tab will rotate up 90 degrees, releasing the ribbon cable.
Both ribbon cables were especially difficult to put back in. I can't say I succeeded in getting the nano to work again. If you can avoid detaching the cables, do it. If you're replacing the clickwheel, there's no way of avoiding it unfortunately.
A little tip if you are replacing the screen: Reconnect this ribbon cable from the new screen BEFORE affixing the screen to the adhesive! It will make it much easier. Also be sure that the little black things are UP before trying to put the ribbon in, and make sure you put them DOWN before closing up! The black things on the receptacle "lock" the cable in place, so it is important that you have it STRAIGHT or it wont work. Good luck!
-
-
-
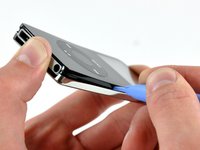
Use a spudger to slide the display ribbon out of its connector.
Getting the display ribbon back in place is the most difficult maneuver in the whole fix. I actually broke the black plastic tab in half while trying to close it back down, (be very gentle with it!). Managed to put the broken half back in(tweezers and patience) and get that ribbon in and put it back down. This battery replacement was the most difficult/tedious repair I have ever done. Don't do it unless you are brave and stubborn.
You can leave out this steps with disconnecting the two cables.
Without disconnecting the two cables, one can separate the two pieces only 1/2 inch. This is enough to work carefully with the soldering iron and change the battery.
It's a little bit difficult to work with the needle to open the three holes after removing the old battery - but you can do it.
From the reading of the other notes it seems to me easier than to disconnect the two cables
-
-
-
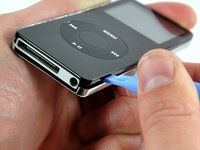
Use a spudger to slide the click wheel ribbon out of its connector.
Don't do this unless you have to. Getting this ribbon back in is nearly impossible.
daisystanton kullanıcısından alıntı:
Don't do this unless you have to. Getting this ribbon back in is nearly impossible.
Try using tweezers or medical clamps to reach in that tight spot. Use these tools to also connect the click wheel ribbon back to the logic board.
Stamp tweezers worked great for the ribbon cable! (Search eBay or Amazon, or your local hobby store.) This would be a useful tool for iFixIt to add to their inventory.
-
-
Bu adımda kullanılan alet:Tweezers$4.99
-
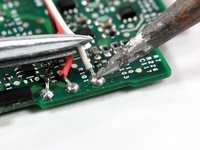
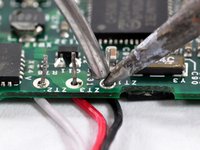
Begin by heating the exposed end of the white battery lead with the tip of a soldering iron while simultaneously pulling the lead away from the connection, using tweezers to grasp the lead by the insulation.
-
De-solder the remaining leads, following the procedure illustrated above.
-
-
-
To open the solder holes, open a safety pin and push it against the solder blocking the hole. At the same time, heat the same solder pad from the other side of the logic board. Opening the holes completely will require repeating this procedure several times from alternating sides of the logic board.
A desoldering pump is helpful and makes this step much easier. You basically heat the solder up til it goes liquid, then hit the button on the desoldering pump and all the solder is taken off leaving the hole totally clean.
-
-
-
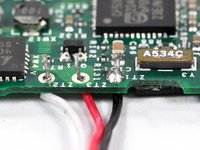
Place the logic board flat on a table with the gold ground contacts (shown in orange) facing up.
-
Using a pair of tweezers, insert the stripped ends of the battery leads into their respective holes.
-
Insert the black lead into the hole nearest the hold switch (shown in red).
-
Insert the red lead into the center hole.
-
Insert the white lead into the hole furthest from the hold switch.
-
-
-
Solder the connection by momentarily placing the tip of the soldering iron against the connection, melting solder into the connection, and quickly removing both the solder and the tip of the soldering iron from the connection. The solder should flow around the new battery lead, solidly connecting it to the pad on the logic board.
-
Solder the other two battery leads in the same fashion, taking care not to bridge any of the connections together.
-


To reassemble your device, follow these instructions in reverse order.
To reassemble your device, follow these instructions in reverse order.
İptal et: Bu kılavuzu tamamlamadım.
109 farklı kişi bu kılavuzu tamamladı.

12Kılavuz Yorumları
I skipped steps 8,9,11-17, and 21.
Step 19> when un-soldering the old battery wires, make sure to leave solder on the pads and in the holes.
I replaced steps 22-24 with Step 22-24> Very carefully and precisely:
-Place the black lead onto the pad nearest the hold switch (shown in red) with the end of wire pointing away from the battery.
-Place the red lead onto the center pad with the end of wire pointing away from the battery.
-Place the white lead onto the pad furthest from the hold switch with the end of wire pointing away from the battery.
Gently hold each wire in place on the pad while applying the soldering iron taking care not to touch the wire to any other pad or trace (note black wire). When the wire sinks into the solder, remove heat. Hold wire until solder has set.
Do step 25 and charge battery. Much simpler and less risk.
For all newbies, make sure that your soldering spots are neat and clean. Your workplace must be clean! Too hasty repair...and you'll reassemble your Pod once again.
Thanks for the neat repair guide! Much appreciated!" Now I can enjoy my "new Pod" for another 8years at least! No that's what I call environmental awareness! (built in 2005)
Well, how’s it going? It’s been 8 years…
Success! The instructions were clear and helpful. This was the third battery for my iPod, so the desoldering step took a fair amount of time. I am not very experienced with soldering, so I practiced on a little blinking christmas tree kit before attempting this, and I think that was useful.
MUCH easier than I expected. For me the hardest part was getting the rear cover back on. LOL!
First the iPod worked before I put the rear cover back on…then nothing works…the iPod ist dead. I think there must be a short circuit.
What can I do to rescue it?!
Why not cut the 3 wires and splice vs. soldering to PWA? Much less risk to board and easier to do.
I successfully replaced the battery on my iPod nano, the first iPod I’ve ever bought. The hardest part for me was to open the solder holes for the wires, I used a blood lancet for this, but it took a lot of time. While the three wires are glued together on the original battery, they are loose on the replacement battery, which required guiding them in the right position (and staying there) to prevent them from overlapping. After reconnecting the display (using tweezers), it only showed a white screen, but after resetting by pressing menu and middle button for 5 secs, the iPod was working again – and as nice side effect: the clicker is working again too.
For anyone else looking at this, use solder braid to get the holes open. It's the best way to do it in nearly every circumstance.
Öffnen und Ausbau der Hauptplatine ging mit geeignetem Werkzeug sher schnell. Eine Entlötpumpe würde ich nicht empfehlen. Besser geht es mit Entlötlitze und reichlich Flußmittel (z. B. No-Clean X32-10i Flux).
Am schwierigsten gestaltet sich das Wiedereinführen der Flachbandverbindungen. Ansonsten eine Superanleitung, danke.
Turn on the notes and READ thru all the steps and the notes, especially the ones involving the ribbon cables.
patjmccarthy - Yanıt