Ana içeriğe geç

MacBook Pro 15" Touch Bar Late 2016 バッテリーの交換

Uyarı: Ön koşul olan bir kılavuzu düzenliyorsunuz. Yapacağınız herhangi bir değişiklik bu adımın yer aldığı bütün 3 kılavuzları etkileyecektir.

İngilizce
Japonca
Adım 8
MacBook Pro 15" Touch Bar Late 2016 Battery Replacement: adım 0, 3 resimden 1. MacBook Pro 15" Touch Bar Late 2016 Battery Replacement: adım 0, 3 resimden 2. MacBook Pro 15" Touch Bar Late 2016 Battery Replacement: adım 0, 3 resimden 3.
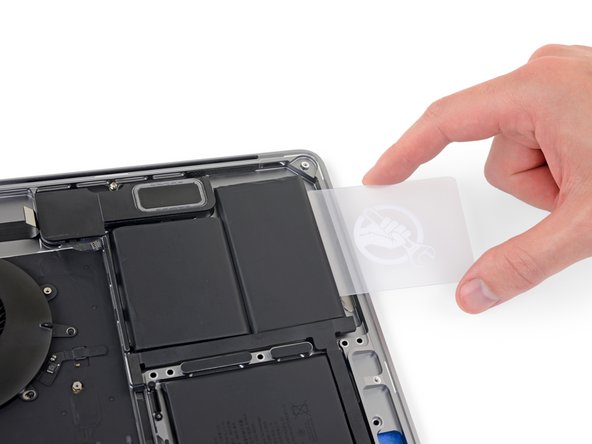
  • After a couple minutes, insert one corner of a plastic card underneath the battery, starting from the lower edge of the bottom, right-most cell.

  • This shouldn't require much force. If you have trouble, apply more adhesive remover and give it 2-3 additional minutes to penetrate.

  • Try not to deform the battery. A damaged or punctured battery can leak dangerous chemicals and/or catch fire.

  • Wiggle the card from side to side and slide it all the way underneath both battery cells.

  • Lift the cells to fully separate the adhesive, but don't try to remove them from your MacBook yet.

  • Leave the plastic card temporarily underneath the cells to prevent the adhesive from re-bonding as you proceed to the next step.

2、3分経過後、プラスチックカードの角をバッテリーの下に差し込みます。一番右側のセルの下側端から作業を初めてください。

あまり力を入れないでください。上手くさ仕込めない場合は、さらにリムーバーを数滴滴らして、浸透するまで数分間待機してください。

バッテリーを変形させないようご注意ください。ダメージが入ったり、穴の開いたバッテリーは危険な化学物質を排出して、引火の恐れがあります。

カードを左右に揺らしながら、2つのバッテリーセルの下全体をスライドします。

接着剤を完全に剥がせたら、バッテリーを持ち上げますが、MacBookから完全に取り出さないでください。

プラスチックカードを一時的にバッテリーの下に残します。次の作業に進んだ時、接着剤が再装着するのを防ぐためです。

Katkılarınız, açık kaynak Creative Commons lisansı altında lisanslanmaktadır.