Ana içeriğe geç

MacBook Pro 15" Touch Bar Late 2016 배터리 교체

Uyarı: Ön koşul olan bir kılavuzu düzenliyorsunuz. Yapacağınız herhangi bir değişiklik bu adımın yer aldığı bütün 3 kılavuzları etkileyecektir.

İngilizce
Korece
Adım 5
MacBook Pro 15" Touch Bar Late 2016 Battery Replacement: adım 0, 3 resimden 1. MacBook Pro 15" Touch Bar Late 2016 Battery Replacement: adım 0, 3 resimden 2. MacBook Pro 15" Touch Bar Late 2016 Battery Replacement: adım 0, 3 resimden 3.
  • Pull off the black rubber stopper from your bottle of adhesive remover.

  • Twist to loosen or remove the bottle cap before you cut the applicator tip.

  • This unseals the bottle and allows the pressure to equalize before you cut the applicator tip. If you skip this step, the adhesive remover may spray out unexpectedly when the tip is cut.

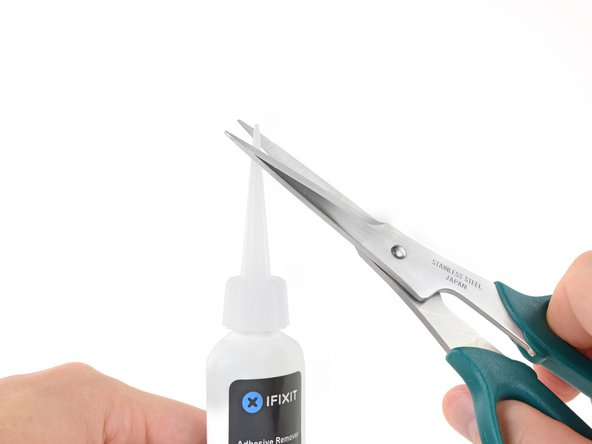
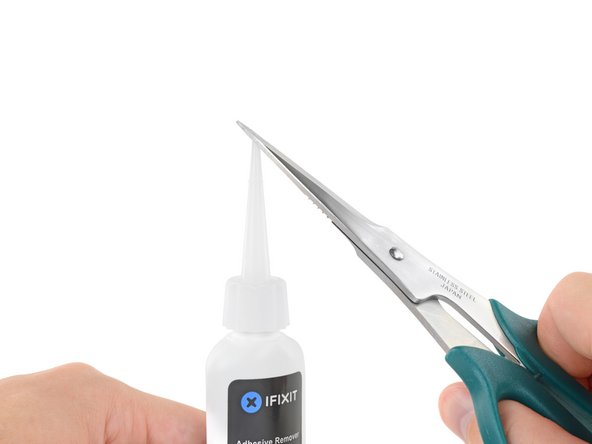
  • Use scissors to cut off the sealed tip of the applicator.

  • Cutting close to the narrow tip will give you better control so you can apply the adhesive remover in small amounts.

  • Twist and close the bottle cap securely before you proceed further.

접착제 제거제 병에서 검은색 고무 마개를 분리하세요.

도포기 끝을 자르기 전에 병 뚜껑을 비틀어 풀거나 분리하세요.

이렇게 하면 병의 밀봉이 풀리고 도포기 끝을 자르기 전에 압력이 균일해집니다. 이 단계를 건너뛰면 도포기 끝을 자를 때 접착제 제거제가 예기치 않게 분사될 수 있습니다.

가위를 사용하여 도포기의 밀봉된 끝을 잘라주세요.

좁은 끝에 가깝게 자르면 접착제 제거제를 더 잘 조절할 수 있으므로 소량으로 도포할 수 있습니다.

계속 진행하기 전에 병 뚜껑을 단단히 비틀어 닫으세요.

Katkılarınız, açık kaynak Creative Commons lisansı altında lisanslanmaktadır.