Ana içeriğe geç

Reemplazo de la batería de MacBook Pro 13" con Pantalla de Retina Finales de 2012

Uyarı: Ön koşul olan bir kılavuzu düzenliyorsunuz. Yapacağınız herhangi bir değişiklik bu adımın yer aldığı bütün 5 kılavuzları etkileyecektir.

Adım 12 çevriliyor
İngilizce
İspanyolca
Adım 12
MacBook Pro 13" Retina Display Late 2012 Battery Replacement: adım 0, 3 resimden 1. MacBook Pro 13" Retina Display Late 2012 Battery Replacement: adım 0, 3 resimden 2. MacBook Pro 13" Retina Display Late 2012 Battery Replacement: adım 0, 3 resimden 3.
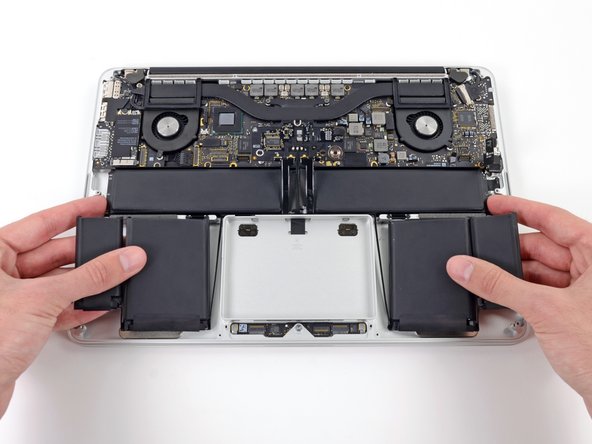
  • Lift the battery as a whole up out of the upper case, and remove the battery.

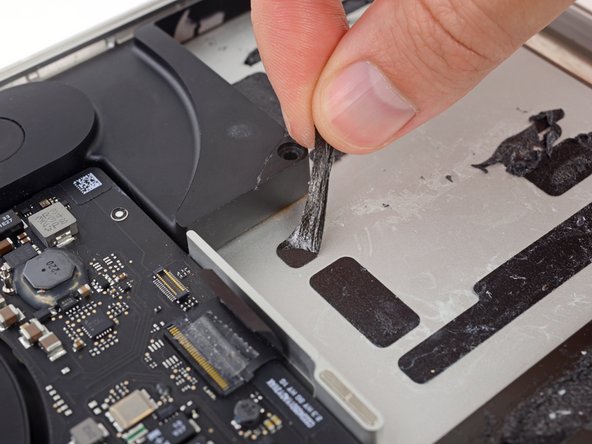
  • Before installing a new battery, remove all the old adhesive from the MacBook Pro's case.

  • With a little luck, you can slowly pull out each strip of adhesive with your fingers.

  • Otherwise, soak each section of adhesive with a bit of adhesive remover for 2-3 minutes, and then scrape it out with an opening pick or one of the other tools in your kit. This can take quite a bit of work, so be patient.

  • Mop up any remaining adhesive remover and give your MacBook Pro a few minutes to air dry.

  • The replacement battery included in your iFixit kit comes with adhesive pre-installed. Test the battery's fit and alignment carefully before peeling off the film covering the adhesive, and then press each cell firmly into place. If any additional films/liners are present that weren't on your original battery, remove them now.

  • Calibrate your newly installed battery: charge it to 100%, and keep charging it for at least 2 more hours. Unplug and use it normally to drain the battery. When you see the low battery warning, save your work, and keep your laptop on until it goes to sleep due to low battery. Wait at least 5 hours, then charge your laptop uninterrupted to 100%.

  • If you notice any unusual behavior or problems after installing your new battery, you may need to reset your MacBook Pro's SMC.

Levanta la batería como una sola de la caja superior y remuévela .

Antes de instalar una batería nueva, remueve todo el adhesivo viejo de la caja de la MacBook Pro.

Con un poco de suerte, puedes lentamente levantar cada tira de adhesivo con tus dedos.

De lo contrario, empapa cada sección de adhesivo con un poco de removedor de adhesivo durante 2-3 minutos y luego raspa y sácalo con un pico de apertura o cualquiera de las herramientas en tu kit. Esto podría ser mucho trabajo, así que ten paciencia.

Limpia cualquier resto de removedor de adhesivo y dale a tu MacBook Pro durante unos pocos minutos para que se seque al aire.

La batería de reemplazo incluida en tu kit de iFixit viene con un adhesivo pre-instalado. Prueba el ajuste y la alineación de la batería con cuidado antes de quitar la capa que cubre el adhesivo y luego presiona cada celda firmemente en su lugar. Si hay capas y recubrimientos adicionales que no estaban en la batería original, remuévelos ahora.

Calibra tu batería nueva. Cárgala hasta el 100% y luego sigue cargándola durante al menos 2 horas más. Luego, desenchúfala y úsala normalmente para drenar la batería. Cuando veas la advertencia de batería baja, guarda tu trabajo y mantén tu laptop encendida hasta que se duerma. Espera al menos 5 horas, luego cárgala de forma ininterrumpida hasta 100%.

Si notas alguna conducta o problema inusual luego de instalar tu batería nueva, podrías necesitar restablecer el SMC de tu MacBook Pro.

Katkılarınız, açık kaynak Creative Commons lisansı altında lisanslanmaktadır.