Ana içeriğe geç

MacBook Pro 13インチ Retina Display Late 2012 バッテリーの交換

Uyarı: Ön koşul olan bir kılavuzu düzenliyorsunuz. Yapacağınız herhangi bir değişiklik bu adımın yer aldığı bütün 5 kılavuzları etkileyecektir.

İngilizce
Japonca

Adım 12 çevriliyor

Adım 12
MacBook Pro 13" Retina Display Late 2012 Battery Replacement: adım 0, 3 resimden 1. MacBook Pro 13" Retina Display Late 2012 Battery Replacement: adım 0, 3 resimden 2. MacBook Pro 13" Retina Display Late 2012 Battery Replacement: adım 0, 3 resimden 3.
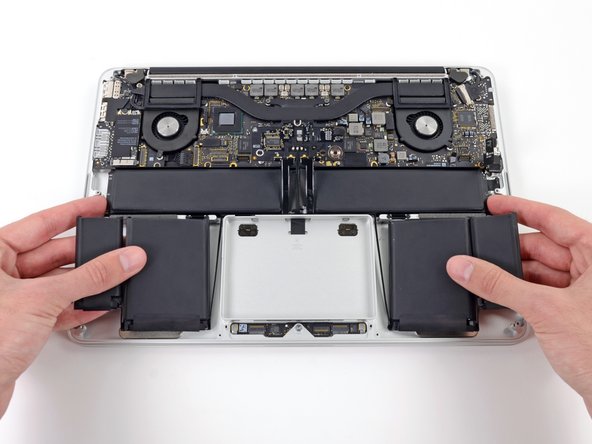
  • Lift the battery as a whole up out of the upper case, and remove the battery.

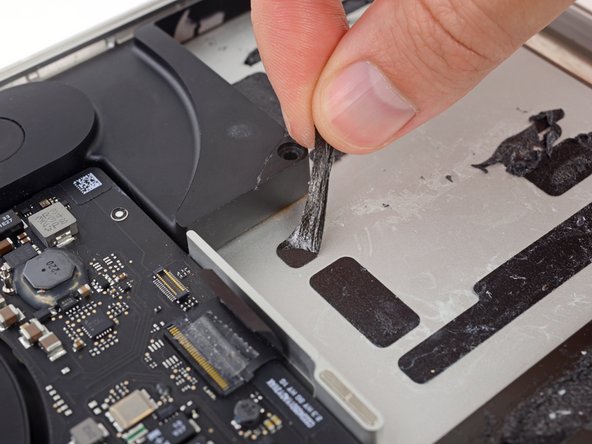
  • Before installing a new battery, remove all the old adhesive from the MacBook Pro's case.

  • With a little luck, you can slowly pull out each strip of adhesive with your fingers.

  • Otherwise, soak each section of adhesive with a bit of adhesive remover for 2-3 minutes, and then scrape it out with an opening pick or one of the other tools in your kit. This can take quite a bit of work, so be patient.

  • Mop up any remaining adhesive remover and give your MacBook Pro a few minutes to air dry.

  • The replacement battery included in your iFixit kit comes with adhesive pre-installed. Test the battery's fit and alignment carefully before peeling off the film covering the adhesive, and then press each cell firmly into place. If any additional films/liners are present that weren't on your original battery, remove them now.

  • Calibrate your newly installed battery: charge it to 100%, and keep charging it for at least 2 more hours. Unplug and use it normally to drain the battery. When you see the low battery warning, save your work, and keep your laptop on until it goes to sleep due to low battery. Wait at least 5 hours, then charge your laptop uninterrupted to 100%.

  • If you notice any unusual behavior or problems after installing your new battery, you may need to reset your MacBook Pro's SMC.

バッテリーを上部ケースから完全に取り出します。

新しいバッテリーを装着する前に、MacBook Proのケースから残った接着剤を綺麗に取り出します。

運が良ければ、ゆっくりと指で各接着ストリップを剥がせます。

そうでない場合は、各バッテリーセルの下に接着剤リムーバーを少量ずつ付けます。2−3分間待った後、開口ピックやお持ちのツールで接着剤をこすり落とします。この作業には少し忍耐が必要です。

残りのバッテリーセルについても接着剤リムーバーを付けて同じ作業を繰り返します。それからMacBook Proを数分間、空気乾燥させます。

交換用バッテリーはiFixitキットに接着剤と一緒に同封されています。接着剤のフォルムを剥がす前に、バッテリーの配置やフィット感を確認してください。もし余分なフォルムやライナーがある場合は、この交換用バッテリーキットはお持ちのバッテリーと合致しませんので取り出してください。

この修理ガイドを完成したら、新しく装着したバッテリーのキャリブレーションを行なってください。100%になるまで充電します。充電後も最低2時間はプラグを繋げたままにします。それからプラグを外して、通常通り使用しながら、自然に放電させます。バッテリー残量小のサインが表示されたら、これまでの作業を保存して、スリープ状態になるまで放置してください。スリープ状態に入ったら、少なくとも5時間置きます。それから一気に100%まで充電します。

新しいバッテリーの装着後、何か様子が通常と異なる場合はMacBook ProのSMCをリセットする必要があります。

Katkılarınız, açık kaynak Creative Commons lisansı altında lisanslanmaktadır.