Ana içeriğe geç

ニンテンドー3DS LLの上側LCDディスプレイの交換

Adım 7 çevriliyor

İngilizce
Japonca
Adım 7
Nintendo 3DS XL Upper LCD Display Replacement: adım 0, 3 resimden 1. Nintendo 3DS XL Upper LCD Display Replacement: adım 0, 3 resimden 2. Nintendo 3DS XL Upper LCD Display Replacement: adım 0, 3 resimden 3.
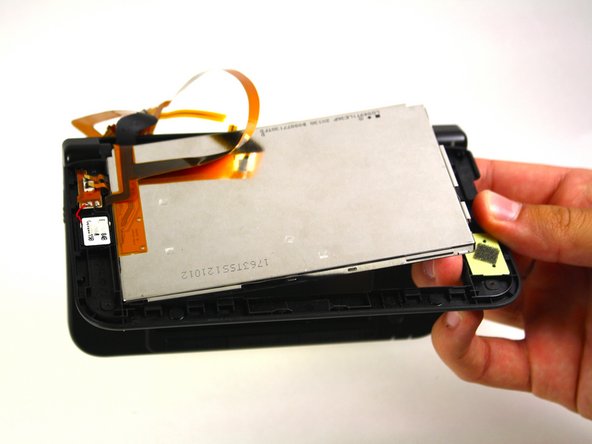
  • Open the hinge and carefully pop off the Upper LCD using your fingers.

  • Gently remove the ribbon from the hinge.

  • Though not required, the task of removing the ribbon cables becomes much easier once you remove the hinge barrel on the right side of the device.

  • Do not lose the tiny fabric and rubber water-resistant rectangles that cover the two speakers; they often fall out once the speakers are removed.

  • The screen's cover glass can be replaced or transferred to your new screen. The cover is easily scratched by metal tools; use plastic or your fingernail to separate it.

  • Adhere the cover to the new screen by using thin adhesive around the edges, or by reusing the old adhesive.

  • To reinsert the hinge piece, open the console to the last click before it's completely flat.

ヒンジを開いて、指を使って慎重に上側LCDを押し出します。勢いよく外れる場合があるので注意して下さい。

ヒンジからリボンケーブルを慎重に外します。

行う必要はありませんが、リボンケーブルを外す際はヒンジの筒を本体右側から外すとずっと作業しやすくなります。

2箇所のスピーカーを覆っている布とゴムでできた防水用の四角い部品を無くさないで下さい。これらの部品はスピーカーが外れる際に落ちることがあります。

スクリーンの保護ガラスは交換することも新しいスクリーンに移植することもできます。金属製の工具は保護ガラスを簡単に傷つけてしまうので、剥がす際はプラスチック製の工具や指先を使って下さい。

保護ガラスを新しいスクリーンに取り付ける際は、縁に沿って細く接着剤をつけるか、古い接着剤を再利用して下さい。

ヒンジを取り付け直す際は、本体を完全に開く直前の止まる位置まで開いて作業してください。

Katkılarınız, açık kaynak Creative Commons lisansı altında lisanslanmaktadır.