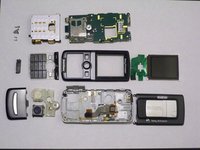
Ana içeriğe geç

Released in June 2005, the Sony Ericsson K750i was a flagship model known for its advanced mobile technology and premium features, though it does not support 3G service. This guide will walk you through the steps to disassemble the K750i, providing a closer look at the inner components of this iconic mid-2000s device. This process will allow you to explore the internal workings of a device that once retailed at $600, showcasing Sony’s top technology of the era.

Disassembly of the K750i may be necessary if you need to replace or inspect internal parts due to performance issues or physical damage. While this guide requires no advanced skills, it is essential to use some listed tools and handle each component carefully to avoid damage.

Before beginning, ensure the phone is fully powered off and disconnected from any power sources.

Neye ihtiyacın var

Aletler

Daha fazlasını göster…

Bu teardown bir tamir kılavuzu değildir. Sony Ericsson K750i cihazınızı onarmak için, servis kılavuzumuzu kullanın.

  1. Sony Ericsson K750i Teardown, Battery Cover: adım 1, 1 resimden 1.
    • Remove the battery cover.

    • Press down firmly with your thumb and slide the cover back.

  2. Sony Ericsson K750i Teardown, Back Casing: adım 2, 1 resimden 1.
    • Remove two Phillips #0 screws from the battery chamber.

    • Remove two Torx T6 screws from the battery chamber.

  3. Sony Ericsson K750i Teardown: adım 3, 1 resimden 1.
    • Gently pry off the back casing.

    • Work an opening tool around the entire seam before attempting to pull off the casing. This action will reduce the chance of cracking the casing.

  4. Sony Ericsson K750i Teardown: adım 4, 1 resimden 1.
    • Remove the casing to expose the camera's components.

  5. Sony Ericsson K750i Teardown, Keypad: adım 5, 1 resimden 1.
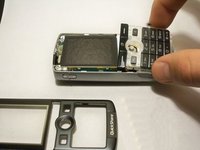
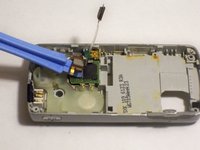
    • Gently pry open the front casing by working an opening tool along the entire seam.

  6. Sony Ericsson K750i Teardown: adım 6, 1 resimden 1.
    • Remove the front casing by gently lifting it from the phone.

    • Be careful not to pull off any other delicate pieces.

  7. Sony Ericsson K750i Teardown: adım 7, 2 resimden 1. Sony Ericsson K750i Teardown: adım 7, 2 resimden 2.
    • Remove the keypad.

    • The LCD screen is very fragile. Be careful not to catch the keypad on it while removing.

  8. Sony Ericsson K750i Teardown, LCD Screen: adım 8, 1 resimden 1.
    • Remove the screws holding the screen in place.

  9. Sony Ericsson K750i Teardown: adım 9, 1 resimden 1.
    • Gently lift the base of the keypad to remove it.

  10. Sony Ericsson K750i Teardown: adım 10, 1 resimden 1.
    • Gently pull up the green film, avoiding the joystick.

    • The LCD screen will be attached to this film and come off with it.

  11. Sony Ericsson K750i Teardown, Sony Ericsson K750i Teardown: adım 11, 1 resimden 1.
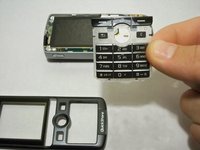
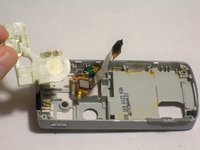
    • Remove the back cover from the phone.

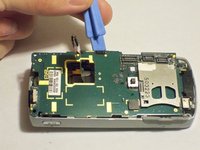
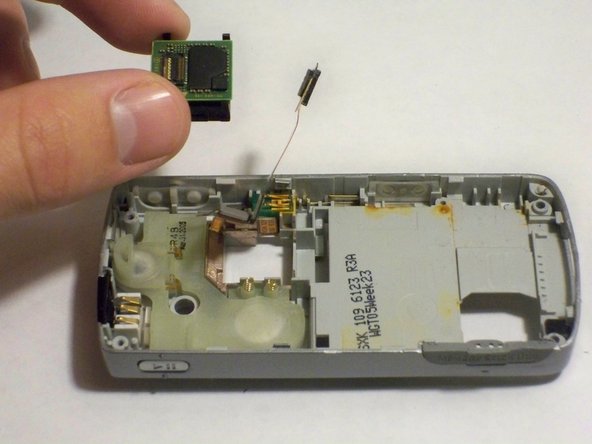
    • Gently slide the ribbon out of its connection.

  12. Sony Ericsson K750i Teardown: adım 12, 2 resimden 1. Sony Ericsson K750i Teardown: adım 12, 2 resimden 2.
    • Lift the motherboard out of the phone.

    • The ribbon is fragile so work the motherboard off around the ribbon to prevent damage.

  13. Sony Ericsson K750i Teardown: adım 13, 2 resimden 1. Sony Ericsson K750i Teardown: adım 13, 2 resimden 2.
    • Pry off the microchip that is located below the ribbon.

  14. Sony Ericsson K750i Teardown: adım 14, 2 resimden 1. Sony Ericsson K750i Teardown: adım 14, 2 resimden 2.
    • Lift out the plastic support to complete the teardown.

Abby Evers

Üyelik tarihi: 10/04/11

202 İtibar

6 adet Kılavuz yazıldı

Ekip

UW Stout, Team 1-6, Zhou Fall 2011 UW Stout, Team 1-6, Zhou Fall 2011 üyesi

UWSTOUT-ZHOU-F11S1G6

4 Üyeler

12 adet Kılavuz yazıldı

1Rehber Yorum

Very helpful!

Nibhish Naik - Yanıt

Yorum Ekle

İstatistikleri Görüntüle:

Son 24 Saat: 3

Son 7 gün: 12

Son 30 gün: 26

Her zaman: 12,730