Ana içeriğe geç

The Smart Oven® with Element IQ® is a trustworthy tool for the cook who wants a countertop oven that roasts succulent meat, broils, bake pizza, reheas leftovers and toasts evenly. Convection setting reduces cooking time by up to 30%. Model: BOV800XL

28 Soru Tümünü görüntüle

Convection fan hums but doesn't turn.

The convection fan isn’t turning when trying to use the convection setting on the Breville toaster oven. Motor hums (60 Hz I believe) when trying to turn. Everything else works fine. Heating elements, display, etc.

Convection fan turns freely by blowing pressurized air across blades with power off or convection setting off. The fan will continue to spin for 30 seconds or more.

If the fan is spun initially and the convection function is then turned on, the fan quickly slows and stops.

Bu soruyu yanıtla Ben de bu sorunu yaşıyorum

Bu iyi bir soru mu?

Puan 4
7 Yorum

Have you ohmed it out? Check the motor for specs and check amp draw. Might have bad windings on it.

tarafından

Will do, if I can get to the motor. From what I've seen on the web, these things are a bear to take apart. Apparently, a really long screwdriver is needed to reach from the back to the front at some point.

tarafından

Opened it up and was able to get to the motor. Resistance was 150 ohms. Looked for specs (SDR5812-01A15 120V 60Hz 15W). Only thing I was able to find was that this part is no longer available on a couple of repair websites.

Turned motor several times by hand, no real resistance. Noticed some play (~1mm or maybe less) where shaft can go in and out. Pushed and pulled along axis and turned motor. Noticed some minor scraping from the fan blades inside the oven (couldn't see these). Assumed it may be crud and did it a few more times and the scraping decreased.

Put motor straight to 120V 60Hz. Motor turned no problem. Put everything back together and now it works.

Motor does make a low, dull knocking sound when turning (not tinny like the fan blades are hitting something). Don't really know if it was doing this before.

I suspect the bushings are going bad and the "fix" is only temporary. Guess I'll start saving up for another one.

tarafından

@cbhuffman very odd... normally bearings go (screeching/grinding/whining sounds) or fan is hitting something... sounds you described is very 9dd indeed. And yeah I can't source a motor n either. And it is such a strange looking motor i can't think of one that could be used in its place.

tarafından

My son bought us this one in 2019 - fan died in just over a two years. The Delonghi I threw away was still working after over 15 years. Oh well.

tarafından

2 tane daha yorum göster

Yorum Ekle

9 Cevap

Filtre ölçütü:
En Yararlı Yanıt

Hi @cbhuffman,

For what it’s worth the fan motor part number is Breville part # SP0010500.

I’ve searched online without success as all suppliers state that it is no longer available from the manufacturer. You may have better luck.

There is always trying the donor parts option perhaps, i,e, search online for a faulty oven but having a different problem, if you consider it’s worth taking the risk on the fan working OK and the price suits. Just a thought

Bu yanıt yardımcı oldu mu?

Puan 2
Yorum Ekle

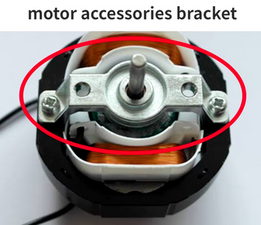
Total pain in the butt... i ordered a jy58 motor.. 220v unit.. and will attempt to merge the 2 motors together to make 1 working unit. The 'clips' are not able to be attached.. so im going to transplant them from a 220v motor to the original 110v windings. https://www.amazon.com/dp/B0987TMX53

and the verdict is... yes, it can be done... and yes, the frankenstein motor works.. with a few notes:

.25) Be EXTREMELY careful. the covers are razor sharp.

.4) Have a torch handy. The screws on the sides of the fan blade hub are frozen solid, torch the hub for 15 seconds to loosen the Allen screw.

.5) take pictures as you disassemble the unit. Better yet, wait to disassemble until donor motor arrives. 1-2 weeks introduces a lot of mistakes when reassembling

.75) The screws holding the endcaps on... wet with acetone before trying to take apart.. otherwise, they will NOT come apart. they used some type of Lock-Tite in the threads that makes it a PITA if you don't soak with solvent.

1) The endcaps/bushing mounts don't fit. you need to (I used a stair step drill-bit) drill to open the magnetic winding core so the endcap alignment protrusion fits, after a minor drilling, they clicked right into place. Stair-step bit will auto center.

2) The center core needs to be swapped between units. The above motor doesn't have the external fan shaft for cooling the control board

3) the core doesn't match the same size. using the spare washers from the donor core, you can space them correctly. If you are still front to rear sloppy on the shaft, ace hardware carries nylon washers that fit. I bought 4 washers, I think I only used 1.. maybe 2. (23 cents apiece)

4) Be slow at disassembly and careful handling the motor core.. my unit is like 8? years old and the insulating plastic is brittle as all heck..

Did I mention to take pictures.. take A LOT of them....

reassembling the endcaps with the original core, don't use the new core's screws.. the motor wont fit if you try. The screws are too long.

The endcaps are NOT universal. Place the endcap with the threaded screw holes on the long shaft side of the motor.

Don't be afraid of sharpie marking panels as you disassemble.

Don't miss-place the spacer washers between the metal plate, insulating pad, insulating plate, and motor (take a lot of pictures)

If you need to step away and scream.. do so.

when the wife says "is it on? It isn't making that grumbling/buzzing noise anymore", smile.

Note: the original motor had a defective design. The new motor endcaps are crimped to not fail in the same way.

Note: if when re-assembling, the cover wont fit (right side).... the fan blades face INWARD.... /facepalm

Bu yanıt yardımcı oldu mu?

Puan 2

2 Yorum:

I can verify this method works. Disassembling the oven is a PITA, but at least they didn't glue it together.

tarafından

I agree: the design is poor. It's unbeliable how many screws they used to asseble the oven !

tarafından

Yorum Ekle

Same here. This is my second, and there will be no third for me. It's time to move on. There are better companies out there.

Bu yanıt yardımcı oldu mu?

Puan 1

1 Yorum:

Ditto on that. No more Brevilles !

tarafından

Yorum Ekle

The lubricant dried and the motor shaft seized in its bushings. I took it apart, cleaned and re-lubricated. Lasted another 2 years.

Bu yanıt yardımcı oldu mu?

Puan 1

1 Yorum:

I tried that. Even used teflon based light oil. Lasted about 6 months - it's a design issue that makes lots of moola for Breville. Trying out a totally different toaster make after seeing this issue on a new Breville unit after just 3 months !

tarafından

Yorum Ekle

the YJ58 is an oven fan rated at 220/110v with the exact same specs! you are welcome people!!!
LONG LIVE THE 800XL!!!

Bu yanıt yardımcı oldu mu?

Puan 0

3 Yorum:

Has anyone tested the YJ58 as a replacement part? Our 800XL just did the fan death harry carry...

tarafından

There are 4 different versions of the YJ58.

Can anyone confirm the exact model number?

tarafından

@peterd95081 check my posting on the repair.

tarafından

Yorum Ekle

From your efforts, it sounds like the fan was hanging up on that "crud". Just do a good cleaning to totally eliminate that "dull knocking sound". The fan runs fine outside the unit - so it has to be interference making the noise.

Update (12/24/2022)

That fan doesn't have a starter capacitor on it, does it?

Bu yanıt yardımcı oldu mu?

Puan 0
Yorum Ekle

I had the same problem. I completely removed the motor and took out the 2 screws holding the motor together. I found that the bushings were not worn at all, but the oven side bushing was loose. There's ring "clip" holding the busing in place. The clip looks like an inside out flower (pedals facing inward instead of outward). I applied some pressure on opposing pedals with a pair of needle nose pliers to reseat the busing and tighten it up. That removed all play in the shaft. After reassembling everything the noise was gone and the motor no longer stalled.

Bu yanıt yardımcı oldu mu?

Puan 0

2 Yorum:

can you show a photo of where the 2 screws are? i took off the cover, i see the fan from the outside, but i don't see any access to the fan facing the inside. i do notice that something that was holding it up was loose but not sure where that holder is at

tarafından

I tried that. Even used teflon based light oil. Lasted about 6 months - it's a design issue that makes lots of moola for Breville. Trying out a totally different toaster make after seeing this issue on a new Breville unit after just 3 months !

tarafından

Yorum Ekle

After about 3 years of use, the fan in our oven started making noise.

I had success with lubricating the fan through the inside vent... without taking the oven apart!

Place the oven on its right side. With the door open, the fan and vent will now allow a silicon spray (with a 'straw' attachment) to be directed through the vent to the center hub without dripping too much. After leaving it set for a few minutes, I plugged the oven in and turned on a cook setting that used convection and there was absolutely no noise.

This may change over time if the silicone dries, thickness or coagulates but... I will try another 1 minute fix before attempting to disassemble the metal housing.

Bu yanıt yardımcı oldu mu?

Puan 0

1 Yorum:

Ditto for me. However the lubricant only works a few months (depending on use) and the problem is back. The best solution is anotjher brand as I've gone through 2 units in the past 6 years with the same issue including a NEW unit only 2 weeks old.

tarafından

Yorum Ekle

Mine was making a loud hum as described. I took it apart and then reconnected the to control board connections and plugged it back in with the housing off so I could make a guess as to where the failure was, and it just started working again.

Costs nothing, worth a shot.

My best guess is that there was a bad connection somewhere that I re-seated.

The part I had the most trouble with was getting the housing off. There's a folded pinch connector at the front just where the housing meets the top of the hinged door, and you have to pull the housing straight back to get it off. It was really stuck there.

Before I did that I took off the feet, all of the screws on the back, and one screw under the bottom of the control panel accessible through a small hole.

Bu yanıt yardımcı oldu mu?

Puan 0
Yorum Ekle

Yanıtını ekle

Chad Huffman sonsuza kadar minnettar olacak.
İstatistikleri Görüntüle:

Son 24 Saat: 8

Son 7 gün: 80

Son 30 gün: 307

Her zaman: 9,540