Ask any mechanical or electrical engineer and they will advise that the use of jumper wires in such an application is a poor choice. There are several reasons that this holds true. One, when you install jumper wires into a device with such a small form factor and one in which you may remove the back plate in the future (for battery replacement, other repair work, etc) there is a tremendous risk that the wires can become caught (snagged) and torn. Secondly, those wires are routed under/over/around the motherboard frame. These wires can be routed next to or, worse yet, sitting on top of some very hot motherboard components. That heat that is generated by the components can have a detrimental effect on the wire itself as well as the heat conducting down the wire back to the connector itself.
We see dozens of these battery connector failures in our store every week. It is a very common repair for us. Here is how we have approached this repair. In coming up with this, we have spoken to (3) of the top circuit board rework companies in the US to solicit their input as to the strengths and weaknesses of each repair option.
In many cases when the battery terminal connector is ripped from the motherboard, one or more of the solder pads is removed as well. This is bad. The purpose of those solder pads is to act as a base for creating a solder fillet (joint) between the legs of the terminal connector and the motherboard. Each of those pads has a copper tailing that comes out and connects to the trace on the motherboard. When the pad is ripped out, you also lose that copper tailing connection to the trace.
In our shop, we use the following standard procedure (again that was developed in conjunction with several motherboard rework companies).
1. We clean up the solder off of any remaining pads using a solder wick.
2. We then install new solder pads to replace the missing ones.
3. We use an exacto knife (or razor blade) and CAREFULLY remove the very top layers of the motherboard trace down to the point where the copper wire is exposed. You need to be careful as you only need to expose roughly the last 1/2" where the trace connects into the pad.
4. We then overlay solder the copper tailing off the new solder pad onto the exposed copper trace.
5. Once that is completed, we go in and put an epoxy coating on top of the exposed trace.
6. We use the same process for any other missing pads.
7. Lastly, we reinstall a new battery terminal connector by soldering it back onto the (4) solder pads on the motherboard. We also use a dab of neutral core silicone under the connector to better adhere it to the motherboard.
It is a very tedious process and one that is not simple, but it is the correct way to repair this iPhone 4S with a broken battery connector and lifted solder pad.
I do not want to get slammed for referencing our company but here is the link if you need any help:
Bu yanıt yardımcı oldu mu?
Oy verildi
Geri al
Puan
4
İptal
Bu yoruma uygun yeri bulmak için bu konuyu kaydırın. Ardından, taşımak için "Bu yazıya yorum ekle"ye tıklayın.


3 Yorum
Pictures would help.. One of our regular contributors repairs these and may be able to give an expert opinion on where to go form here depending on which pad is missing
pollytintop tarafından
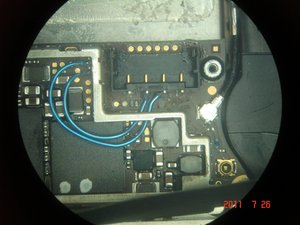
Okay updated with picture. Hopefully that should help. The problem is that apple lightly soldered the battery pins in place, so when i removed the battery, it ripped one of the square connecting pads up. since it looks like the square pads lead to the circular ports to their left, I'm guessing I should be able to wire it back somehow with some fine gauge wire, but I'm not really sure how, and I've never done soldering this small.
thoseevilrobots tarafından
Is there any way to tag this specifically so the right person will see it?
thoseevilrobots tarafından