
CD player on Bose AWRC-1P stopped working.
CD player on Bose AWRC-1P stopped working. Is this fixable?
Bu iyi bir soru mu?
Puan
1

İtibar: 13
![]() 1
1
CD player on Bose AWRC-1P stopped working. Is this fixable?
Bu iyi bir soru mu?

İtibar: 814,6b
![]() 1,2b
1,2b
![]() 920
920
![]() 2,4b
2,4b
@auntykate the bad thing about this is, that there are no tests for the CD drive that can be done. Bose considers it dead if it does not do anything. So, the only thing that we can offer for now, are the instructions on how to remove (and finally replace) the drive.
DISASSEMBLY/ASSEMBLY PROCEDURES
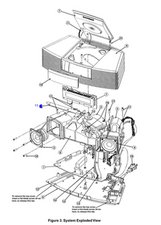
Note: The numbers in parentheses refer to the callouts in Figure 3.
1. Top Cover Removal
1.1 Remove the three screws (21) that secure the top cover (6) to the base (9).
1.2 Insert a flat blade screwdriver into the two locations shown in Figure 3. Apply force on the flat blade screwdriver so that the grille is moved outward and clears the two tabs located on the base.
1.3 Lift up on the top cover to remove it.
2. Top Cover Replacement
2.1 Lower the top cover (6) onto the base (9).
Make sure that the ribbon cable that connects to the CD door (7) lays in the track to the left of the CD mechanism (2).
Note: The light shield (4) can get caught on the top cover. Make sure the light shield is secured in place when replacing the top cover.
2.2 With the palms of your hands located on the front corners of the top cover, press down on the top cover until it snaps into place.
2.3 Replace the three screws (21) that secure the top cover to the base.
3. Display PCB Removal
3.1 Perform procedure 1.
3.2 Lift up the display PCB (1).
3.3 Remove the ribbon cable that connects the CD door (7) to the display PCB. Remove the two ribbon cables that connect to the main PCB. Lift out the display PCB.
Caution: If you remove the ribbon cable from the CD door, you might have difficulties reconnecting the cable.
4. Display PCB Replacement
4.1 Replace the three ribbon cables that attach to the display PCB (1).4.2 Lower the display PCB into the slots located on the matrix assembly (8).
CD Mechanism Removal
5.1 Perform procedure 1.
5.2 Lift up the CD mechanism (2) and solder the two points located on the CD mechanism’s APC PCB. See Figure 1. This will prevent static electricity damage to the CD mechanism.
5.3 Remove the cables from the CD mechanism’s and lift out the CD mechanism.
Figure 1. APC PCB, ESD Solder Points
6. CD Mechanism Replacement
6.1 Attach the cables to the CD mechanism (2) and remove the solder from the two points indicated in Figure 1.
6.2 Lower the CD mechanism into the matrix assembly (8) so that the cables are toward the right speaker.
You can skip 5.2 if you are discarding the old drive.
The CD MECHANISM should be a CD93V4M and Bose part number for that is 193373. Now, all of that you want to verify when you have your mechanism removed. Finding a replacement may pose it's own challenge. It may require time and the art of scouring for old spare parts :-)
If at any time you should be stuck with anything, take some pictures and post those with your Question. That way we can see what you see. Adding images to an existing question
Those are still great audio devices. It would be great if you could fix it. If in doubt or if there are any issues, come back here and we'll try to assist you further.
Repair is War on Entropy!
Bu yanıt yardımcı oldu mu?
Son 24 Saat: 0
Son 7 gün: 16
Son 30 gün: 36
Her zaman: 163