Ana içeriğe geç
Acer Aspire 5349-2592 RAM Replacement

Acer Aspire 5349-2592 RAM Replacement

Abderahmane Naidjate

Abderahmane Naidjate ve 6 diğer katkıda bulunanlar

En son April 15, 2020 tarihinde güncellendi

4 - 5 dakika
Orta

Does your Acer Aspire 5349-2592 get stuck at a blue screen during bootup, regularly crash or freeze? Does your computer slow down the longer it is in use, or act sluggish when running programs? If so, a ram memory problem might exist, and replacement might be necessary. This guide provides simple steps with minimal tools to replace the ram memory module.

If you are unsure the ram memory is bad, review the Troubleshooting Computer Memory guide located on iFixit’s website at the following URL before proceeding: ++Troubleshooting Computer Memory

Please make sure to follow the prerequisite procedures.


Neye ihtiyacın var

Aletler

Daha fazlasını göster…

  1. Acer Aspire 5349-2592 RAM Replacement, Battery: adım 1, 1 resimden 1.
    • Turn the laptop over so that the back is facing you.

  2. Acer Aspire 5349-2592 RAM Replacement: adım 2, 1 resimden 1.
    • Push the laptop battery release lock.

  3. Acer Aspire 5349-2592 RAM Replacement: adım 3, 1 resimden 1.
    • Now that the Acer-Aspire 5349-2592 laptop battery is unlocked, press the battery release button down.

  4. Acer Aspire 5349-2592 RAM Replacement: adım 4, 1 resimden 1.
    • Holding down the laptop battery release button, gently pull the battery away from the laptop.

  5. Acer Aspire 5349-2592 RAM Replacement, Back plate: adım 5, 1 resimden 1.
    • Remove all of the screws located on the back of the laptop using your Phillips #0 screwdriver.

  6. Acer Aspire 5349-2592 RAM Replacement: adım 6, 1 resimden 1.
    • Pry open the backplate using the iFixit opening tool and remove the backplate from the device.

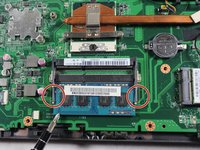
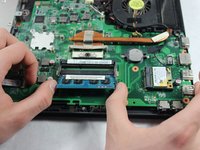
  7. Acer Aspire 5349-2592 RAM Replacement, RAM: adım 7, 2 resimden 1. Acer Aspire 5349-2592 RAM Replacement, RAM: adım 7, 2 resimden 2.
    • Push the clips securing the RAM outwards.

    • The RAM stick will pop up and is safe to remove from the device. Repeat the same process for additional RAM sticks.

Sonuç

To reassemble your device, follow these instructions in reverse order.

Bir başkası bu kılavuzu tamamladı.

Abderahmane Naidjate

Üyelik tarihi: 04/03/19

547 İtibar

6 adet Kılavuz yazıldı

Ekip

UMass Dartmouth, Team S1-G3, Simcock Spring 2019 UMass Dartmouth, Team S1-G3, Simcock Spring 2019 üyesi

UMASSD-SIMCOCK-S19S1G3

4 Üyeler

8 adet Kılavuz yazıldı

0 Yorum

Yorum Ekle

İstatistikleri Görüntüle:

Son 24 Saat: 1

Son 7 gün: 5

Son 30 gün: 33

Her zaman: 2,145