Ana içeriğe geç
Amazon Echo Dot 3rd Generation Casing Replacement

Amazon Echo Dot 3rd Generation Casing Replacement

Kristen Gismondi

Kristen Gismondi ve başka bir katkıda bulunan

En son January 24, 2025 tarihinde güncellendi

20 - 35 dakika
Kolay
Daha iyi giriş
Eksik Ayrıntılar
Öğrenci İş Başında

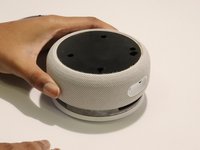
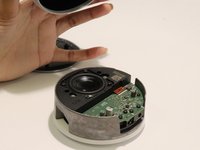
This guide will walk you through step by step instructions on how to replace the casing of the Amazon Echo Dot 3rd Generation. This repair is needed if the casing of the Echo Dot is damaged, cracked, or suffering from wear and tear. The process involves removing the adhesive, unscrewing four screws, and separating the casing. No special skills are necessary for this, but basic tools are required, such as a spudger and screwdriver. Make sure that the device is powered off and unplugged before starting this guide.

Neye ihtiyacın var

Aletler

  1. Amazon Echo Dot 3rd Generation Casing Replacement, Casing: adım 1, 3 resimden 1. Amazon Echo Dot 3rd Generation Casing Replacement, Casing: adım 1, 3 resimden 2. Amazon Echo Dot 3rd Generation Casing Replacement, Casing: adım 1, 3 resimden 3.
    • Turn the Echo Dot over so the barcode is facing up, giving you access to the bottom of the device.

  2. Amazon Echo Dot 3rd Generation Casing Replacement: adım 2, 2 resimden 1. Amazon Echo Dot 3rd Generation Casing Replacement: adım 2, 2 resimden 2.
    • Use a spudger to gently lift the adhesive covering between the casing and the device.

  3. Amazon Echo Dot 3rd Generation Casing Replacement: adım 3, 1 resimden 1.
    • Use a T6 Torx screwdriver to remove the four 7.2 mm screws located around the corners of the device.

    • Make sure to keep the screws in a safe place for the reassembly process.

  4. Amazon Echo Dot 3rd Generation Casing Replacement: adım 4, 2 resimden 1. Amazon Echo Dot 3rd Generation Casing Replacement: adım 4, 2 resimden 2.
    • Gently lift the casing of the device, starting from one side.

    • If the casing is stuck, use the spudger to carefully loosen it along the edges.

    • Be careful not to damage any internal components of the device.

Sonuç

To reassemble your Echo Dot, follow these instructions in reverse order. Ensure the casing fits properly before tightening the screws back on. Once reassembly is finished, check that the device powers on and functions correctly.

2 farklı kişi bu kılavuzu tamamladı.

Kristen Gismondi

Üyelik tarihi: 11/12/14

92.745 İtibar

241 adet Kılavuz yazıldı

Ekip

iFixit iFixit üyesi

Staff

120 Üyeler

19.660 adet Kılavuz yazıldı

0Kılavuz Yorumları

Yorum Ekle

İstatistikleri Görüntüle:

Son 24 Saat: 0

Son 7 gün: 5

Son 30 gün: 16

Her zaman: 926