Ana içeriğe geç

Asus ROG G751JL-BB17T29 Battery Replacement

Neye ihtiyacın var

  1. Asus ROG G751JL-BB17T29 Battery Replacement, Remove the RAM access door: adım 1, 2 resimden 1. Asus ROG G751JL-BB17T29 Battery Replacement, Remove the RAM access door: adım 1, 2 resimden 2.
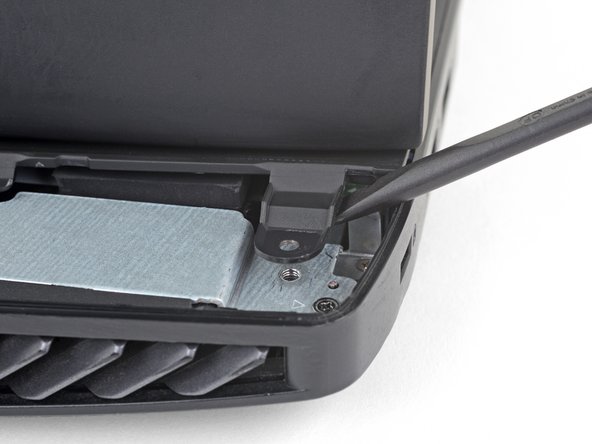
    • Use an opening tool to pry up the small rubber cover on the upper right corner of the RAM access door.

  2. Asus ROG G751JL-BB17T29 Battery Replacement: adım 2, 1 resimden 1.
    • Remove the 5.3 mm Phillips #00 screw securing the RAM access door.

    • This screw is held in the hole in the door with a washer and will not come out of the hole, even after you unscrew it.

  3. Asus ROG G751JL-BB17T29 Battery Replacement: adım 3, 2 resimden 1. Asus ROG G751JL-BB17T29 Battery Replacement: adım 3, 2 resimden 2.
    • Insert the point of an opening pick in the seam near the top right corner of the RAM access door and gently pry the door up slightly.

    • The door is held in place by small clips around its edges. Pry until you feel the nearest clips release.

  4. Asus ROG G751JL-BB17T29 Battery Replacement: adım 4, 3 resimden 1. Asus ROG G751JL-BB17T29 Battery Replacement: adım 4, 3 resimden 2. Asus ROG G751JL-BB17T29 Battery Replacement: adım 4, 3 resimden 3.
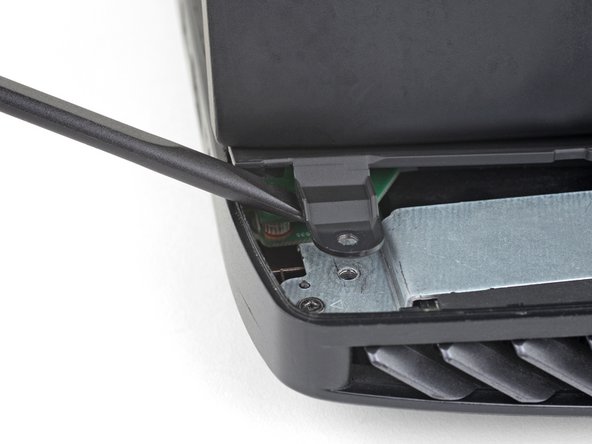
    • Insert the wide edge of an opening pick into a new part of the seam between the door and the computer.

    • Pry the door up to release the clips closest to the pick.

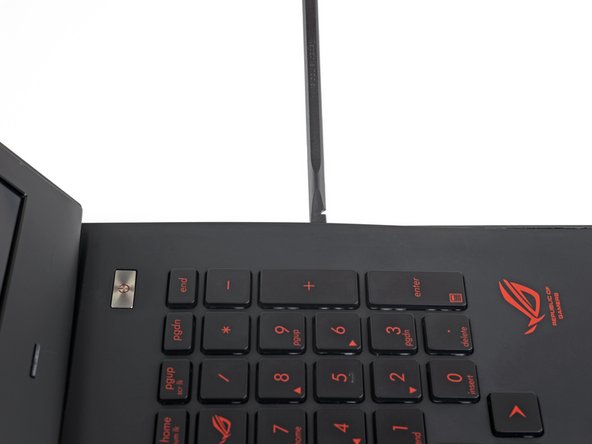
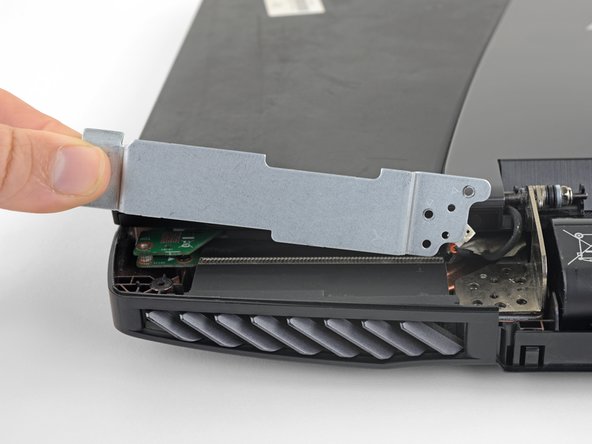
    • Continue to slide the pick along the seam all the way around the door, prying as you go, until all the clips holding the door down have been released.

  5. Asus ROG G751JL-BB17T29 Battery Replacement: adım 5, 1 resimden 1.
    • Remove the RAM access door.

  6. Asus ROG G751JL-BB17T29 Battery Replacement, Remove the optical drive: adım 6, 1 resimden 1.
    • Remove the 5.2 mm Phillips #00 screw securing the optical drive.

  7. Asus ROG G751JL-BB17T29 Battery Replacement: adım 7, 3 resimden 1. Asus ROG G751JL-BB17T29 Battery Replacement: adım 7, 3 resimden 2. Asus ROG G751JL-BB17T29 Battery Replacement: adım 7, 3 resimden 3.
    • Insert an opening tool into the gap between the optical drive and the laptop.

    • Pry the optical drive straight out of the laptop.

    • Remove the optical drive.

  8. Asus ROG G751JL-BB17T29 Battery Replacement, Remove the case screws: adım 8, 1 resimden 1.
    • Use the point of a spudger to pry out eleven rubber plugs covering the screws on the bottom of the laptop.

    • Some plugs have a hole or notch into which you can insert the point of a spudger to more easily pry out the plugs.

  9. Asus ROG G751JL-BB17T29 Battery Replacement: adım 9, 2 resimden 1. Asus ROG G751JL-BB17T29 Battery Replacement: adım 9, 2 resimden 2.
    • Remove 18 Phillips #00 screws of the following lengths:

    • Eight 8.8 mm screws

    • Seven 5.2 mm screws

    • Three screws

  10. Asus ROG G751JL-BB17T29 Battery Replacement, Remove the battery cover: adım 10, 3 resimden 1. Asus ROG G751JL-BB17T29 Battery Replacement, Remove the battery cover: adım 10, 3 resimden 2. Asus ROG G751JL-BB17T29 Battery Replacement, Remove the battery cover: adım 10, 3 resimden 3.
    • Flip the laptop right-side up.

    • Use an opening pick to pry the left and right edges of the battery cover away from the laptop enough that you can grip the cover with your fingers.

  11. Asus ROG G751JL-BB17T29 Battery Replacement: adım 11, 2 resimden 1. Asus ROG G751JL-BB17T29 Battery Replacement: adım 11, 2 resimden 2.
    • Lift the battery cover straight up from the laptop.

    • Do not try to completely remove the cover yet, it is still tethered by a speaker cable.

  12. Asus ROG G751JL-BB17T29 Battery Replacement, Disconnect the speaker cable: adım 12, 2 resimden 1. Asus ROG G751JL-BB17T29 Battery Replacement, Disconnect the speaker cable: adım 12, 2 resimden 2.
    • Pull the speaker connectors straight away from each other to disconnect the speaker cable.

    • Make sure the speaker cable is out of the way before you reinstall the battery cover.

  13. Asus ROG G751JL-BB17T29 Battery Replacement, Remove the upper case assembly: adım 13, 3 resimden 1. Asus ROG G751JL-BB17T29 Battery Replacement, Remove the upper case assembly: adım 13, 3 resimden 2. Asus ROG G751JL-BB17T29 Battery Replacement, Remove the upper case assembly: adım 13, 3 resimden 3.
    • Open the laptop's display to a 90° angle.

    • Use a spudger to pry against one of the screw tabs on the back of the upper case assembly.

    • Make sure to pry as close as possible to the base of the tab to avoid damaging the tab.

    • Repeat this procedure with the other tab.

    • The upper case assembly is held in place by small clips around its edges. In this step, pry each tab up until you feel the nearest clips release.

  14. Asus ROG G751JL-BB17T29 Battery Replacement: adım 14, 2 resimden 1. Asus ROG G751JL-BB17T29 Battery Replacement: adım 14, 2 resimden 2.
    • Insert the flat end of a spudger in the gap between the laptop and the upper case assembly, near the display.

    • If there's not a big enough gap, repeat the previous step until you have space to insert the spudger.

  15. Asus ROG G751JL-BB17T29 Battery Replacement: adım 15, 3 resimden 1. Asus ROG G751JL-BB17T29 Battery Replacement: adım 15, 3 resimden 2. Asus ROG G751JL-BB17T29 Battery Replacement: adım 15, 3 resimden 3.
    • Slide the spudger along each edge of the upper case assembly, prying and releasing clips as you go.

  16. Asus ROG G751JL-BB17T29 Battery Replacement: adım 16, 3 resimden 1. Asus ROG G751JL-BB17T29 Battery Replacement: adım 16, 3 resimden 2. Asus ROG G751JL-BB17T29 Battery Replacement: adım 16, 3 resimden 3.
    • When all the clips securing the upper case assembly have been released, lift the assembly slightly and slide it down, away from the display, about an inch.

    • Do not attempt to remove the assembly yet. It is still attached to the laptop by four cables.

  17. Asus ROG G751JL-BB17T29 Battery Replacement: adım 17, 3 resimden 1. Asus ROG G751JL-BB17T29 Battery Replacement: adım 17, 3 resimden 2. Asus ROG G751JL-BB17T29 Battery Replacement: adım 17, 3 resimden 3.
    • Use the tip of a spudger to flip up the small locking flap of the keyboard backlight cable ZIF connector.

    • Be sure to pry up on the hinged flap, not the connector socket.

    • Gently pull the cable out of its socket.

  18. Asus ROG G751JL-BB17T29 Battery Replacement: adım 18, 3 resimden 1. Asus ROG G751JL-BB17T29 Battery Replacement: adım 18, 3 resimden 2. Asus ROG G751JL-BB17T29 Battery Replacement: adım 18, 3 resimden 3.
    • Repeat the previous step for the keyboard, trackpad buttons, and trackpad cables held in place by ZIF connectors.

  19. Asus ROG G751JL-BB17T29 Battery Replacement: adım 19, 1 resimden 1.
    • Remove the upper case assembly.

  20. Asus ROG G751JL-BB17T29 Battery Replacement, Disconnect the battery: adım 20, 2 resimden 1. Asus ROG G751JL-BB17T29 Battery Replacement, Disconnect the battery: adım 20, 2 resimden 2.
    • Pull the battery cable away from the connector in the same direction as the individual wires are running to disconnect the battery.

    • Pull evenly on the full width of the cable so that no individual wires are overly strained.

  21. Asus ROG G751JL-BB17T29 Battery Replacement, Remove the display: adım 21, 2 resimden 1. Asus ROG G751JL-BB17T29 Battery Replacement, Remove the display: adım 21, 2 resimden 2.
    • Grab the black tape attached to the display cable and pull straight up to disconnect the display cable.

  22. Asus ROG G751JL-BB17T29 Battery Replacement: adım 22, 3 resimden 1. Asus ROG G751JL-BB17T29 Battery Replacement: adım 22, 3 resimden 2. Asus ROG G751JL-BB17T29 Battery Replacement: adım 22, 3 resimden 3.
    • Slide the point of a spudger under the black antenna cable until it's snug against the connector, and pry straight up from the board to disconnect the antenna cable.

    • Follow the same procedure to disconnect the white antenna cable.

    • To reinstall these antenna cables, hold the connectors in place and gently press them straight down. The connectors “snap” into their sockets much like the metal snaps on a jacket.

    • Make sure to plug each cable into the correct socket during reassembly. The white cable should plug into the upper socket, while the black cable plugs into the lower.

  23. Asus ROG G751JL-BB17T29 Battery Replacement: adım 23, 3 resimden 1. Asus ROG G751JL-BB17T29 Battery Replacement: adım 23, 3 resimden 2. Asus ROG G751JL-BB17T29 Battery Replacement: adım 23, 3 resimden 3.
    • Remove the nine Phillips screws securing the display:

    • Four 6.8 mm Phillips #0 screws

    • Three 8.6 mm Phillips #00 screws

    • Two 5.2 mm Phillips #00 screws

  24. Asus ROG G751JL-BB17T29 Battery Replacement: adım 24, 2 resimden 1. Asus ROG G751JL-BB17T29 Battery Replacement: adım 24, 2 resimden 2.
    • Lift up and remove the two metal display brackets.

  25. Asus ROG G751JL-BB17T29 Battery Replacement: adım 25, 1 resimden 1.
    • Lift the monitor straight up and remove it.

  26. Asus ROG G751JL-BB17T29 Battery Replacement, Remove the battery: adım 26, 2 resimden 1. Asus ROG G751JL-BB17T29 Battery Replacement, Remove the battery: adım 26, 2 resimden 2.
    • Remove the two 5.7 mm Phillips #00 screws securing the battery.

  27. Asus ROG G751JL-BB17T29 Battery Replacement: adım 27, 1 resimden 1.
    • Lift the battery out of its compartment and remove it.

    • You may need to move the battery away from the motherboard to free the battery tabs.

Sonuç

To reassemble your device, follow the above steps in reverse order.

Take your e-waste to an R2 or e-Stewards certified recycler.

Repair didn’t go as planned? Check out our Answers community for troubleshooting help.

33 farklı kişi bu kılavuzu tamamladı.

Kristofer Cesaroni

Üyelik tarihi: 10/06/16

983 İtibar

8 adet Kılavuz yazıldı

Ekip

USF Tampa, Team 2-1, Sullivan Fall 2016 USF Tampa, Team 2-1, Sullivan Fall 2016 üyesi

USFT-SULLIVAN-F16S2G1

4 Üyeler

20 adet Kılavuz yazıldı

14 Yorum

A few steps in this guide are in the wrong order. Could get confusing for and unexperienced technician. Steps 10 - 12 should be before step 6. Other than that this was a very good guide.

Aaron Bower - Yanıt

Good catch! This guide was made by combining a few other guides ( we call prerequisite guides) and they were combined in the wrong order. I went ahead and fixed it. Thanks for the feedback!

Kelsea Weber -

This guide skips a very important step, without which the laptop is unable to connect to wifi networks at any reasonable range. You must reconnect the two cables on the left side of the monitor to the wifi chip. These must be in the order of white toward the monitor, black away from the monitor. I have taken pictures I would be happy to share for this step. Please contact me so I can share these pictures to remedy this oversight

ggrinste - Yanıt

Still not added,! Also the removal of three tiny screws under the lip of the CD Bay is completely unnecessary and they are very very difficult to put back in.

Steve Fox - Yanıt

If you don't remove the three tiny screws on the edge of the CD bay, you won't be able to remove the upper case assembly without damage on that side, so they are in fact necessary to remove.

Christopher Gilkison -

Yorum Ekle

İstatistikleri Görüntüle:

Son 24 Saat: 18

Son 7 gün: 67

Son 30 gün: 305

Her zaman: 41,788