Giriş
This guide will show you how to replace an old worn out or dead battery in an Asus ZenBook UX303U laptop.
Neye ihtiyacın var
-
-
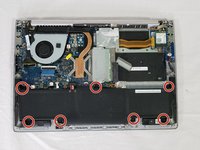
Remove the eleven 4 mm Phillips #00 screws from the back panel.
These screws on other models are Torx T5 or T6, not Phillips
T4 screws on all but the two under the rear rubber feet; those are Phillips PH0 (and my model had two square rubber feet).
Agree. Same as my laptop.
Moops -
-
-
-
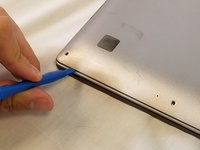
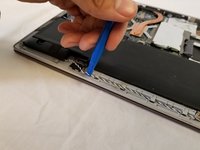
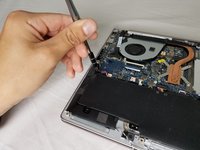
Using a plastic opening tool pry the back panel off of the laptop.
-
-
-
-
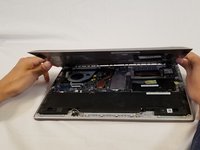
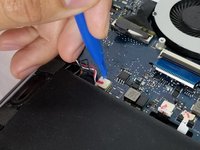
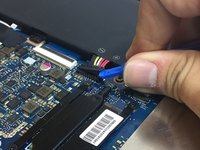
Lift the battery connector straight up off its socket to disconnect it from the motherboard.
-
-
-
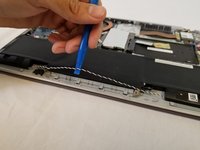
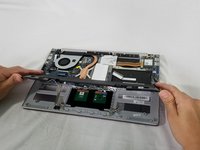
Remove the speakers from the old battery.
This was a bit more fiddly than expected given the speaker arms are stuck to the battery
Yes, it was taped on their quite strongly. I just tried to make sure the tape stayed stuck to the speakers and not the battery.
Moops -
-


To reassemble your device, follow these instructions in reverse order.
Take your e-waste to an R2 or e-Stewards certified recycler.
To reassemble your device, follow these instructions in reverse order.
Take your e-waste to an R2 or e-Stewards certified recycler.
İptal et: Bu kılavuzu tamamlamadım.
17 farklı kişi bu kılavuzu tamamladı.
Ekip

USF Tampa, Team S3-G5, Nance Spring 2018 USF Tampa, Team S3-G5, Nance Spring 2018 üyesi
USFT-NANCE-S18S3G5
3 Üyeler
9 adet Kılavuz yazıldı
11 Yorum
hello where I can buy a UX303U battery for asus?
hello! Where I can buy a UX303U battery for my Asus netbook?
thanks
Just gone through this, but two problems surfaced. 1 it won’t connect to our usual WiFi router and can’t figure out why. Is it possible to damage the WiFi connectivity when removing battery? 2 there’s no indication of charge levels. It says 100% and doesn’t change. Thoughts?
Take all that back. Went back in and battery connector hadn’t clicked in far enough. Seems to be working fine now.
The bottom of the pictured device may feature Phillips #00 screws, but I also have this laptop and the screws around the edge of the bottom panel are Torx T5s on my device.
Same here, they are really small Torx on my Asus UX303U!
Installation was simple, but took me longer than as described. That was due to battery I purchased from iFixit had a longer power cable than original. This required me to angle the power cable in first and secure the battery before finally being able to secure the cable to the socket. Other than that, it worked out.
Good steps and pictures, thx. Tool kit nice, w. the top tray for keeping sorting screws.
Also useful:
[Notebook ASUS Battery Information Center | Official Support | ASUS USA|new_window=true]
The process took me about 30 minutes. If I were to have to do it again then I could probably do it in 10 minutes now that I know what is involved!
Jon Kerridge - Yanıt