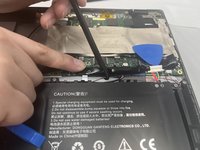
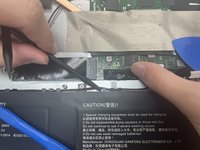
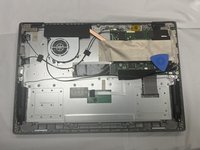
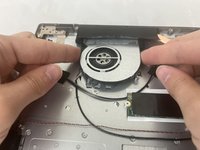
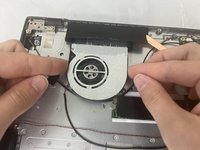
Ana içeriğe geç

CHUWI GemiBook XPro Fan Replacement

Neye ihtiyacın var

  1. CHUWI GemiBook XPro Fan Replacement, Lower Case: adım 1, 2 resimden 1. CHUWI GemiBook XPro Fan Replacement, Lower Case: adım 1, 2 resimden 2.
    • Discharge the battery below 25%, since a charged lithium-ion battery is a potential safety hazard. Fully power down the laptop and unplug any peripheries.

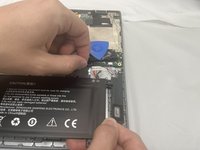
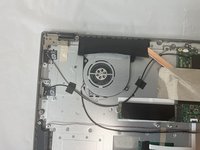
    • Orient the device to where you can see the bottom of the case.

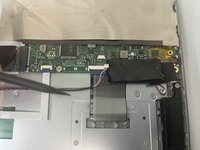
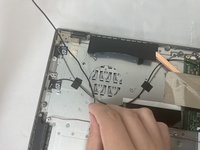
    • Use a Phillips #1 screwdriver to remove the twelve 5.6 mm screws that secure the lower case.

  2. CHUWI GemiBook XPro Fan Replacement: adım 2, 3 resimden 1. CHUWI GemiBook XPro Fan Replacement: adım 2, 3 resimden 2. CHUWI GemiBook XPro Fan Replacement: adım 2, 3 resimden 3.
    • Insert an opening pick into the gap between the lower case and the chassis.

    • Pry along the entire perimeter of the laptop until the lower case fully releases.

    • Lift the lower case up and off of the chassis.

  3. CHUWI GemiBook XPro Fan Replacement, Battery: adım 3, 2 resimden 1. CHUWI GemiBook XPro Fan Replacement, Battery: adım 3, 2 resimden 2.
    • Peel off the black tape on the upper-right side of the motherboard.

  4. CHUWI GemiBook XPro Fan Replacement: adım 4, 2 resimden 1. CHUWI GemiBook XPro Fan Replacement: adım 4, 2 resimden 2.
    • Use two opening tools or your fingernails to carefully "walk" the battery connector out of its socket.

  5. CHUWI GemiBook XPro Fan Replacement: adım 5, 3 resimden 1. CHUWI GemiBook XPro Fan Replacement: adım 5, 3 resimden 2. CHUWI GemiBook XPro Fan Replacement: adım 5, 3 resimden 3.
    • Unseat the speaker wires and antenna wire from their retaining hooks on the battery with a halberd spudger.

  6. CHUWI GemiBook XPro Fan Replacement: adım 6, 1 resimden 1.
    • Use a Phillips #1 screwdriver to remove the five 4.3 mm screws that secure the battery.

  7. CHUWI GemiBook XPro Fan Replacement: adım 7, 3 resimden 1. CHUWI GemiBook XPro Fan Replacement: adım 7, 3 resimden 2. CHUWI GemiBook XPro Fan Replacement: adım 7, 3 resimden 3.
    • Lift the battery up and out of the chassis.

  8. CHUWI GemiBook XPro Fan Replacement, Fan: adım 8, 2 resimden 1. CHUWI GemiBook XPro Fan Replacement, Fan: adım 8, 2 resimden 2.
    • Use a spudger to push the fan connector out of its socket.

  9. CHUWI GemiBook XPro Fan Replacement: adım 9, 2 resimden 1. CHUWI GemiBook XPro Fan Replacement: adım 9, 2 resimden 2.
    • The copper piping can be damaged easily, so take care not to bend it.

    • Carefully peel back the black tape on the radiator.

  10. CHUWI GemiBook XPro Fan Replacement: adım 10, 1 resimden 1.
    • Use a Phillips #1 screwdriver to remove the two 4.2 mm screws that secure the fan.

  11. CHUWI GemiBook XPro Fan Replacement: adım 11, 2 resimden 1. CHUWI GemiBook XPro Fan Replacement: adım 11, 2 resimden 2.
    • Gently lift the fan out of the chassis, with care not to strain the connected wire.

  12. CHUWI GemiBook XPro Fan Replacement: adım 12, 2 resimden 1. CHUWI GemiBook XPro Fan Replacement: adım 12, 2 resimden 2.
    • Gently remove the fan cable from under other wires and fully remove the fan.

Sonuç

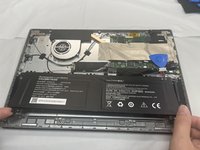
To reassemble your device, follow these instructions in reverse order.

Bir başkası bu kılavuzu tamamladı.

Siller

Üyelik tarihi: 08/28/24

277 İtibar

2 adet Kılavuz yazıldı

0 Yorum

Yorum Ekle

İstatistikleri Görüntüle:

Son 24 Saat: 0

Son 7 gün: 6

Son 30 gün: 15

Her zaman: 94