Ana içeriğe geç
Casio CTK-501 Speaker Replacement

Casio CTK-501 Speaker Replacement

Jimmy Winne

Jimmy Winne ve 3 diğer katkıda bulunanlar

En son January 28, 2014 tarihinde güncellendi

15 - 20 dakika
Zor
Eksik Adımlar
İşlem Görüntüleri
Adım Kırpıcı
Daha iyi giriş

Neye ihtiyacın var

iFixit bu bağlantılar üzerinden satın aldığınızda komisyon kazanır.
  1. Casio CTK-501 Speaker Replacement, Bottom Panel: adım 1, 2 resimden 1. Casio CTK-501 Speaker Replacement, Bottom Panel: adım 1, 2 resimden 2.
    • Flip the keyboard over so that the bottom is facing up.

    • Remove the twenty-seven 12 mm screws from the dark-grey panel using a Phillips #2 screwdriver.

  2. Casio CTK-501 Speaker Replacement: adım 2, 1 resimden 1.
    • Remove the bottom panel by lifting and pulling it towards yourself.

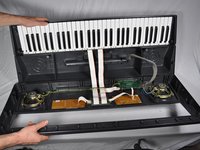
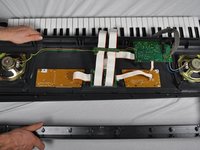
  3. Casio CTK-501 Speaker Replacement: adım 3, 2 resimden 1. Casio CTK-501 Speaker Replacement: adım 3, 2 resimden 2.
    • Flip open the top half of the keyboard.

    • Set the keyboard onto the bottom half with the internal parts facing up.

    • Be careful not to let the bottom drop.

  4. Casio CTK-501 Speaker Replacement, Speaker: adım 4, 1 resimden 1.
    • Plug in the soldering iron and place somewhere safe to avoid burning yourself or causing a fire.

    • Completely unscrew and remove all four screws in the corners of the speaker.

  5. Casio CTK-501 Speaker Replacement: adım 5, 1 resimden 1.
    • Pull the speaker out of the keyboard and set on a flat surface to solder safely.

  6. Casio CTK-501 Speaker Replacement: adım 6, 1 resimden 1.
    • Be careful when removing the wires and avoid dripping solder on yourself or the keyboard.

    • Touch soldering iron to solder over the end of the wires, and when the solder melts, pull the wires away from the speaker.

    • Remove the speaker and replace with a new one.

  7. Casio CTK-501 Speaker Replacement: adım 7, 1 resimden 1.
    • Strip the wires if you need more clean metal to solder to the speaker.

    • Use the soldering iron to melt the solder over the wire to connect them to the speaker.

  8. Casio CTK-501 Speaker Replacement: adım 8, 1 resimden 1.
    • Completely screw in the screws back into the original positions on the corner of the speaker.

Sonuç

To reassemble your device, follow these instructions in reverse order.

Bir başkası bu kılavuzu tamamladı.

Jimmy Winne

Üyelik tarihi: 10/04/12

578 İtibar

6 adet Kılavuz yazıldı

Ekip

Cal Poly, Team 9-16, Amido Fall 2012 Cal Poly, Team 9-16, Amido Fall 2012 üyesi

CPSU-AMIDO-F12S9G16

4 Üyeler

6 adet Kılavuz yazıldı

Bir Yorum

I have a Casio ctk 691 Keyboard and it’s not Turning up is working is coming on but my volume slider is not working

Jacameron Bussey - Yanıt

Yorum Ekle

İstatistikleri Görüntüle:

Son 24 Saat: 5

Son 7 gün: 9

Son 30 gün: 25

Her zaman: 6,635